Draw Tulips Step By Step
Draw Tulips Step By Step - Web how to draw tulips step by step very easy | tulip flower drawing tutorialartwork pictures : For the top of the flower draw a few wavy lines. Add detail to your tulip. These will create the first petal and second petal. The first petal will be the last one on the right side of the tulip. They’re supposed to be a little bit uneven, so you want the edges to be jagged. Enrich the tulip with three more delicate petals. Draw the left petal, and keep it a similar teardrop shape. Next, add a triangle to the center of the tulip and draw a small circle in the center of that. Sketch the tulip flower and stem.
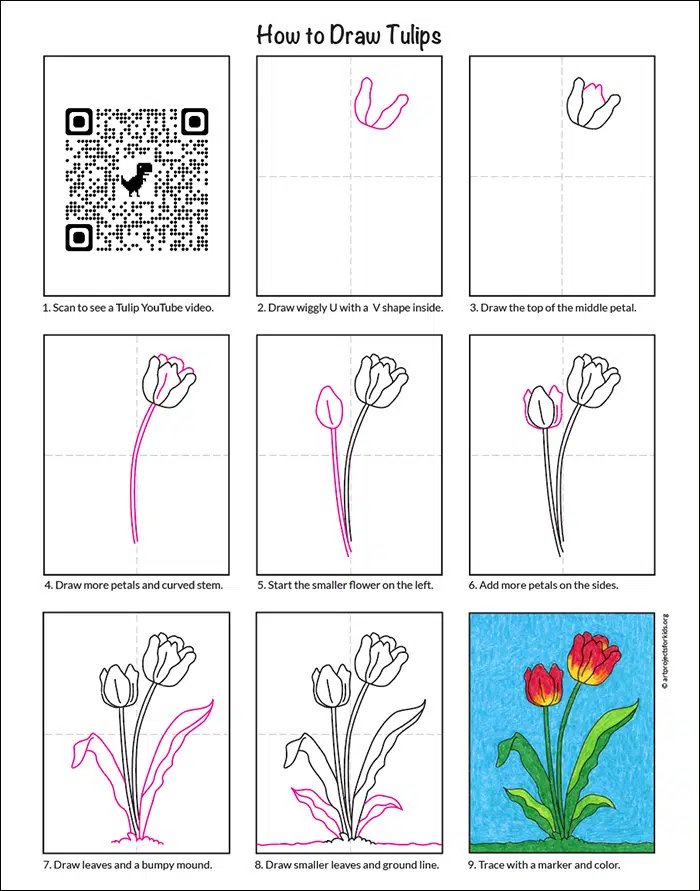
All it took was just a few simple steps! With a variety of animals, magical creatures, vehicles, foods, plants and more your kids will never get bored. You’ll need the following materials to create a simple tulips drawing: Web place a handful or two of glass beads in your glass vase. How to draw a tulip step by step. Step by step flower drawing. Web full blog post with text instructions: Bring the tulip to life by sketching its leaves. You can take reference from the illustration below to get a comprehensive idea of the shape of the final component of the blossom. Start by drawing an oval as the foundation.
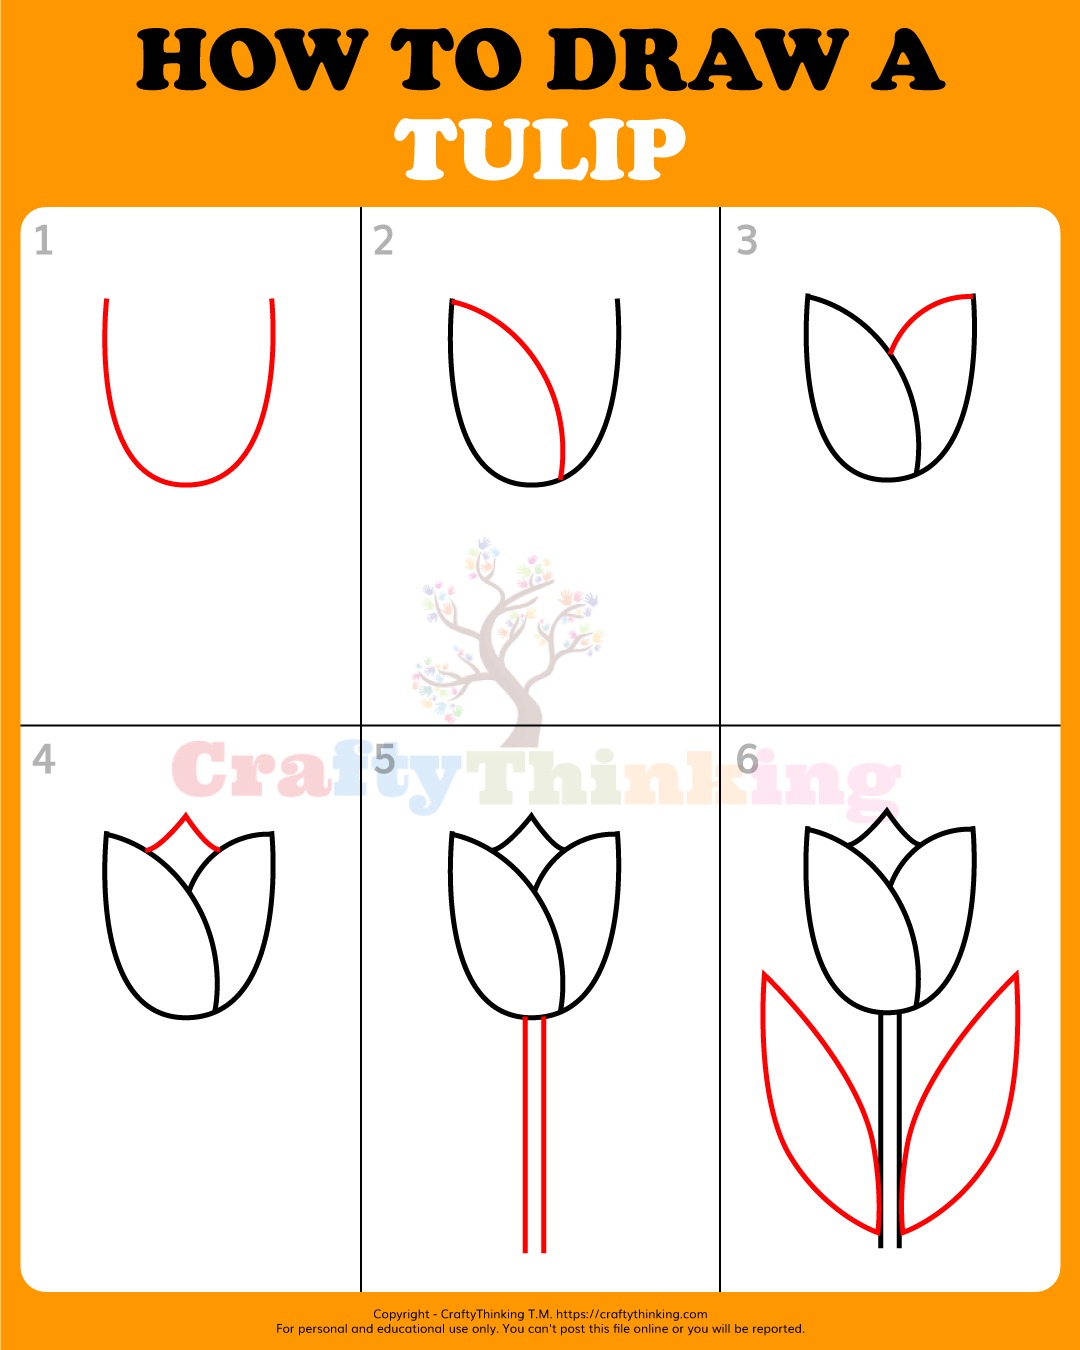
The goal is to establish the overall shape and proportions of the tulip and to make sure it fits well into your drawing area so draw the full height of the stem. Make it pointed and slide it down to the other side so it touches the other petal. Web to draw a tulip, start by sketching a curved line for the stem, then draw 2 circles overlapping at the top for the petals. Web click the fill bucket tool and then click on a color from the color menu bar at the bottom of the screen. Design and draw a character. Note that the blue outlines are used to indicate the new shapes being drawn in each in each of the steps. Place another handful or two of additional glass beads around the bulbs. Realistic drawing of a tulip flower in a pot to celebrate spring.thanks for. The design and proportion of each part will be highlighted in each step of the tutorial. We will draw the petal in the center last.

Tulip drawing step by step Tulip drawing, Step by step drawing
So if you are teaching / christie eddins. The next step is to draw two slightly curved vertical lines from the top of the flower to the bottom of the flower. The design and proportion of each part will be highlighted in each step of the tutorial. Sketch the tulip flower and stem. Web draw a two inch line at.

How To Draw A Tulip Easy Step By Step Tutorial
Now draw the tulip's stem. You’ll need the following materials to create a simple tulips drawing: This gives the tulip a sense of texture and depth. You can take reference from the illustration below to get a comprehensive idea of the shape of the final component of the blossom. Start the drawing with the basic shape of the tulip.
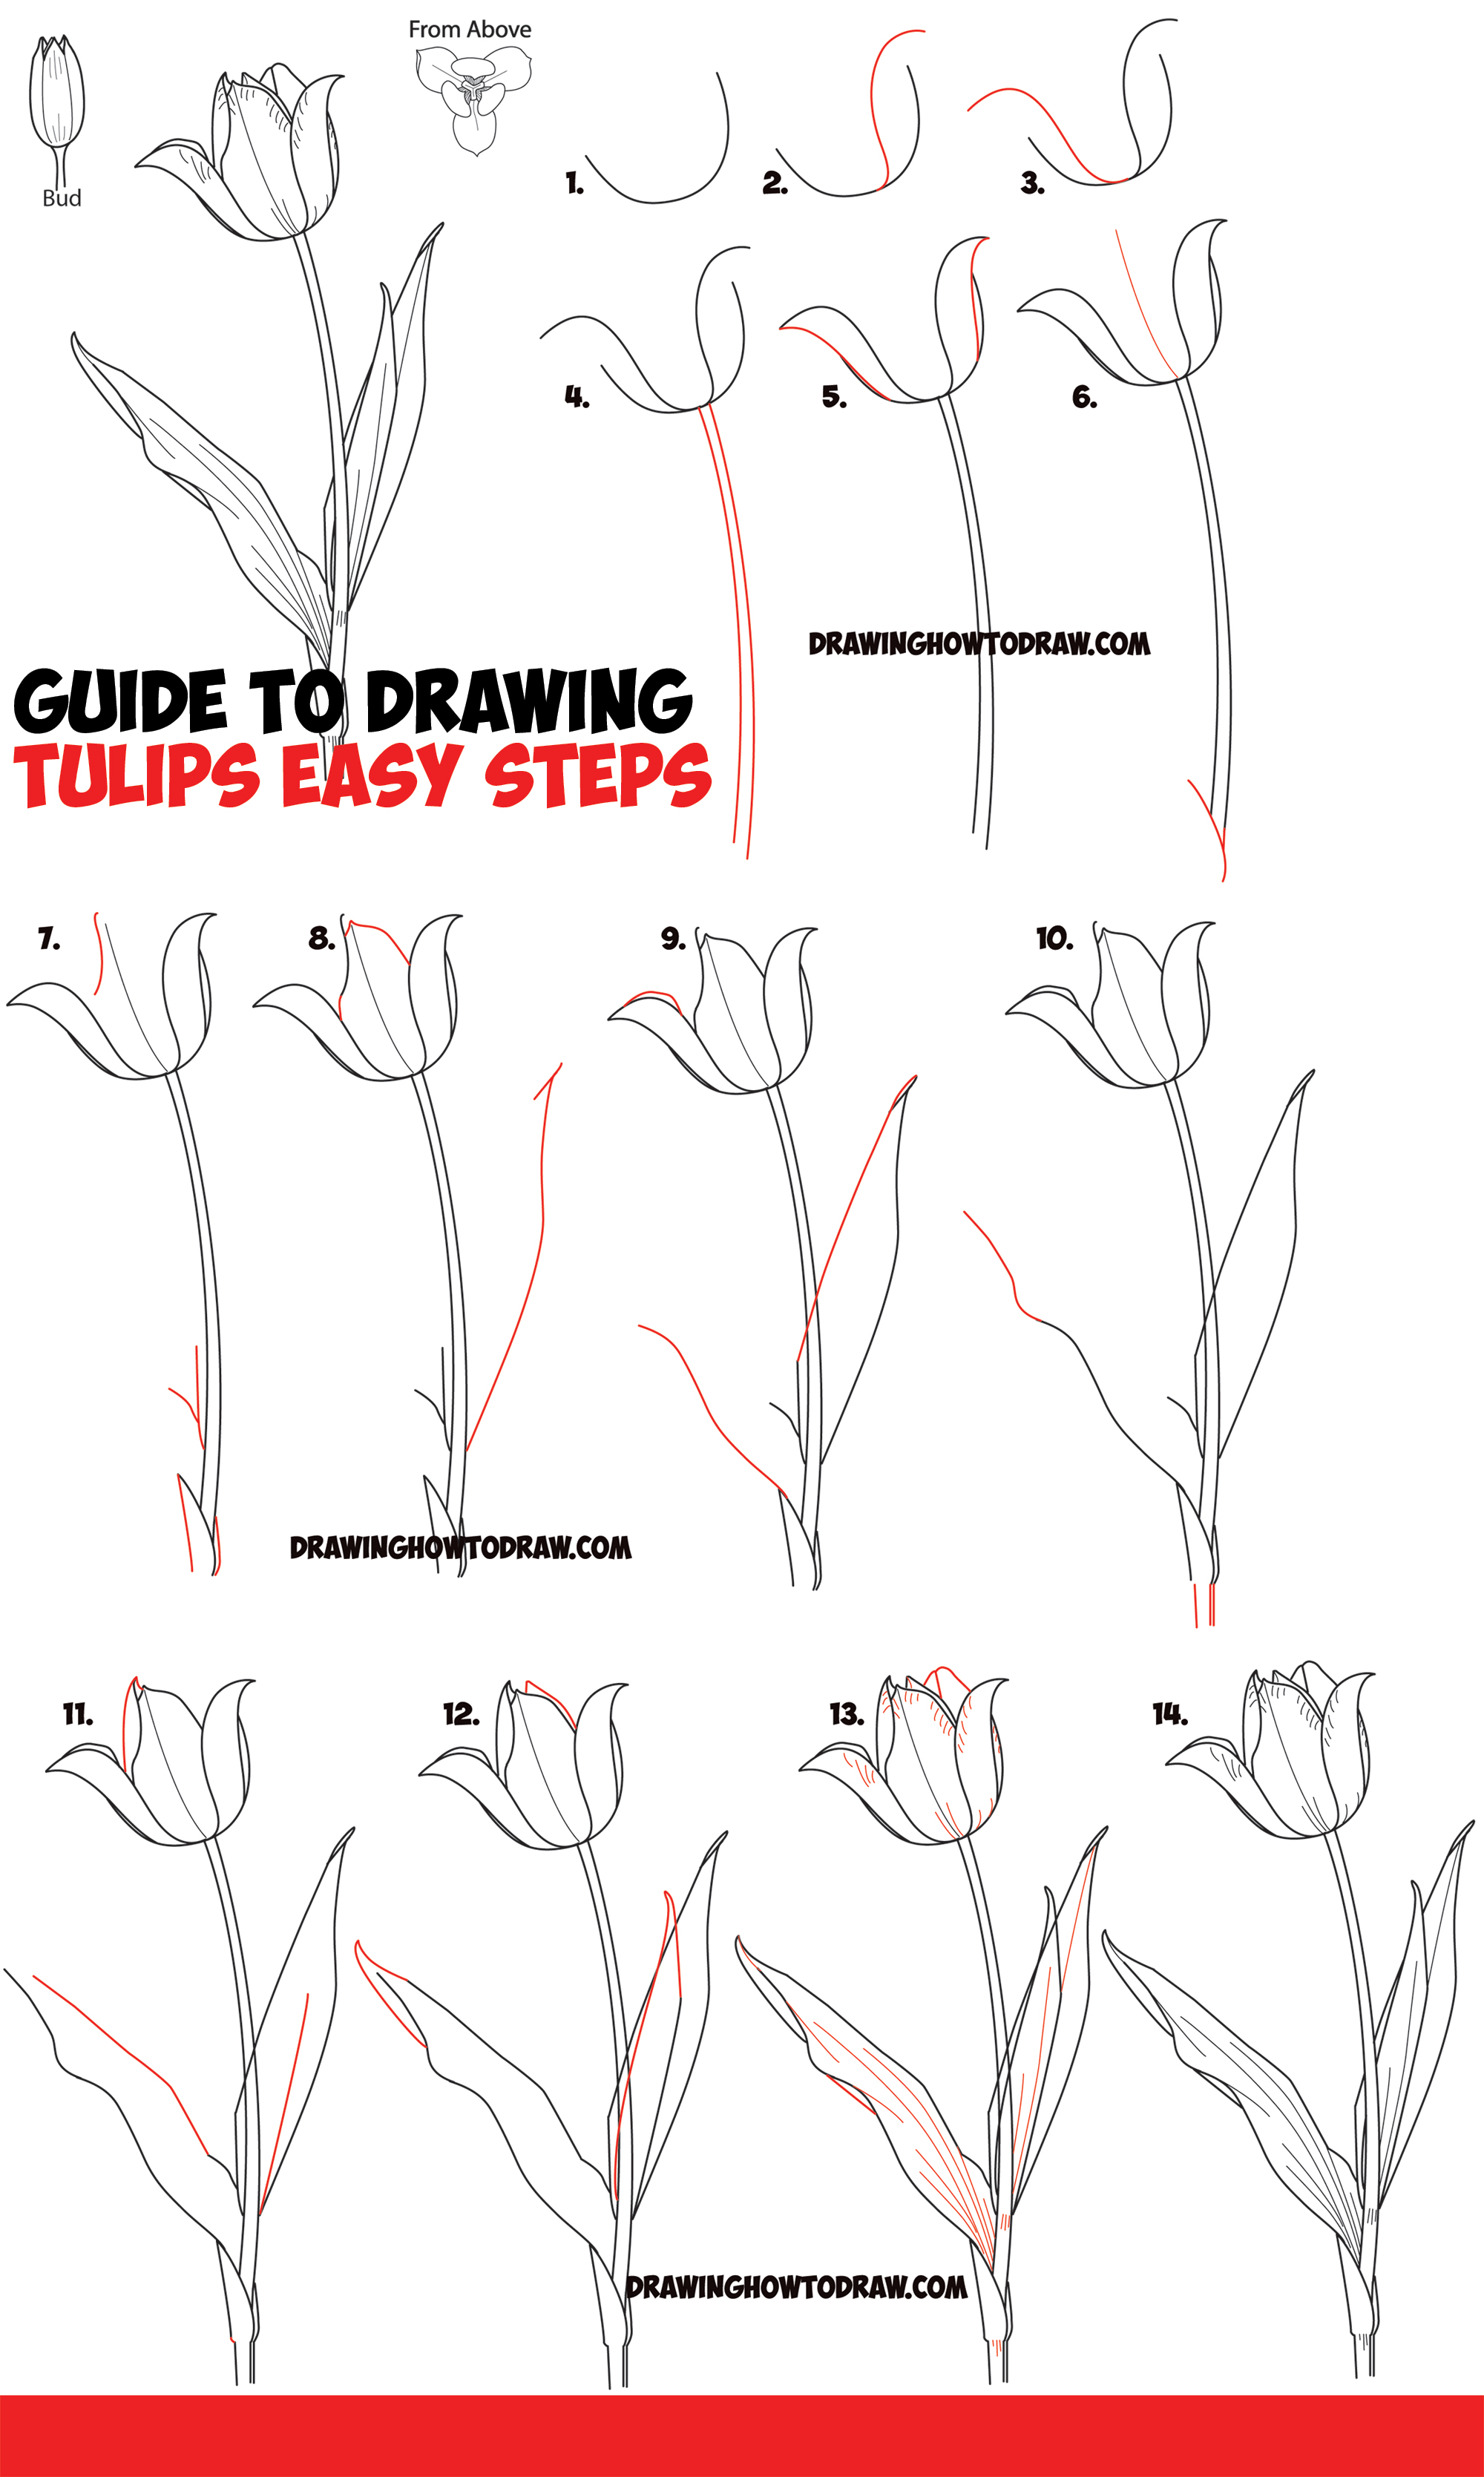
How to Draw Tulips Easy Guide to Drawing Tulips from Side, From Above
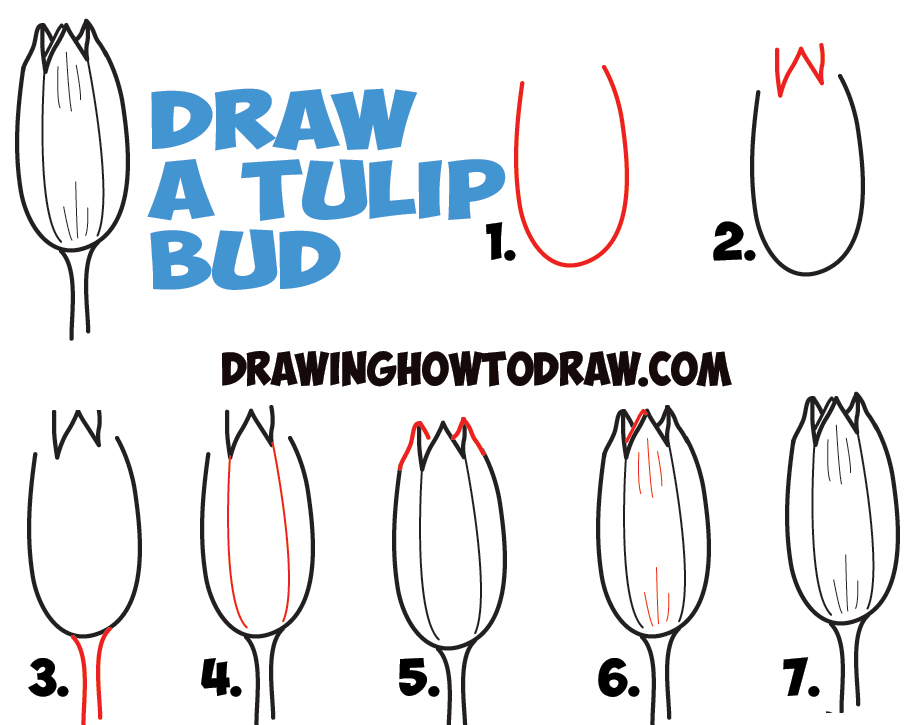
Web the first step is to draw the u shape for the cup of the tulip. If you want to, feel free to jump right into using your pen. Web how to draw tulips step by step very easy | tulip flower drawing tutorialartwork pictures : Web it's finally spring so let's draw some lovely tulips.free worksheets! Start the drawing.
How To Draw A Tulip Step By Step Craftythinking vrogue.co
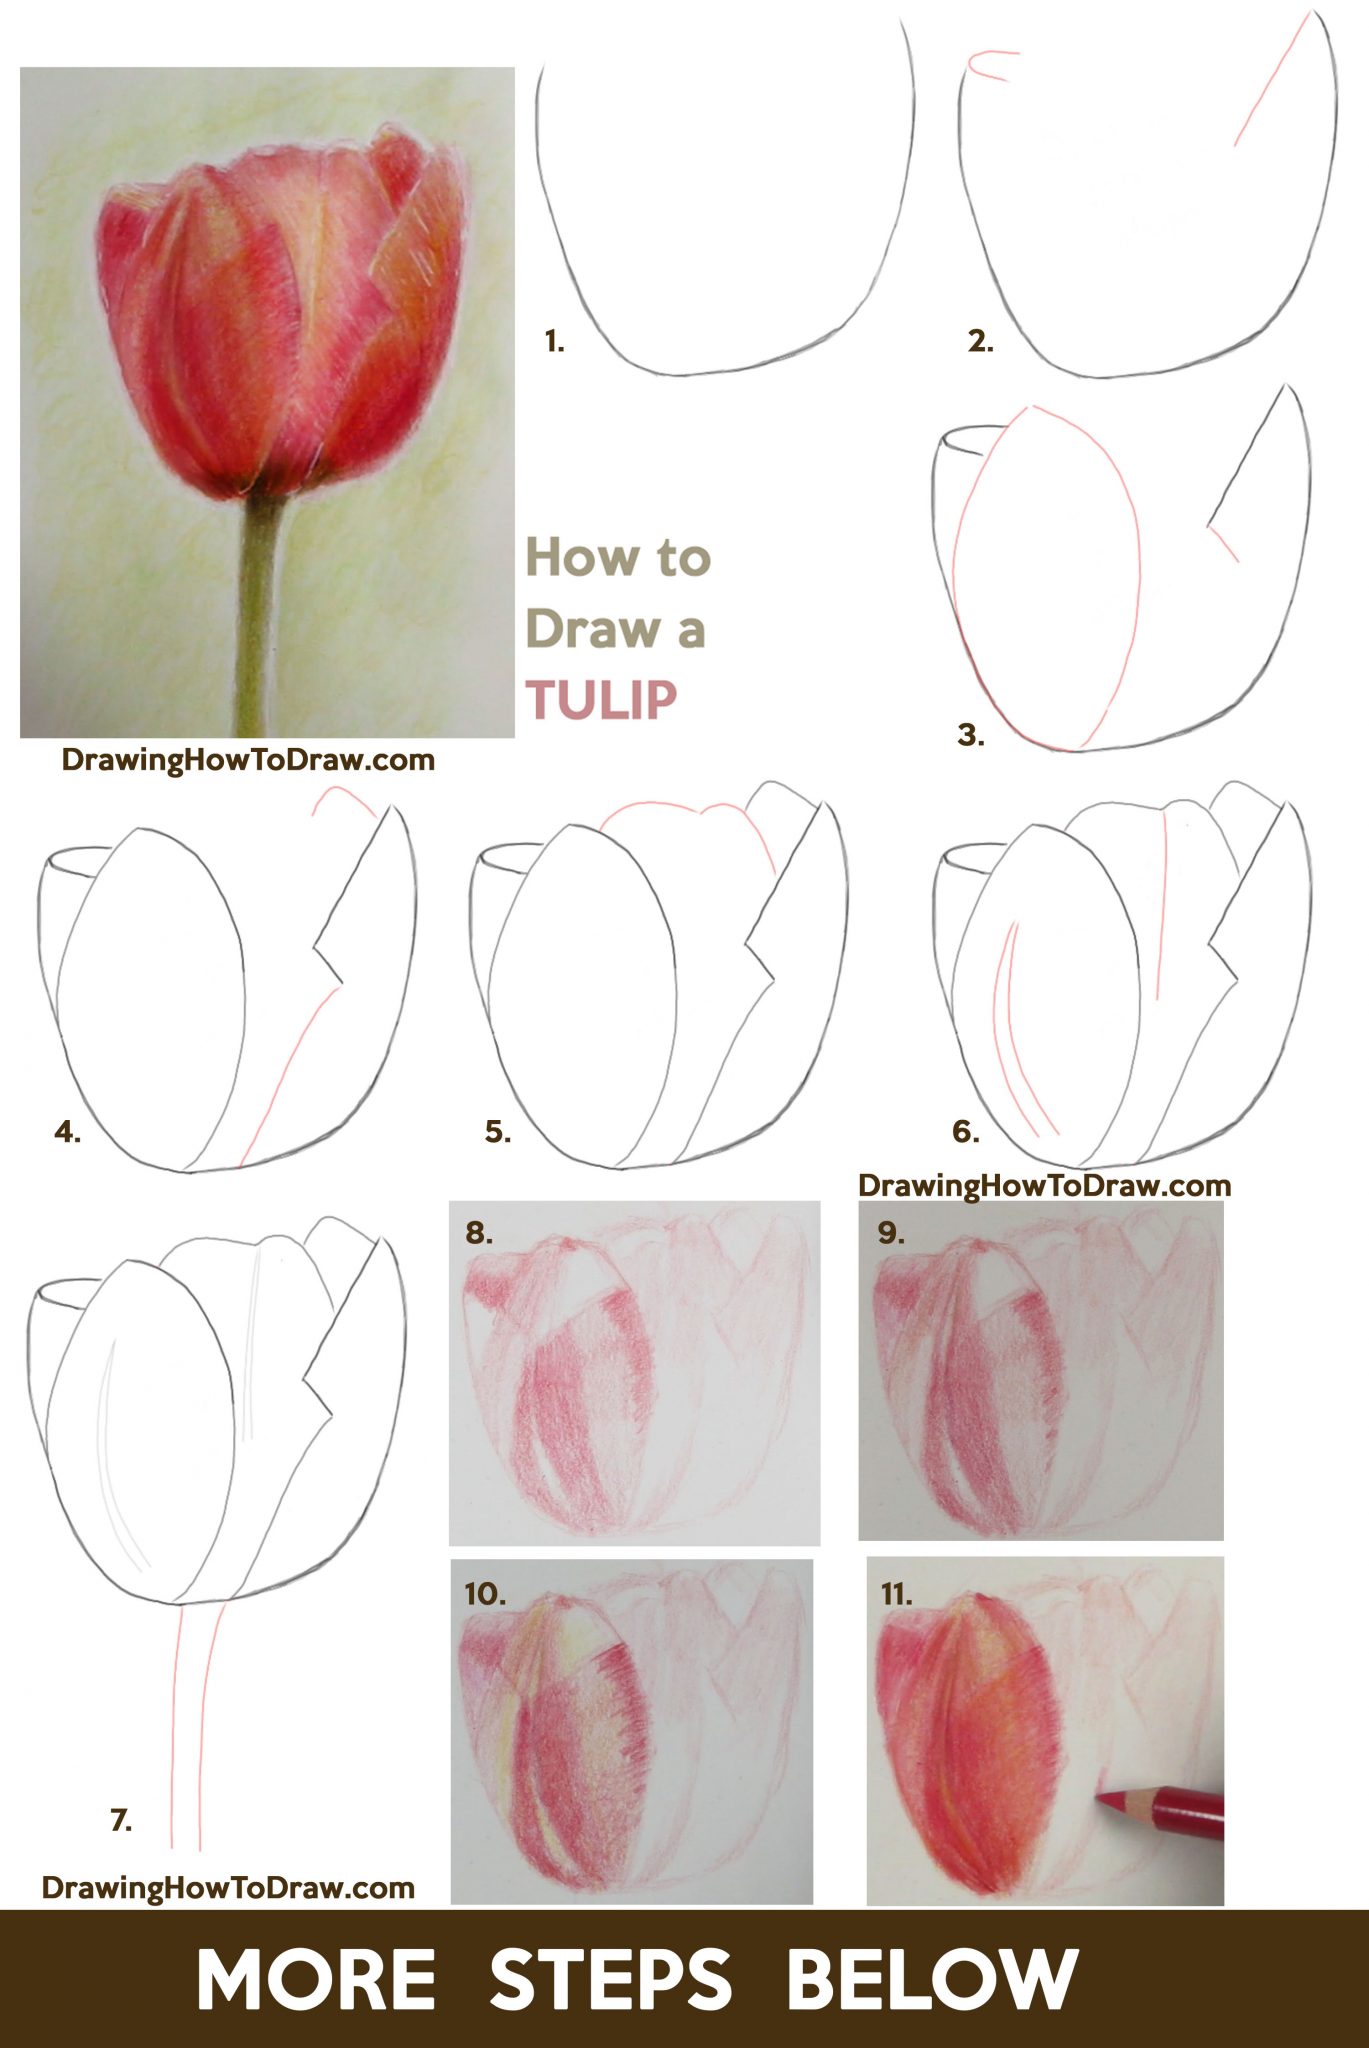
Our second realistic tulip drawing starts as the easy version above with a basic shape for the flower and a simple stem. Web the first step is to draw the u shape for the cup of the tulip. This gives the tulip a sense of texture and depth. We will draw the petal in the center last. Arrange the bulbs,.

How to draw tulips. Stepbystep tutorial.
For the top of the flower draw a few wavy lines. Tulip, allium, & daffodil by wendy hollender. This gives the tulip a sense of texture and depth. The first petal will be the last one on the right side of the tulip. Design and draw a character.
How To Draw A Tulip Step By Step For Kids
With a variety of animals, magical creatures, vehicles, foods, plants and more your kids will never get bored. How to draw a tulip step by step. Learn how to draw a tulip with our easy step by step drawing tutorial. Make this one a little smaller. Note that the blue outlines are used to indicate the new shapes being drawn.
How to Draw Tulips with Colored Pencils Easy Step by Step Drawing
They’re supposed to be a little bit uneven, so you want the edges to be jagged. You’ll need the following materials to create a simple tulips drawing: First draw the flower and the stem (no leaves yet). Bring the tulip to life by sketching its leaves. If you feel like flowers.

How to draw a tulip tutorial for beginners and kids Easy drawings
Our second realistic tulip drawing starts as the easy version above with a basic shape for the flower and a simple stem. Add the stem, visualizing the future tulip. The design and proportion of each part will be highlighted in each step of the tutorial. Draw two large petals, one on each side. Now draw the tulip's stem.
How to Draw Tulips Easy Guide to Drawing Tulips from Side, From Above
You can take reference from the illustration below to get a comprehensive idea of the shape of the final component of the blossom. Web it's finally spring so let's draw some lovely tulips.free worksheets! Cross the end pieces and use a glue stick or hot glue to glue the sliced. The goal is to establish the overall shape and proportions.

How to Draw a Tulip for Kids Easy Step by Step Tutorial Easy Peasy
Realistic drawing of a tulip flower in a pot to celebrate spring.thanks for. Sketch the tulip flower and stem. Then, draw a line with a sharp point near the top in the. Learn how to draw a tulip with our easy step by step drawing tutorial. Web how to draw tulips step by step very easy | tulip flower drawing.
Next, Add A Triangle To The Center Of The Tulip And Draw A Small Circle In The Center Of That.
Your easy tulip drawing is done. What you’ll need for your tulip sketch. Web full blog post with text instructions: Place another handful or two of additional glass beads around the bulbs.
Add The Second Leaf Coming Out From Behind The First One.
They’re supposed to be a little bit uneven, so you want the edges to be jagged. Web draw the middle crease line on each tulip petal with a curved line for extra detail. Tulips have 6 stamens in total, you can choose to draw all 6 or draw less (not all are visible). Now draw the tulip's stem.
Our Second Realistic Tulip Drawing Starts As The Easy Version Above With A Basic Shape For The Flower And A Simple Stem.
Web keep this in mind and draw accordingly. Again, draw it’s overall outline and then add the little bend/curve on the side. For the top of the flower draw a few wavy lines. Add the rest of the petals.
Make It Pointed And Slide It Down To The Other Side So It Touches The Other Petal.
Draw the left petal, and keep it a similar teardrop shape. Web to draw a tulip, start by sketching a curved line for the stem, then draw 2 circles overlapping at the top for the petals. Step by step flower drawing. Money back guaranteecancel anytimetrusted by millions