Drawing A Rabbit Step By Step
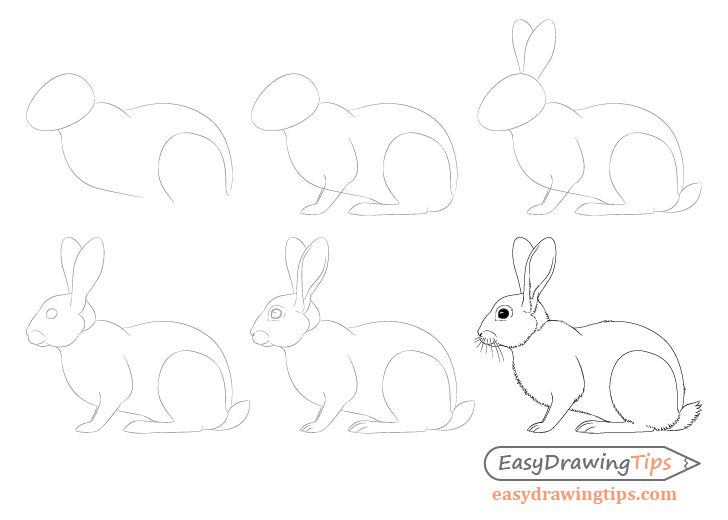
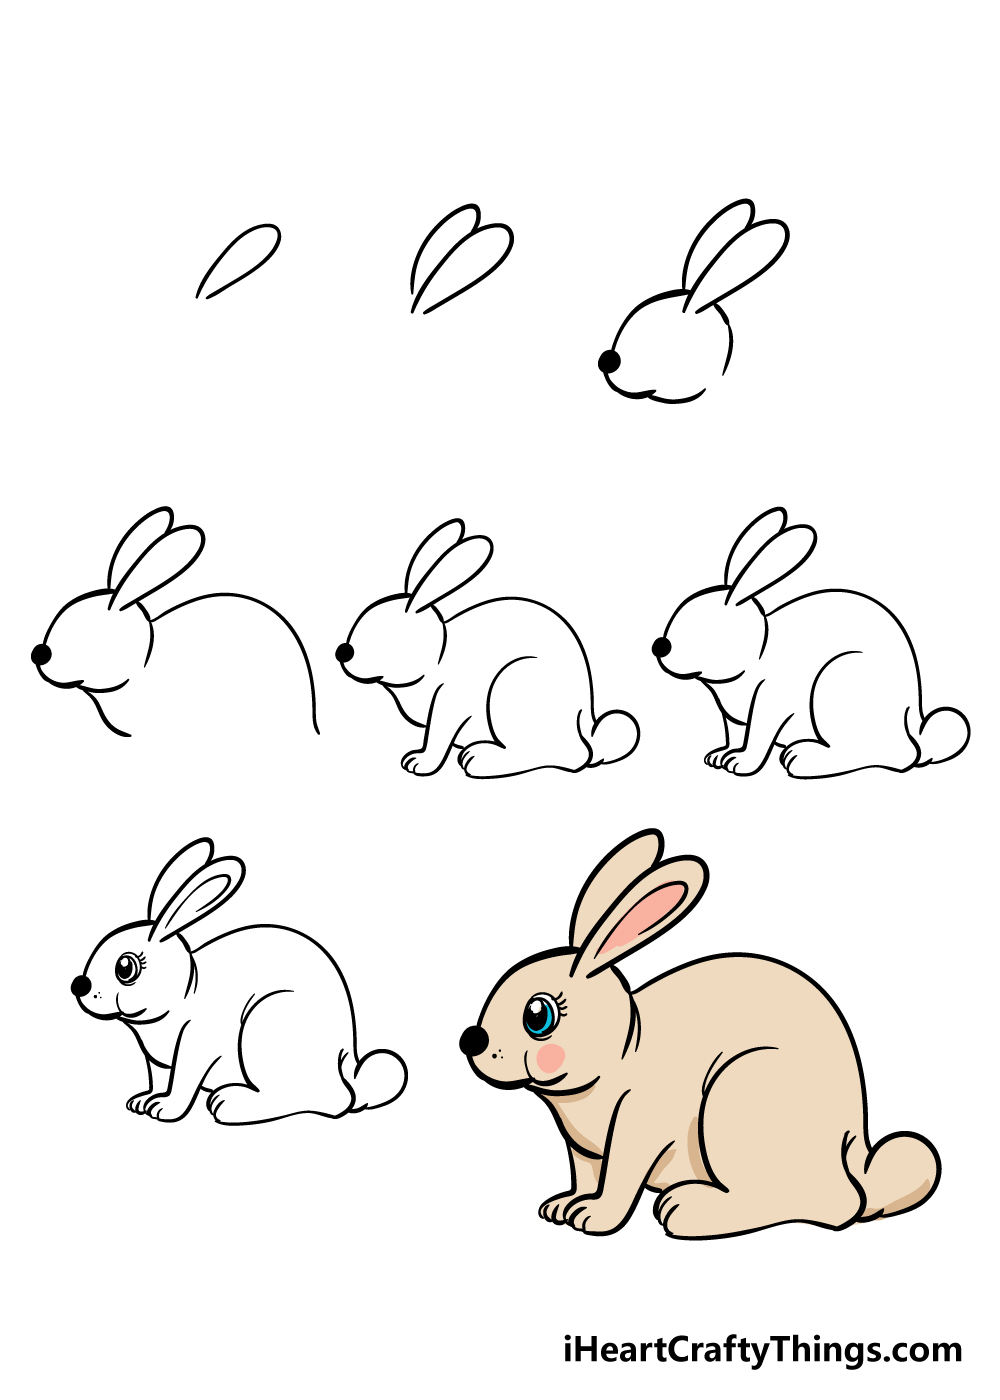
Drawing A Rabbit Step By Step - The basic outline for the bunny. Web learn to draw a cute bunnystore: Web thanks for watching!#drawing #art #simpledrawing #kids Start the drawing of the rabbit by first getting the overall shapes of the major parts of it’s body as in the above example. Draw the side of the bunny's face. Draw a dot for each eye, perhaps leaving a tiny speck uncolored to indicate the shine of the eyes. From the bottom of the oval, we will draw. Darken the outline of the bunny’s body. Sketch your bunny step by step. Web start by drawing a small circle that is a bit smaller at the top then the bottom.
To do this, make an upside down 'u' shape and add a horizontal line at the bottom right, a bit longer than the ear is thick. Draw the ear of the cartoon rabbit using a pair of curved lines that meet at a gentle point. Enclose a long, narrow shape within each ear. Next draw the body itself which for a rabbit in this position can sort of be broken down into two. Web bunny rabbit drawing lesson: Our printable drawing guide (optional) pencil or black marker; As you can see in the final images, the rabbit will. Draw the side of the bunny's face. Learn a simple method for developing an original character, from mind map to finished drawing. Our how to draw book is here!
Draw the front leg p.2. This tutorial should be check by any beginner that wants to understand bunny drawing. We shall start to draw a body for your rabbit drawing in this fourth step. I draw a triangular figure of the nose in the bottom part of the long central shape. Then, you can extend a line from the back of the head to make the back of your rabbit. Draw a straight vertical line. Draw a dot for each eye, perhaps leaving a tiny speck uncolored to indicate the shine of the eyes. On one side, let the arm of the “w” touch the nose. As you can see in the final images, the rabbit will. Web how to draw rabbit drawing from 200 number | easy step by step#drawing #rabbit #drawingrabbit#dog #easydrawing #easyrabbitdrawing@mpdrawingtutorial @drawing.

Rabbit Drawing For Kids Easy Step By Step Jamie Paul Smith
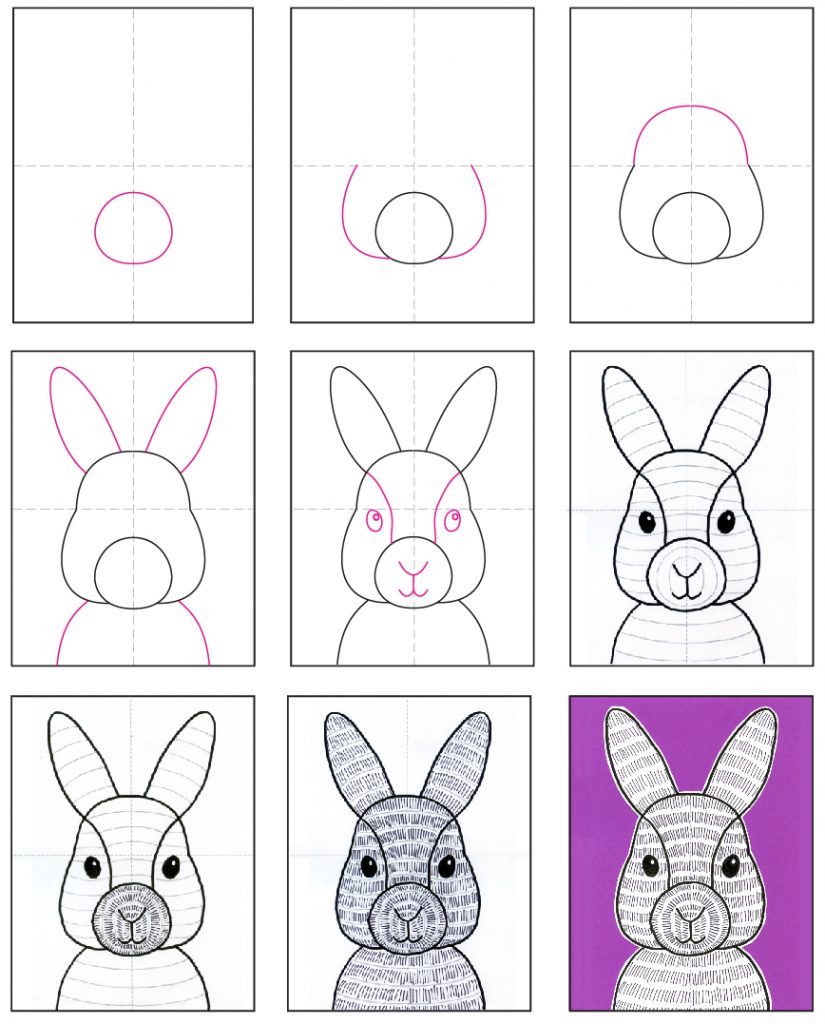
Draw a dot for each eye, perhaps leaving a tiny speck uncolored to indicate the shine of the eyes. At the base of the ear, overlap short curved lines in a jagged fashion to lend the appearance of fur. Web step 1 we start by drawing the most important step i.e. Bunnies naturally have chubby and fluffy cheeks. Draw the.

How to Draw a Bunny a sure way to get kids hyped up about Easter
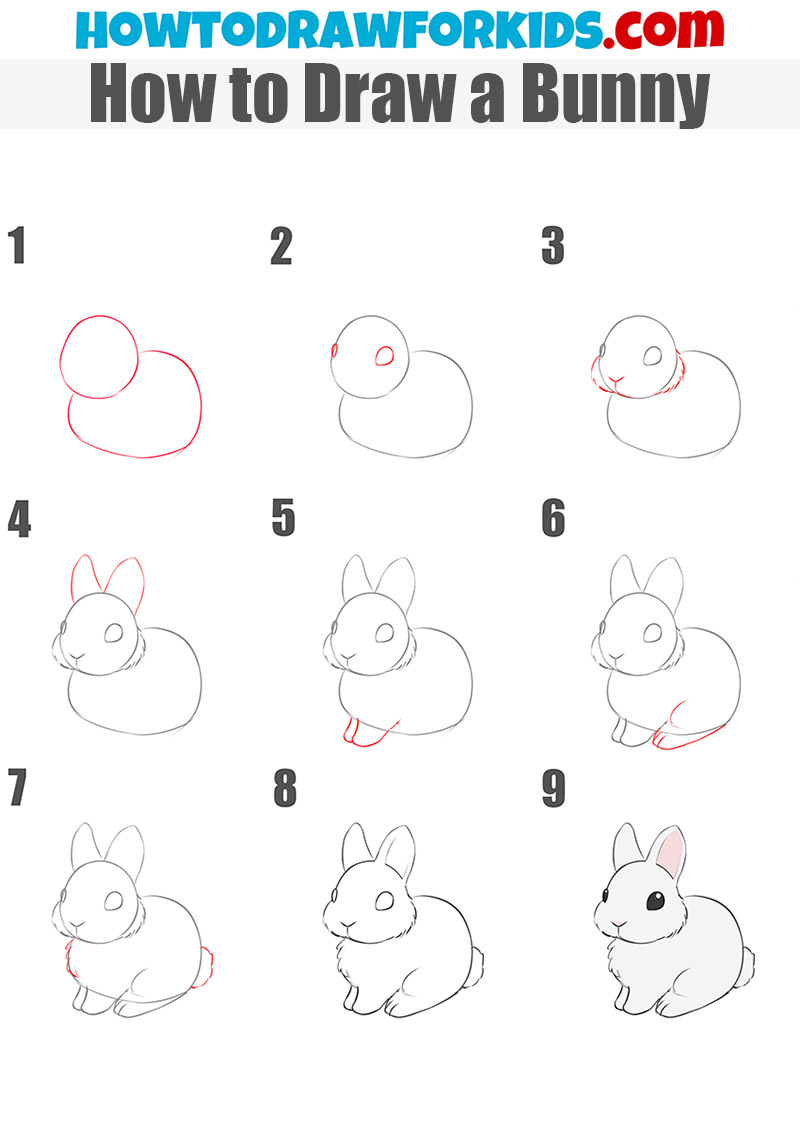
Draw a tiny oval shape in the middle of the rabbit’s head. Either way, start with the basic shapes of the rabbit. Web draw two ovals for the head and body of the rabbit. So, don’t forget to put emphasis on the cheeks as you draw the outline of the bunny’s face. Learn a simple method for developing an original.
How to Draw a Rabbit Step by Step Tutorial EasyDrawingTips
Use guidelines to define places for the legs, nose and mouth of the rabbit. Add the bunny’s whiskers and two short lines on each of the bunny’s limbs. Step 2 form the triangular ears and paws of the rabbit. Learn a simple method for developing an original character, from mind map to finished drawing. Draw a straight vertical line.

Premium Vector Step by step to draw a rabbit. drawing tutorial a
Draw a small circle for the little nose. I construct the central part of the face. As you can see in the final images, the rabbit will. Then, you can extend a line from the back of the head to make the back of your rabbit. Draw a tiny oval shape in the middle of the rabbit’s head.

How to Draw Cute Easter Bunny Guided Drawing Video Tutorial
Make a curved line, connected to the ear, and extend it so it ends in roughly the same. Web how to draw flower step by step. Draw the shapes of the rabbit’s body and neck. Draw another bean shape for the lower leg, and tilt it slightly to make it look. Draw the front leg p.2.

How to Draw a Bunny in a Few Easy Steps Easy Drawing Guides
Web bunny rabbit drawing lesson: On one side, let the arm of the “w” touch the nose. At the base of the ear, overlap short curved lines in a jagged fashion to lend the appearance of fur. Start by using the 0.7mm marker to draw the bunny ear on the left. I start with a rough shape of the rabbit’s.
How to Draw a Bunny Easy Drawing Tutorial For Kids
Draw a vertical line and a. Web thanks for watching!#drawing #art #simpledrawing #kids From the bottom of the oval, we will draw. Here's a list of drawing tools that are perfect for any beginner. Web draw two ovals for the head and body of the rabbit.
Easy How to Draw a Bunny Tutorial and Bunny Face Coloring Page
Enclose a long, narrow shape within each ear. Draw a small circle for the little nose. To do this, make an upside down 'u' shape and add a horizontal line at the bottom right, a bit longer than the ear is thick. I construct the central part of the face. Draw a vertical line and a.
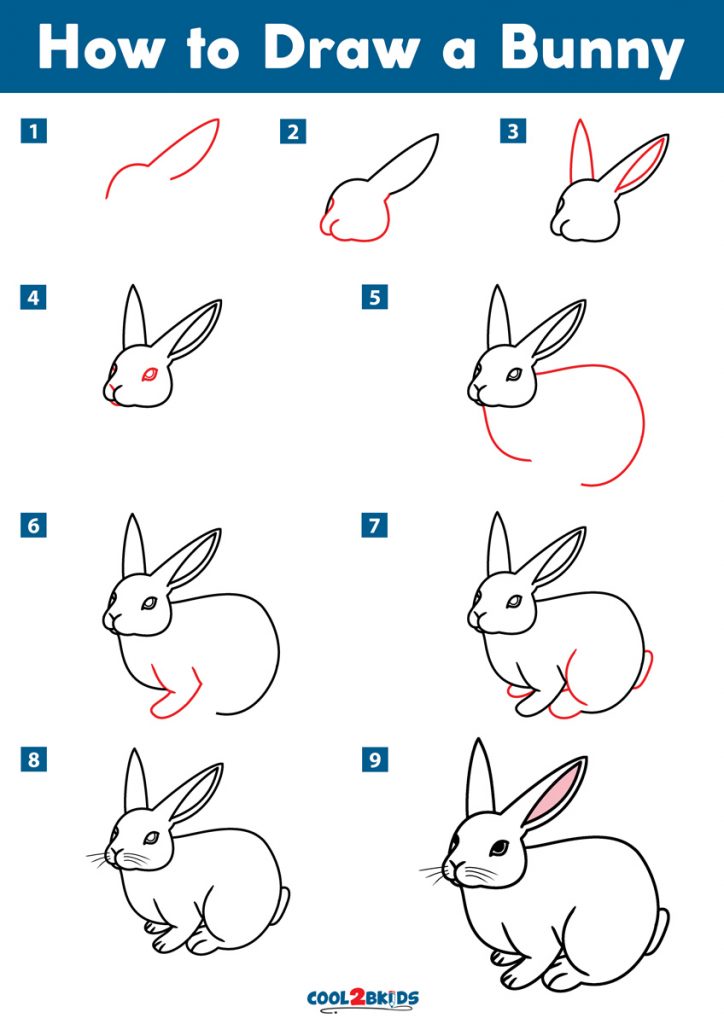
How to Draw a Bunny Cool2bKids
Web learn to draw a cute bunnystore: Fresco makes sketching easy with a powerful suite of drawing tools, but you might be working on paper with the plan to import into a digital space later. Draw a straight vertical line. Web draw two ovals for the head and body of the rabbit. Bunnies naturally have chubby and fluffy cheeks.
Rabbit Drawing How To Draw A Rabbit Step By Step
Add a smooth guideline for its tail. Then, you can extend a line from the back of the head to make the back of your rabbit. Draw a line, which will act as the center of its head. Draw a rounded “w” below the nose to outline the mouth. Draw an irregular circle shape with the bottom part slightly wider.
Next Draw The Body Itself Which For A Rabbit In This Position Can Sort Of Be Broken Down Into Two.
Add shape for bunny nose, mouth, and jaw. Bunnies’ back feet are bigger than the front ones. I construct the central part of the face. Web thanks for watching!#drawing #art #simpledrawing #kids
At The Base Of The Ear, Overlap Short Curved Lines In A Jagged Fashion To Lend The Appearance Of Fur.
Draw a tiny oval shape in the middle of the rabbit’s head. Draw two small circles in the middle of the larger circle for the bunny’s eyes. Learn how to draw a rabbit using this guide that has all the information you need. Darken the outline of the bunny’s body.
Draw A Small Circle For The Little Nose.
Web how to draw rabbit drawing from 200 number | easy step by step#drawing #rabbit #drawingrabbit#dog #easydrawing #easyrabbitdrawing@mpdrawingtutorial @drawing. Add the bunny’s whiskers and two short lines on each of the bunny’s limbs. As you can see in the final images, the rabbit will. Web try searching for “bunny drawing” or “easter bunny” to see what different types of images come up.
With A Variety Of Animals, Magical Creatures, Vehicles, Foods, Plants And More Your Kids Will Never Get Bored.
Add detail to the bunny’s face. Draw the head as a sort of “egg” shape. Make a curved line, connected to the ear, and extend it so it ends in roughly the same. We shall start to draw a body for your rabbit drawing in this fourth step.