Drawing Creo
Drawing Creo - Web how to create a drawing in creo step 1: Web the dwg models menu appears on the menu manager. The modules dialog box opens. Even exporting in dxf format resulted in an incomplete drawing, while pdf is ok. From there you can rotate any direction. You do not know how? Click empty with format and choose a.frm. Web create new drawings using drawing templates. The open dialog box opens and lists all the files in your current working directory. Sketching is one of the most fundamental, consistently performed operations.
Click the annotation tab on the ribbon and then, in the setup group, click new drawing. In this whole series we will try to cover entire creo dimension module.the first video covers the points in c. The resulting dwg file is incomplete, the biggest shaded views are missing on the drawing. Drawing files are drafting documents that contain annotations, detailed dimensions, part lists, title blocks, and various views of a model such as isometric and orthographic. From there you can rotate any direction. Complete the following tasks that are part of this tutorial: Web this is the first video of creo drawing basics. There are various views you can add to a drawing, including, but not limited to: Web do you need to create creo drawings view? You should only use the templates that are relevant to your unit systems.
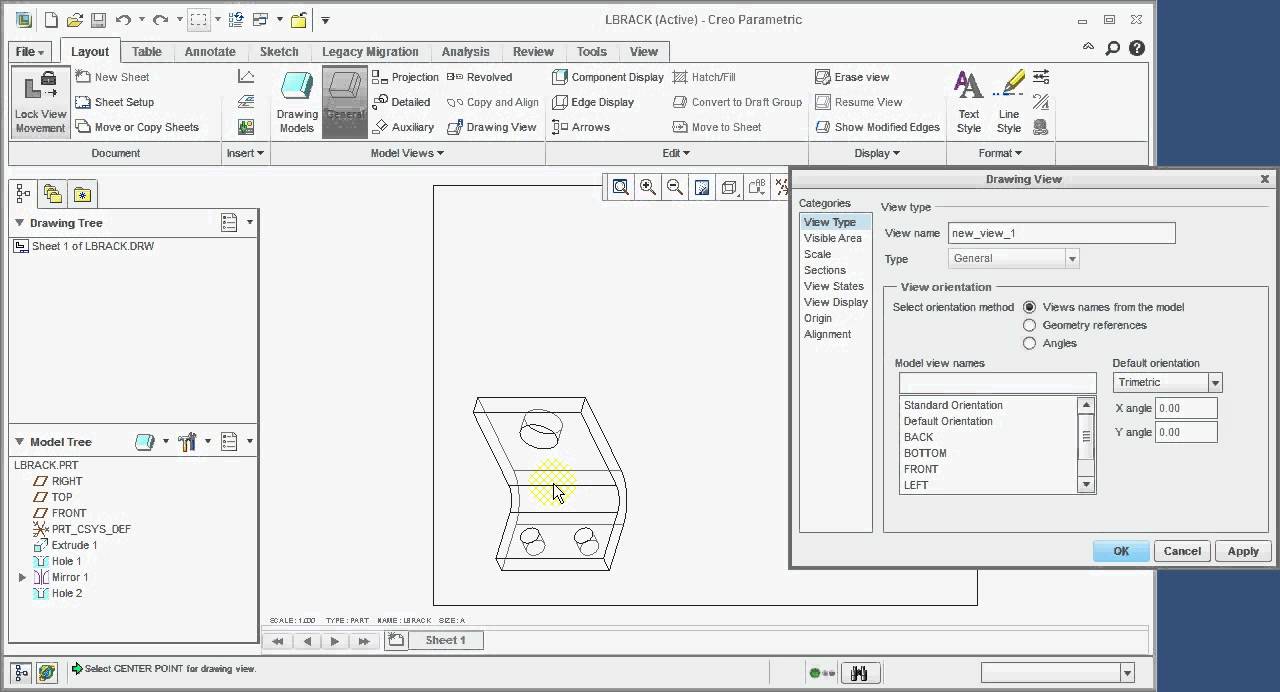
A general view is usually the first of a series of views to. Click empty with format and choose a.frm. • if the new model that you are adding to the drawing contains part simplified representations, the open. You do not know how? On the applications pane, in the included section, click annotation. Name your part drawing and click okay. Opened original abs_bracket_2.prt, created a family table and a new instance named abs_bracket_02.prt. The basic drawing view types. Web creo is the 3d cad solution that helps you accelerate product innovation to build better products faster. Right click on the view, and click properties, when you drawing view, click view type and change [ type box from projection to general, then you will see angles option on the gray out, just click apply, it will be active.

How to make 3D Part from 2D Drawing in Creo 3.0 Creo Beginner
Complete the following tasks that are part of this tutorial: When you start a new drawing, you specify a 3d model file in which to place drafting views. Click drawing and type a name in the file name box or use the default. All dims and views stayed perfectly. Web displaying cross sections in drawings.

03 Creo Detailed Drawing General View & It's Different Options YouTube
When you start a new drawing, you specify a 3d model file in which to place drafting views. (to:pjuvekar) apr 13, 2018 06:01 pm. Learn more about creo parametric's features, benefits, and free. The open dialog box opens and lists all the files in your current working directory. Name your part drawing and click okay.

Simple 3D Drawings using combined views in Creo and Pro/E EAC Tip of
Whether you need to design for manufacturing, simulation, or data integration, creo parametric has the tools and capabilities you need. Right click on the view, and click properties, when you drawing view, click view type and change [ type box from projection to general, then you will see angles option on the gray out, just click apply, it will be.
Starting a Drawing with Creo Parametric YouTube
The create drawing dialog box opens. From there you can rotate any direction. (to:pjuvekar) apr 13, 2018 06:01 pm. Click drawing and type a name in the file name box or use the default. Save the drawing at this point.
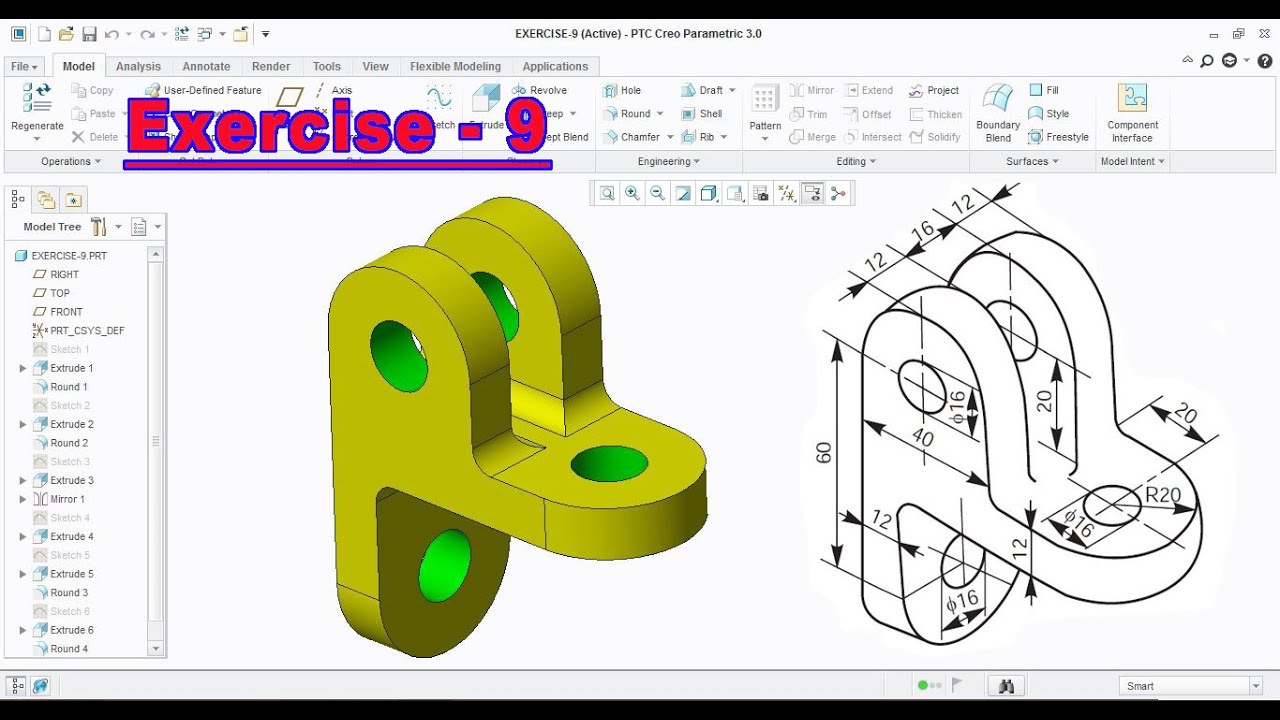
Creo Tutorial for Beginner Exercise 9 How to Mirror and Sketch of
Select the model to add as a drawing model to the current drawing, and click open. The second image in this section is what you screen should currently look like. Right click on the view, and click properties, when you drawing view, click view type and change [ type box from projection to general, then you will see angles option.

Creo Parametric Drawing 3D Section Views and Zones YouTube
• piston part drawing • piston sectioned views • detailed views Opened original abs_bracket_2.prt, created a family table and a new instance named abs_bracket_02.prt. The basic drawing view types. Like part and assembly templates, a drawing template provides you with a starting point to create your drawings. Web during the saving operation, creo displays a warning in the console, i.

Drawing Detailing in Creo Parametric with GD&T (Part01) Modeling best
You should only use the templates that are relevant to your unit systems. The modules dialog box opens. From there you can rotate any direction. Web here's how i did it: Web this creo parametric tutorial video for beginners shows you how to create a new 2d production drawing in creo parametric for parts and assemblies using the f.

Creo part modeling tutorial Machine part18 in Creo Parametric YouTube
The resulting dwg file is incomplete, the biggest shaded views are missing on the drawing. Web here's how i did it: Drawing files are drafting documents that contain annotations, detailed dimensions, part lists, title blocks, and various views of a model such as isometric and orthographic. There are several templates for drawing files available in creo. Even exporting in dxf.

Creo Parametric 8.0 2D & 3D Detailing Enhancements Drawings and
Like part and assembly templates, a drawing template provides you with a starting point to create your drawings. The create drawing dialog box opens. A cross section is an imaginary cutting plane applied through a part, with a cross hatch pattern associated with it. Click the annotation tab on the ribbon and then, in the setup group, click new drawing..

Detailing the drawing in Creo Parametric for beginners YouTube
Even exporting in dxf format resulted in an incomplete drawing, while pdf is ok. Web do you need to create creo drawings view? Web the dwg models menu appears on the menu manager. Web here's how i did it: Web create new drawings using drawing templates.
Web Do You Need To Create Creo Drawings View?
Web [how to insert drawing views in creo]. Web 1 / 50 video in the 2d sketching series for creo parametric. You should only use the templates that are relevant to your unit systems. Web to create a drawing.
Opened Drawing And Used Drawing Model> Replace And Then Chose Abs_Bracket_02.Prt As It Was Now Part Of A Family Table.
Here is the video for you.feel free to contact me or leave a comment, or idea for another creo. 3) the following folders contain drawing standard specific drawing templates: The modules dialog box opens. The new dialog box opens.
You Do Not Know How?
In this playlist, you learn how to create a robust, predictable sketch. A cross section is an imaginary cutting plane applied through a part, with a cross hatch pattern associated with it. Web how to create an engineering drawing from your creo model The resulting dwg file is incomplete, the biggest shaded views are missing on the drawing.
The Following Menu Should Appear.
Click the annotation tab on the ribbon and then, in the setup group, click new drawing. There are several templates for drawing files available in creo. Even exporting in dxf format resulted in an incomplete drawing, while pdf is ok. The second image in this section is what you screen should currently look like.