How To Draw A Gnome Step By Step Easy
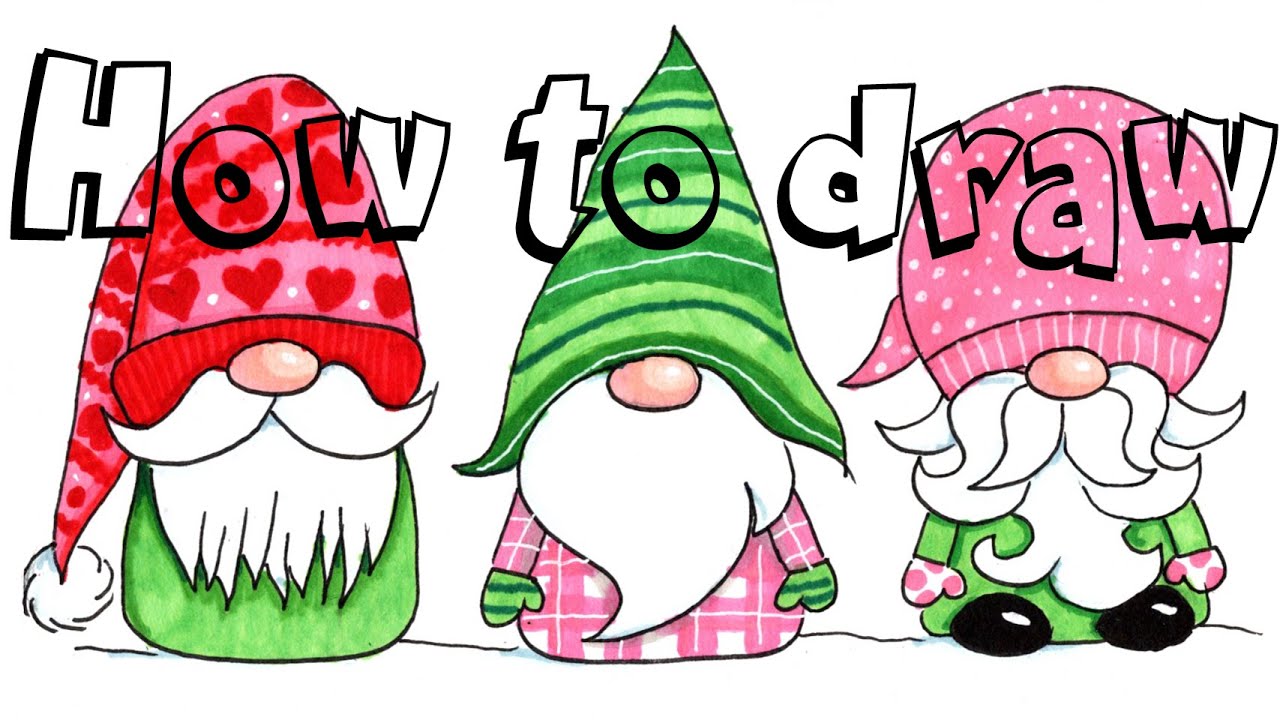
How To Draw A Gnome Step By Step Easy - You can have the white and blue mix together to a solid color or leave it “unblended” so the colors look a bit “streaky”. A rectangle for the body. Continue onto the secondary color coat. Follow along with me as i draw with pencil and color with markers these 3 different kinds of cute christ. Make your hat a little narrower than the width of the beard and pointy at the end. Draw the gnome’s head and body. Using the same brush and light cream paint, proceed to add color to the gnome’s face, ears, and hands. Add eyes, brow and beard. Web in this 'how to draw' tutorial, i'll be your artistic guide as we explore 'how to draw' a whimsical gnome. This is your gnome’s head and body all in one!
It should start about a. Extend two short straight lines to outline the remaining line. Draw a nose and mustache. You can begin by drawing a small, rounded shape for his nose. Notice the curved lines that contour the flesh of the palm, at the base of the fingers. Add a line, which will act as the center of it. Gnomes, with their pointy hats and delightful pers. Arts for kids, drawing tutorial lesson.learning videos for all ages. Web how to draw muffin from bluey, step by step tutorial. Add eyes, brow and beard.
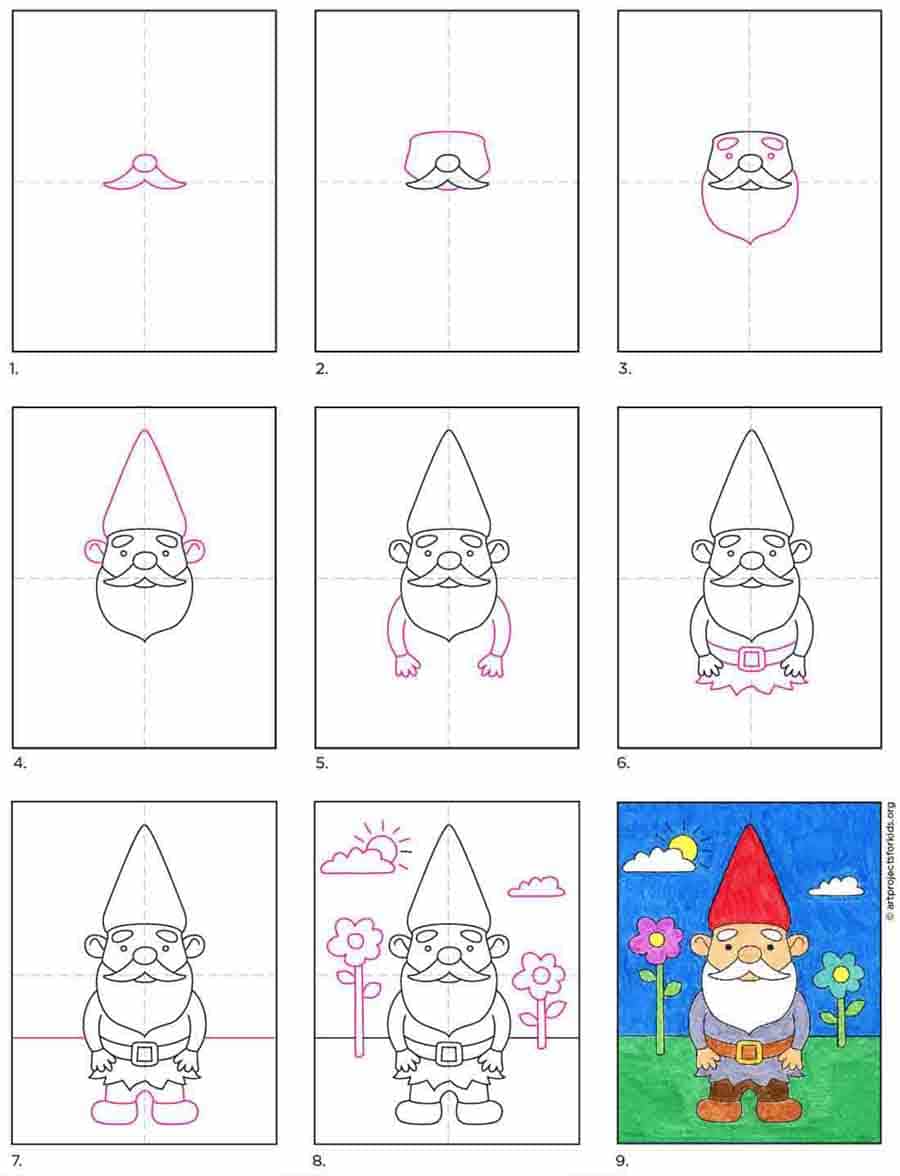
At the end, i show a few options for customizing your gnome and adding a little per. We hope you enjoy following along with us! Web step by step instructions. We will be creating a classic depiction of a gnome in this guide on how to draw a gnome. Then, use a series of curved lines and overlapping “u” shaped lines to draw the hand. Make sure the base of the triangle is as wide as the gnome's head. Web this quick video goes over the basics to start drawing the cutest gnomes! Paint the nose a solid coat of that color. In the center of the face, draw a small circle for the nose. Extend two short straight lines to outline the remaining line.

Gnome step by step drawing tutorial. Learn how to draw a cute gnome
Use your 3/4″ flat wash brush and the colors: Mark off the width and height of the picture. Notice the curved lines that contour the flesh of the palm, at the base of the fingers. Using the same brush and light cream paint, proceed to add color to the gnome’s face, ears, and hands. Add two straight lines that point.

How to draw a cute gnome in 6 steps Easy christmas drawings
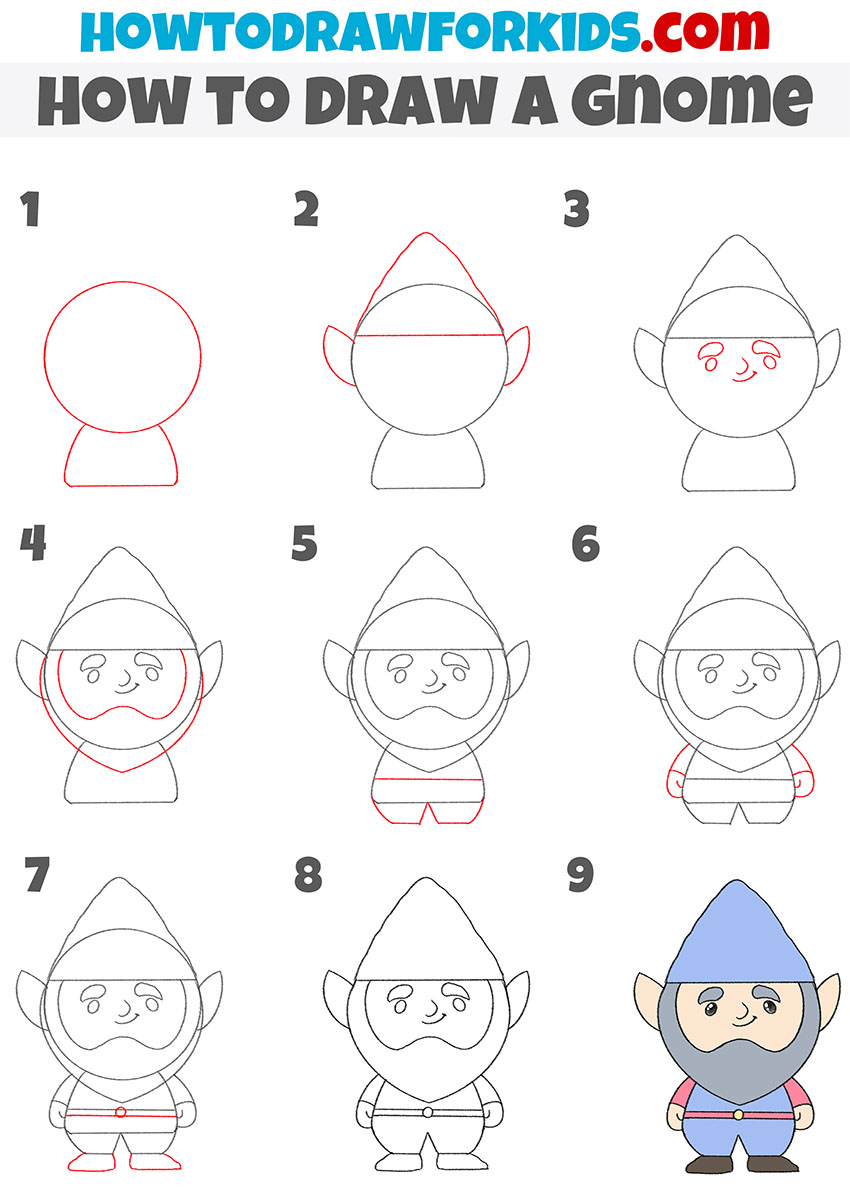
Sketch a circle for the gnome’s head, leaving space at the bottom to add the beard later. Select a sharp brush and gray paint, and evenly color the entire beard, this includes the mustache. Draw two ears and add a hat. Then, use a series of curved lines and overlapping “u” shaped lines to draw the hand. Draw a long.

How to Draw a Gnome Step by Step Drawing lessons for kids, Easy
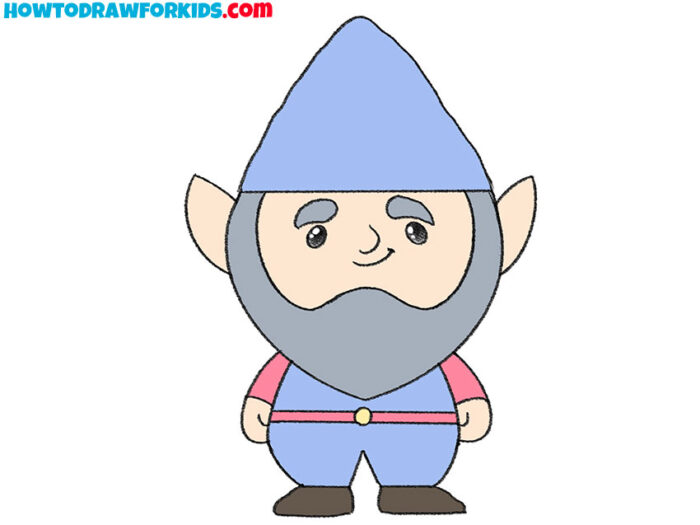
Select a sharp brush and gray paint, and evenly color the entire beard, this includes the mustache. Web draw a circle for the head. Sketch a circle for the gnome’s head, leaving space at the bottom to add the beard later. Add a little white to your brush and then paint a lighter color in the center of your oval.

How to Draw Simple Christmas Gnomes YouTube
Draw a circle on top of the oval, slightly overlapping it. Add a little white to your brush and then paint a lighter color in the center of your oval and blend it. Draw two legs and horizon line. Web drawing the face. Make sure the base of the triangle is as wide as the gnome's head.
How to Draw a Gnome Easy Drawing Tutorial For Kids
Sketch a circle for the gnome’s head, leaving space at the bottom to add the beard later. Web this quick video goes over the basics to start drawing the cutest gnomes! Add two small shoes, with the feet, turned in opposite directions. In this first step, we will begin with his head outline as well as the classic pointy gnome.

Gnome Drawing Tutorial using Dual Brush Pens! YouTube
Today, we're learning how to draw a funny, cute christmas gnome! Web at the center top of your beard, sketch an oval shape for the nose. Web this gnome is simple but cute, perfect for any project that needs a little bi. Web this quick video goes over the basics to start drawing the cutest gnomes! Arts for kids, drawing.
HOW TO DRAW CHRISTMAS GNOMES Step by Step Drawing Tutorial for Kids
Web at the bottom of the gnome’s torso add two short legs and draw a horizontal line on the belly. Gnomes, with their pointy hats and delightful pers. Web christmas drawing gnome step by step. The hands are short and close to the torso. Sketch a circle for the gnome’s head, leaving space at the bottom to add the beard.

How to Draw a Gnome, Step by Step, Stuff, Pop Culture, FREE Online
Color the beard on your gnome drawing. Add a circle for the nose at the center of the hat, and then go fancy with the beard.c create a nice pointy tip and zig zags. In this first step, we will begin with his head outline as well as the classic pointy gnome hat he is wearing. Art supplies ~ this.
How to Draw a Gnome Easy Drawing Tutorial For Kids
Web learn how to draw a cute garden gnome, a symbol of good luck with flowers, mushrooms and watering can scenery. A rectangle for the body. Web how to draw muffin from bluey, step by step tutorial. Draw the face around it. Use curved lines to draw two symmetrical elements.
Simple Easy methods to Draw a Gnome Tutorial and Gnome Coloring Web
Add a belt and shirt edge. Web this gnome is simple but cute, perfect for any project that needs a little bi. Once you have added the nose, start sketching the hat above. Web draw a circle for the head. Add a body, gown, and shoes.
Start By Drawing A Loose Floppy Hat And Pom Pom.
Load your paint palette with “titanium white”. Draw a long triangle for the gnome’s tall hat on top of the oval. Then, we will be drawing two large circles sitting atop his nose. Mark off the width and height of the picture.
Leave The Outer Part Of The Oval Darker.
Web at the center top of your beard, sketch an oval shape for the nose. Web this quick video goes over the basics to start drawing the cutest gnomes! Draw the gnome’s head and body. Add guidelines for the gnome’s body.
Draw The Legs By Sketching Two Thin Rectangles With Small Feet At The Bottom.
The hands are short and close to the torso. There you go—you've just sketched the basic shape of your gnome! This is your gnome’s head and body all in one! We will be creating a classic depiction of a gnome in this guide on how to draw a gnome.
Art Supplies ~ This Is A List Of.
Create the gnome’s outfit by drawing a small triangle at the neck and a curved line from the waist to the feet. Then, use a series of curved lines and overlapping “u” shaped lines to draw the hand. Arts for kids, drawing tutorial lesson.learning videos for all ages. Web very easy circle scenery drawing | how to draw circle scenery | house scenery drawing step by step #circlescenery #scenery #easydrawing #drawing #art relate.