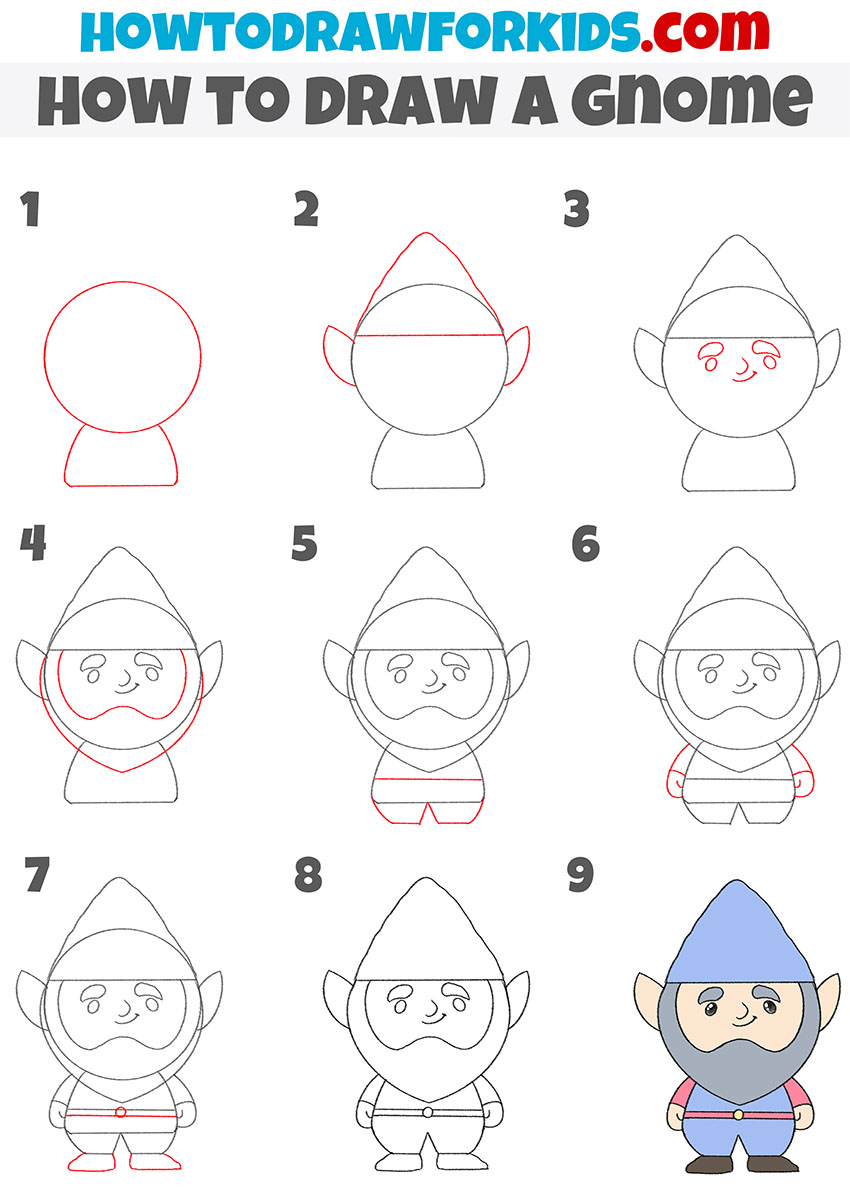
How To Draw A Gnome Step By Step
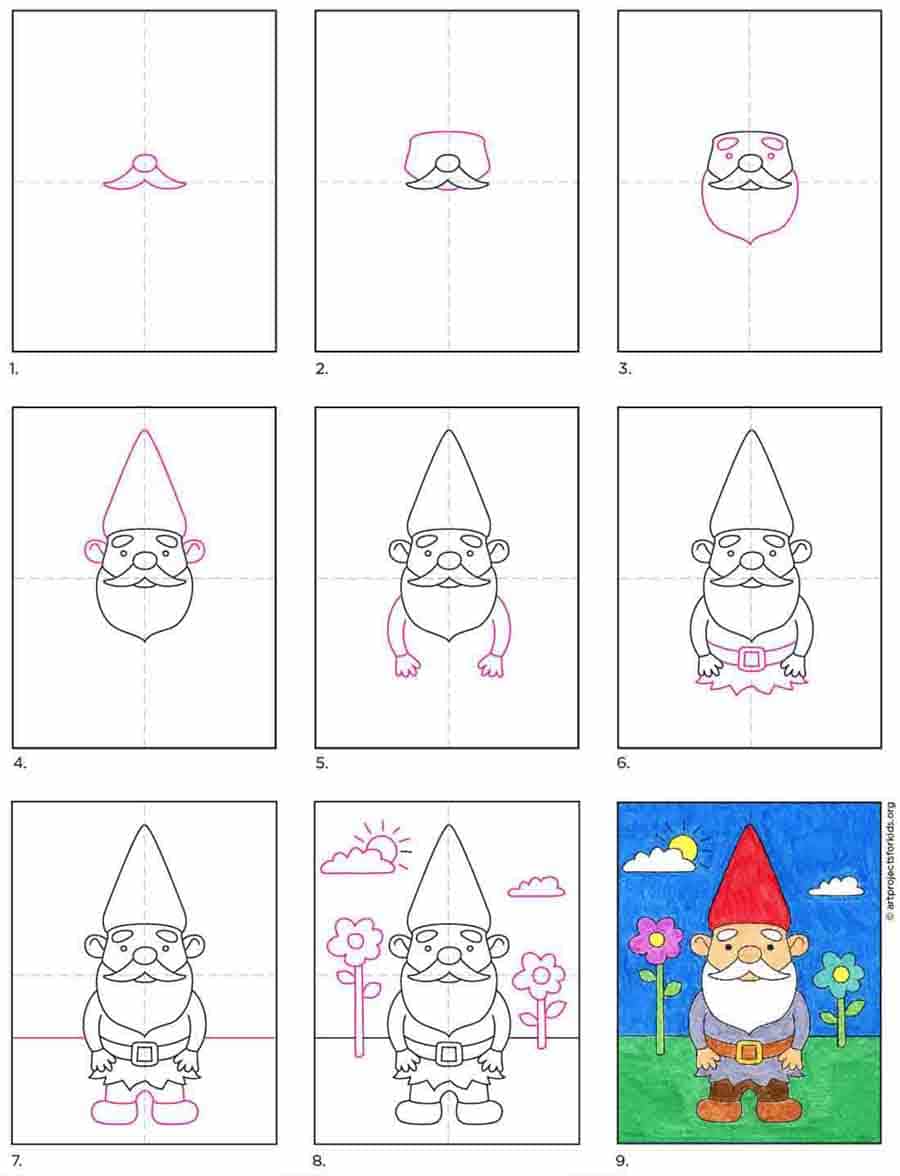
How To Draw A Gnome Step By Step - This is going to be the ball at the end of gnome’s santa hat. Shape the hat and eye area; Let’s begin by drawing a large circle first. Add a little white to your brush and then paint a lighter color in the center of your oval and blend it. Then you can personalize your gnome with colored pencils. Next, sketching a flopppy hat; This project is intended for kids ages 4+. Reference picture of a gnome. Paint the nose a solid coat of that color. Add a body, gown, and shoes.
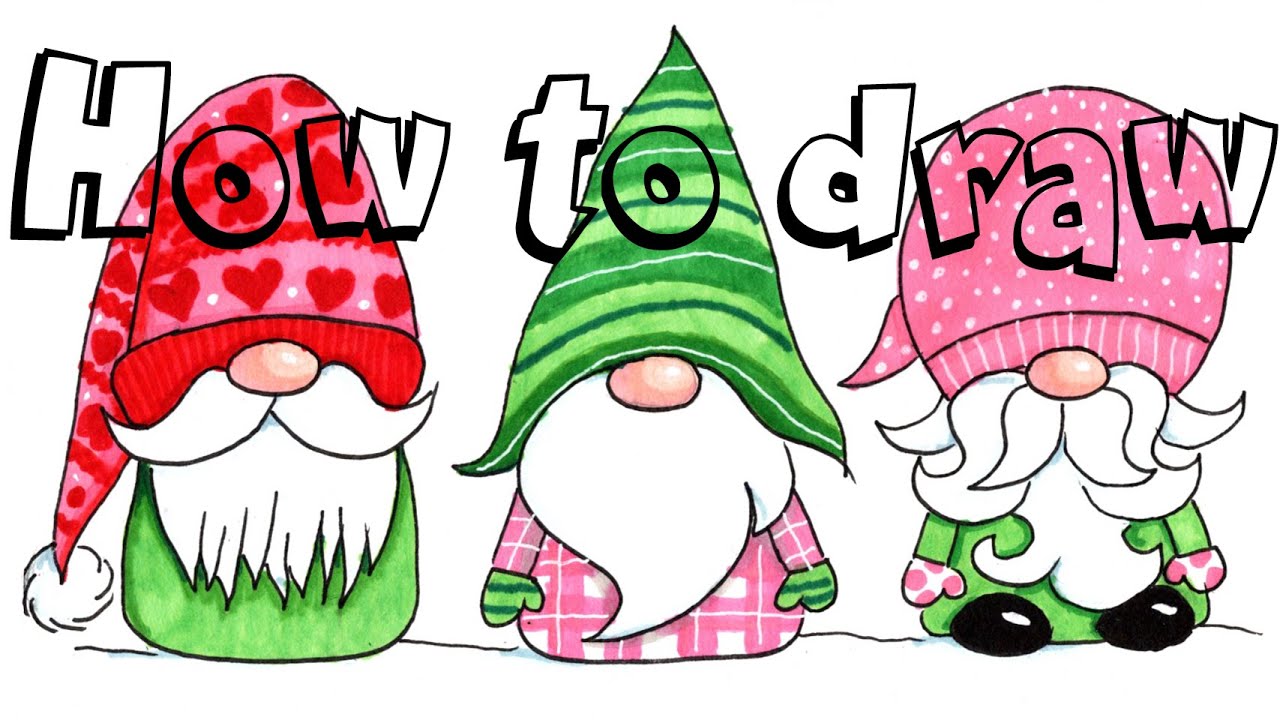
We'll show you step by step how to draw, outline, and color your gnome drawings with markers. Of course, if you prefer, you can keep it simple and draw a regular triangle instead. Let's create rough sketches for our gnome to get an idea of his appearance. In this first step, we will begin with his head outline as well as the classic pointy gnome hat he is wearing. Draw a straight line, then sketch hill shapes over the line like the scalloped edge of a shell. Draw the gnome's head and body; Load your paint palette with “titanium white”. You’ll learn how to start your drawing with some simple shapes and then sketch out all the details before ou. Web learn how to draw a cute garden gnome, a symbol of good luck with flowers, mushrooms and watering can scenery. Here’s how to draw a christmas gnome!
Web how to draw a gnome (step by step with markers). Web in this 'how to draw' tutorial, i'll be your artistic guide as we explore 'how to draw' a whimsical gnome. One 11 x 14 canvas. You can find the clipart pack made from this gnome on www.ambillustrations.com looking for this gnome? Draw a straight line, then sketch hill shapes over the line like the scalloped edge of a shell. Add a circle for the nose at the center of the hat, and then go fancy with the beard.c create a nice pointy tip and zig zags. Next, we’ll draw one side of the gnome’s santa’s hat. Web built with convertkit. A long time carving enthusiast that enjoys carving wood and stone. In this tutorial, we’ll guide you through the process of drawing a charming gnome that will bring a touch of magic to your artwork.
How to Draw a Gnome Easy Drawing Tutorial For Kids
You’ll learn how to start your drawing with some simple shapes and then sketch out all the details before ou. Draw the cute arms and hands; Web in this 'how to draw' tutorial, i'll be your artistic guide as we explore 'how to draw' a whimsical gnome. Always has way to many carving tools and is willing to try new.
Simple Easy methods to Draw a Gnome Tutorial and Gnome Coloring Web
Reference picture of a gnome. Draw his hands, feet ; Web 12 tips on how to draw a better gnome. Web in this 'how to draw' tutorial, i'll be your artistic guide as we explore 'how to draw' a whimsical gnome. Paint the nose a solid coat of that color.

Gnome Drawing Tutorial using Dual Brush Pens! YouTube
I added stripes, polka dots and lots of pops of colors! Add a little white to your brush and then paint a lighter color in the center of your oval and blend it. This is going to be the ball at the end of gnome’s santa hat. Web gnomes are mythical creatures known for their pointy hats and beards, and.

How to Draw a Gnome Step by Step Easy Tutorial YouTube
Paint the nose a solid coat of that color. You’ll learn how to start your drawing with some simple shapes and then sketch out all the details before ou. Finish off your gnome drawing by adding the arms with mittens. Add a circle for the nose at the center of the hat, and then go fancy with the beard.c create.

How to Draw a Gnome, Step by Step, Stuff, Pop Culture, FREE Online
The hat is just a triangle with a slight curve at the top, like a santa hat. Gnomes, with their pointy hats and delightful pers. Learn how to paint a summer gnome step by step with acrylics on canvas. Finish off your gnome drawing by adding the arms with mittens. Web 12 tips on how to draw a better gnome.

Gnome step by step drawing tutorial. Learn how to draw a cute gnome
Then, we will be drawing two large circles sitting atop his nose. Web this quick video goes over the basics to start drawing the cutest gnomes! Web how to draw a gnome (step by step with markers). A long time carving enthusiast that enjoys carving wood and stone. Let’s begin by drawing a large circle first.

How to draw a cute gnome in 6 steps Easy christmas drawings
Next, we’ll draw one side of the gnome’s santa’s hat. Leave the outer part of the oval darker. Web use a #4 round brush and mix both of those colors together (equal amounts). Web learning how to draw a gnome is easy and fun. Web 12 tips on how to draw a better gnome.

How to Draw a Gnome Step by Step Drawing lessons for kids, Easy
Grab a few of your favorite markers, and let’s get doodling. Finish off your gnome drawing by adding the arms with mittens. We will be creating a classic depiction of a gnome in this guide on how to draw a gnome. Leave the outer part of the oval darker. Web learn how to draw a cute garden gnome, a symbol.
HOW TO DRAW CHRISTMAS GNOMES Step by Step Drawing Tutorial for Kids
Sketch two lines from the head to the body to create the neck. Web this quick video goes over the basics to start drawing the cutest gnomes! Then you can personalize your gnome with colored pencils. Gnomes, with their pointy hats and delightful pers. Draw a straight line, then sketch hill shapes over the line like the scalloped edge of.

How To Draw Christmas Gnome Christmas Draw & Color Tutorial YouTube
Use two curved lines pointing upward to make a cone shape without the point. Next, sketching a flopppy hat; This is going to be the ball at the end of gnome’s santa hat. One 11 x 14 canvas. Web this quick video goes over the basics to start drawing the cutest gnomes!
Finish Off Your Gnome Drawing By Adding The Arms With Mittens.
Learn how to paint a summer gnome step by step with acrylics on canvas. Draw his hands, feet ; Web built with convertkit. Paint the nose a solid coat of that color.
This Step By Step Tutorial Will Help Young Artists Learn How To Draw A Christmas Gnome.
I added stripes, polka dots and lots of pops of colors! Web gnomes are mythical creatures known for their pointy hats and beards, and they often live in gardens and forests. You’ll learn how to start your drawing with some simple shapes and then sketch out all the details before ou. Next, draw his facial details;
This Gnome Is Simple But Cute, Perfect For Any Project That Needs A Little Bi.
Web learn how to draw a cute garden gnome, a symbol of good luck with flowers, mushrooms and watering can scenery. This is going to be the ball at the end of gnome’s santa hat. Web 12 tips on how to draw a better gnome. Web in this 'how to draw' tutorial, i'll be your artistic guide as we explore 'how to draw' a whimsical gnome.
In This Tutorial, We’ll Guide You Through The Process Of Drawing A Charming Gnome That Will Bring A Touch Of Magic To Your Artwork.
Add a body, gown, and shoes. Web start by drawing a loose floppy hat and pom pom. At the end, i show a few options for customizing your gnome and adding a little per. Leave the outer part of the oval darker.