How To Draw A Pumpkin Vine
How To Draw A Pumpkin Vine - Shade the petals with curving lines at the center and tips. Position the chalk pastel at the top of the oval and proceed to draw a large curve away from the shape and then back to join the bottom. The design and proportion of each part will be highlighted in each step of the lesson. You can use a pen, ink, marker, or pencil to draw the leaf. Draw another curved line across it to give the tip of the stem an oval shape. Draw the crossbeam of the trellis. Draw a circle connecting the two lines. Draw an adjoining segment to build the pumpkin shell. Use three short lines to enclose the rectangular stem on top of the pumpkin. Connect the dots 3 times.
Come draw along an orange pumpkin in this drawing video for kids! Web the simplest pumpkin drawing method uses just circles and basic curved lines. On the opposite side of the stake, use a short curved line to enclose the end of the beam. Web pumpkin vines can grow up to 20 feet in length, depending on the variety of pumpkin and growing conditions. This completes the first segment of the pumpkin shell. Then, draw simple rounded leaves on either side of each line. Keep secondary vines separate and prevented from crossing over one another. Web here are some basic tasks for your to do list in the pumpkin patch. Extend a long, curved line from the stake at a perpendicular angle. Use a curved line to enclose the end of the stem.
Web draw the ridged stem with several curving lines. Web the simplest pumpkin drawing method uses just circles and basic curved lines. Scientifically speaking, pumpkins are a fruit because they are the part of the plant that contains seeds. Unlock ad free and printable drawing and coloring tutorials. Then, texture the stem with curved lines. Web pumpkin vines can grow up to 20 feet in length, depending on the variety of pumpkin and growing conditions. These lines will create sections on your pumpkin. Web to draw a pumpkin leaf, you start with the outline, and then work on the details inside it. Each lesson is designed for begi. If some of you are wondering what a plant bed is, a plant bed is for to keep plant pot in.

Pumpkin drawing Creeper drawing Watercolor painting easy for
Connect the dots 3 times. Web draw the ridged stem with several curving lines. Web a classic example of companion planting is the three sisters or corn, beans, and squash: Web here are some basic tasks for your to do list in the pumpkin patch. This completes the first segment of the pumpkin shell.
Easy How to Draw a Pumpkin Tutorial Video and Coloring Page
Corn acts as a support system for climbing beans, beans add nitrogen to the soil and help stabilize the tall corn during heavy winds, and the large squash leaves shade the ground helping retain soil moisture and prevent weeds. Take a look at the middle arch on top and on the bottom. That way, you’ll have a structure to refer.
How to draw pumpkin step by step The Smart Wander
Double it back upon itself to enclose the beam. It all depends on the sharpness you’re aiming for. Web draw a stalk and finish off with a vine! Allow plenty of room for pumpkin vines to grow. Keep secondary vines separate and prevented from crossing over one another.
How to Draw Pumpkins · Art Projects for Kids
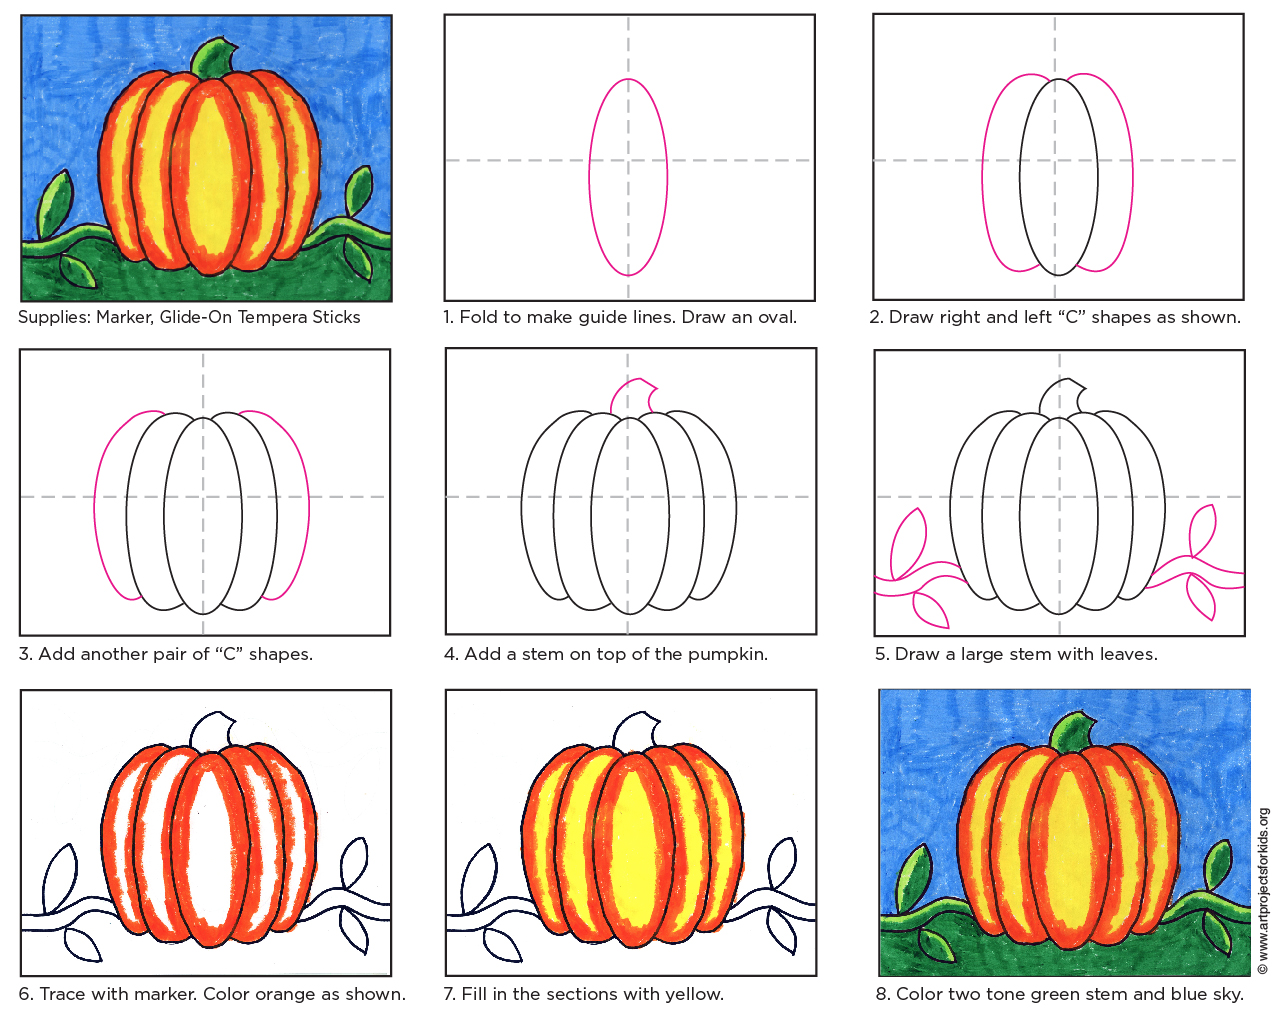
Web draw the ridged stem with several curving lines. These lines will create sections on your pumpkin. Web draw a stalk and finish off with a vine! Draw a circle connecting the two lines. Lightly sketch a horizontal oval on your paper.
Pumpkin Drawing Easy · Art Projects for Kids
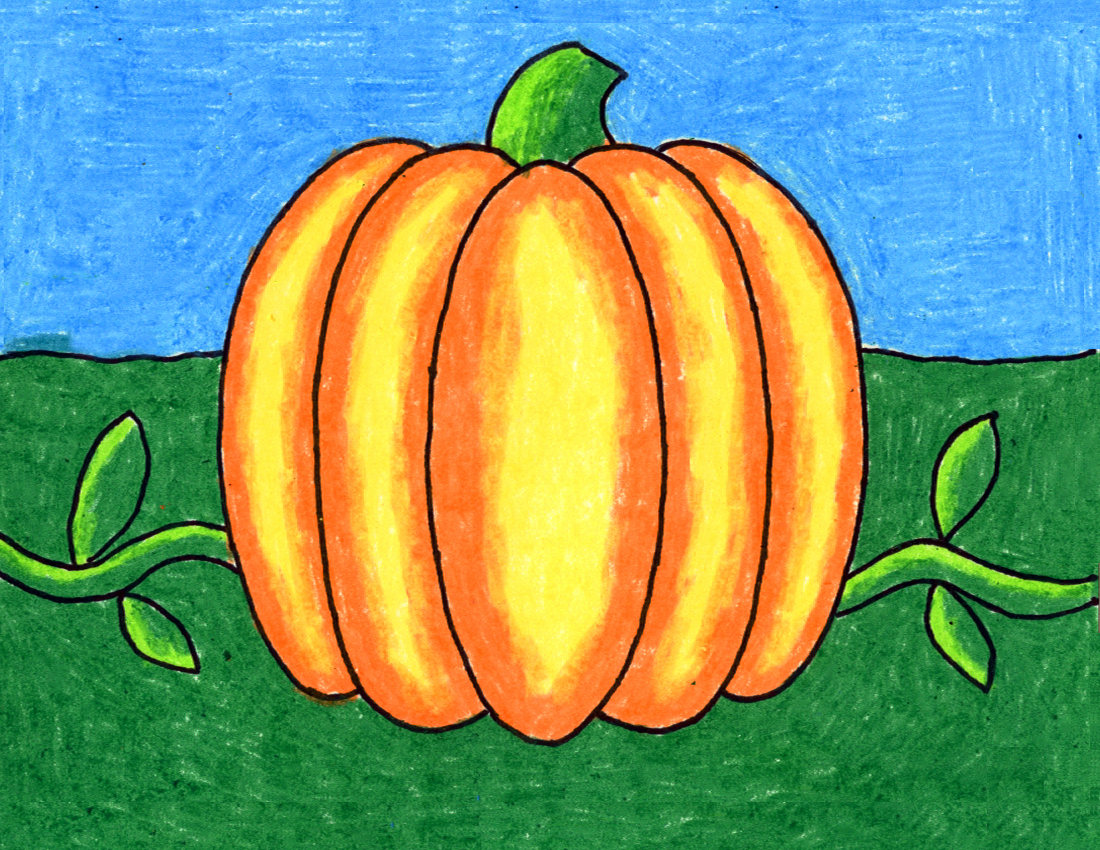
Draw an adjoining segment to build the pumpkin shell. Web draw two lines up from the center top of the pumpkin and an oval on the top to connect them. Divide the oval into 5 parts using curved lines. You can use a pen, ink, marker, or pencil to draw the leaf. Fall season is still here to enjoy and.
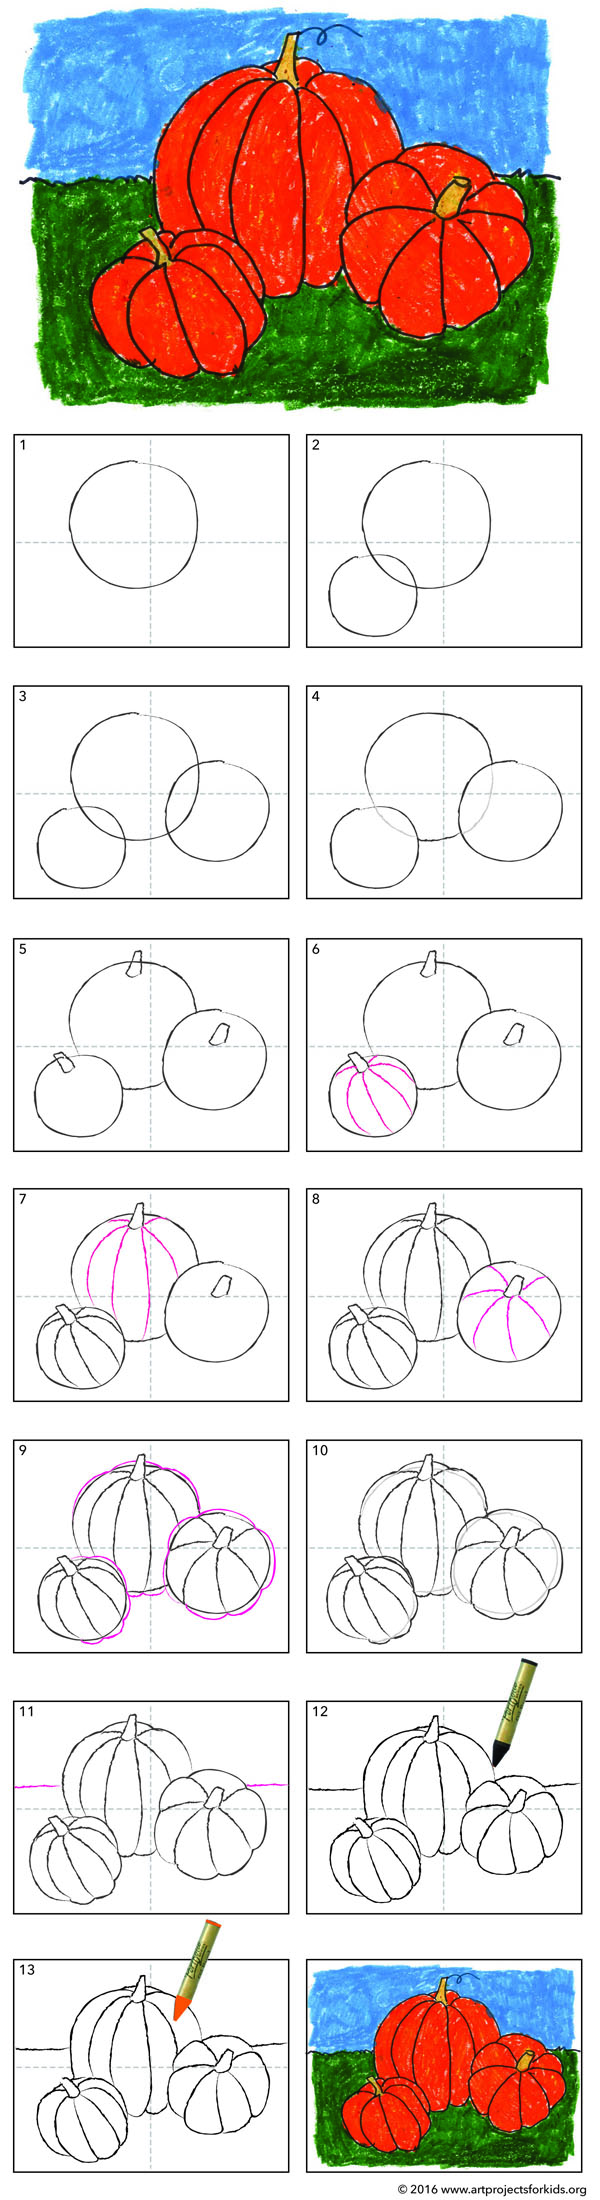
How to Draw a Pumpkin · Art Projects for Kids
A stem can have a bend in it and the two lines may not be parallel to one another. The design and proportion of each part will be highlighted in each step of the lesson. This creates a heirloom pumpkin look and you can draw a few berries and leaves to enhance that feel. Web the simplest pumpkin drawing method.

10 Amazing & Easy Step by Step Tutorials & Ideas How to Draw Pumpkin
Draw 2 curved lines at the top. Position the chalk pastel at the top of the oval and proceed to draw a large curve away from the shape and then back to join the bottom. Unlock ad free and printable drawing and coloring tutorials. Web here are some basic tasks for your to do list in the pumpkin patch. Web.
Drawing Lesson How to Draw Pumpkins YouTube
Coming out of the top of the pumpkin add the stem. Corn acts as a support system for climbing beans, beans add nitrogen to the soil and help stabilize the tall corn during heavy winds, and the large squash leaves shade the ground helping retain soil moisture and prevent weeds. Web in today’s tutorial, we will discover how to draw.

How to draw a pumpkin easy step by step Creeper plant Pumpkin drawing
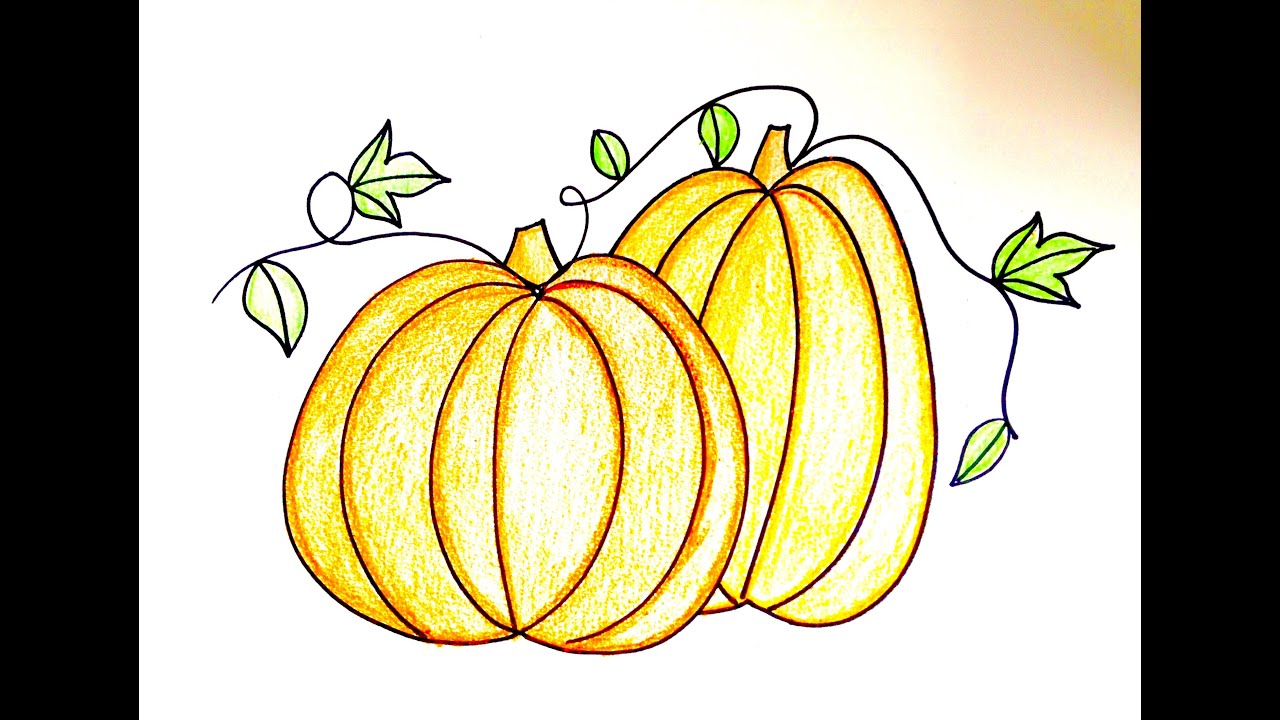
What type of paper and pencils are best for drawing pumpkin vines? Draw the vine with a squiggly line. It all depends on the sharpness you’re aiming for. Web hi everyone and today i'll be showing you how to draw a plant bed. Web to create this simple vine look, first draw vertical lines on your pumpkin with a permanent.

How to draw pumpkin step by step The Smart Wander
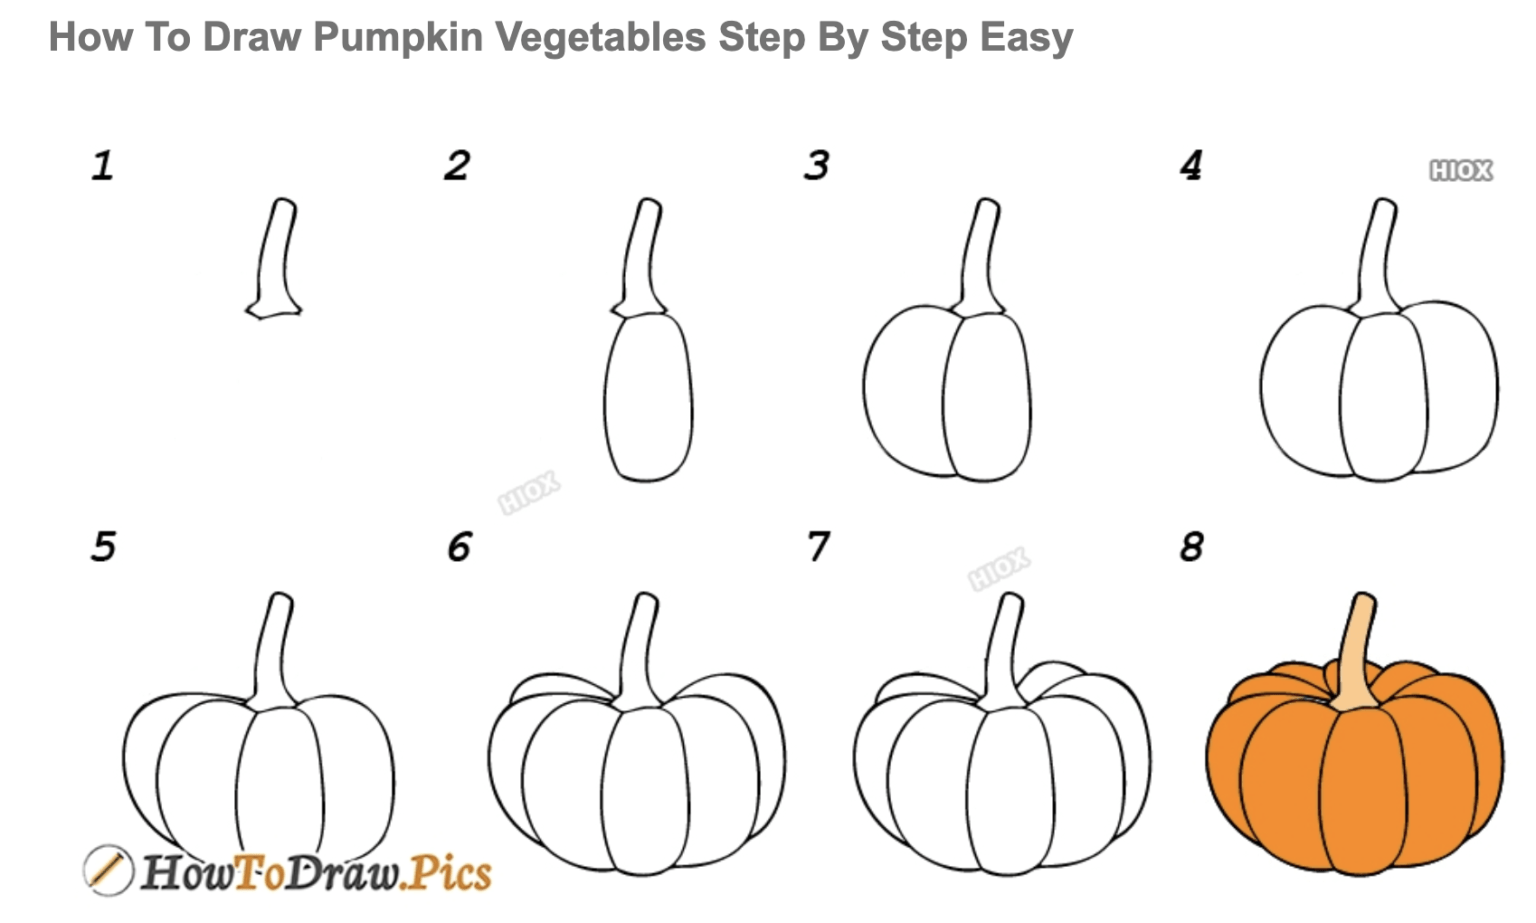
Using two curved lines, enclose a vertical rounded shape. Web draw two lines up from the center top of the pumpkin and an oval on the top to connect them. Draw the stem right over top of the rest of the pumpkin and then erase the lines of the ribs that are now overlapped by it. These lines will create.
Create The Pumpkin’s Eyes By Drawing Two Triangles And A Mouth.
Draw two curved lines to make the firs rib of your pumpkin. Shade the stem with very short lines. Corn acts as a support system for climbing beans, beans add nitrogen to the soil and help stabilize the tall corn during heavy winds, and the large squash leaves shade the ground helping retain soil moisture and prevent weeds. Draw a stem about 1/4 of the way down the pumpkin.
Then, Draw Simple Rounded Leaves On Either Side Of Each Line.
You can experiment with this later. Keep secondary vines separate and prevented from crossing over one another. Position the chalk pastel at the top of the oval and proceed to draw a large curve away from the shape and then back to join the bottom. Connect the dots 3 times.
Rather Than An Oval, Create A Bumpy Pumpkin Shape.
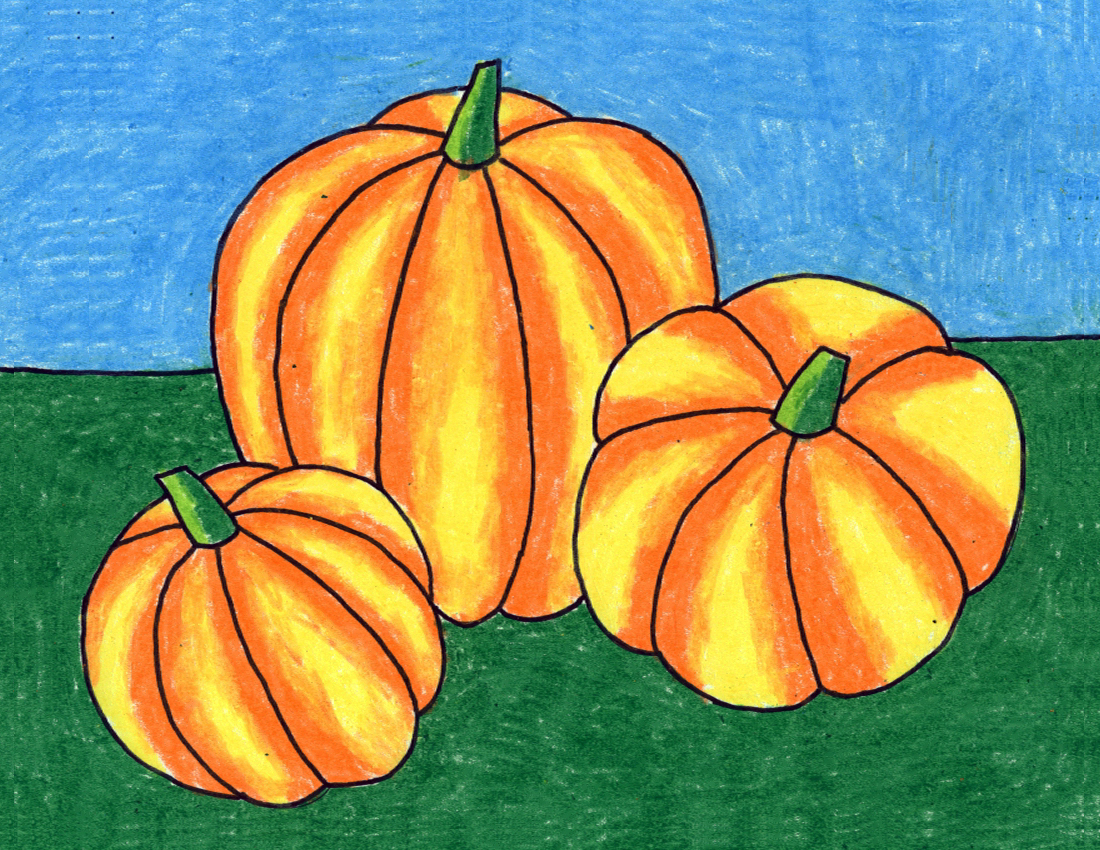
This one can be a bit wider. Begin by drawing your first pumpkin. Come draw along an orange pumpkin in this drawing video for kids! Repeat this process until the pumpkin is nearly circular in form.
More Specifically, They Are A Type Of Berry Known As A Pepo.
The design and proportion of each part will be highlighted in each step of the lesson. Join me each week for more educational art tutorials. Then, texture the stem with curved lines. Shade the pumpkin with long, curving lines near the ridges and at the bottom.