How To Draw A Realistic Nose Step By Step
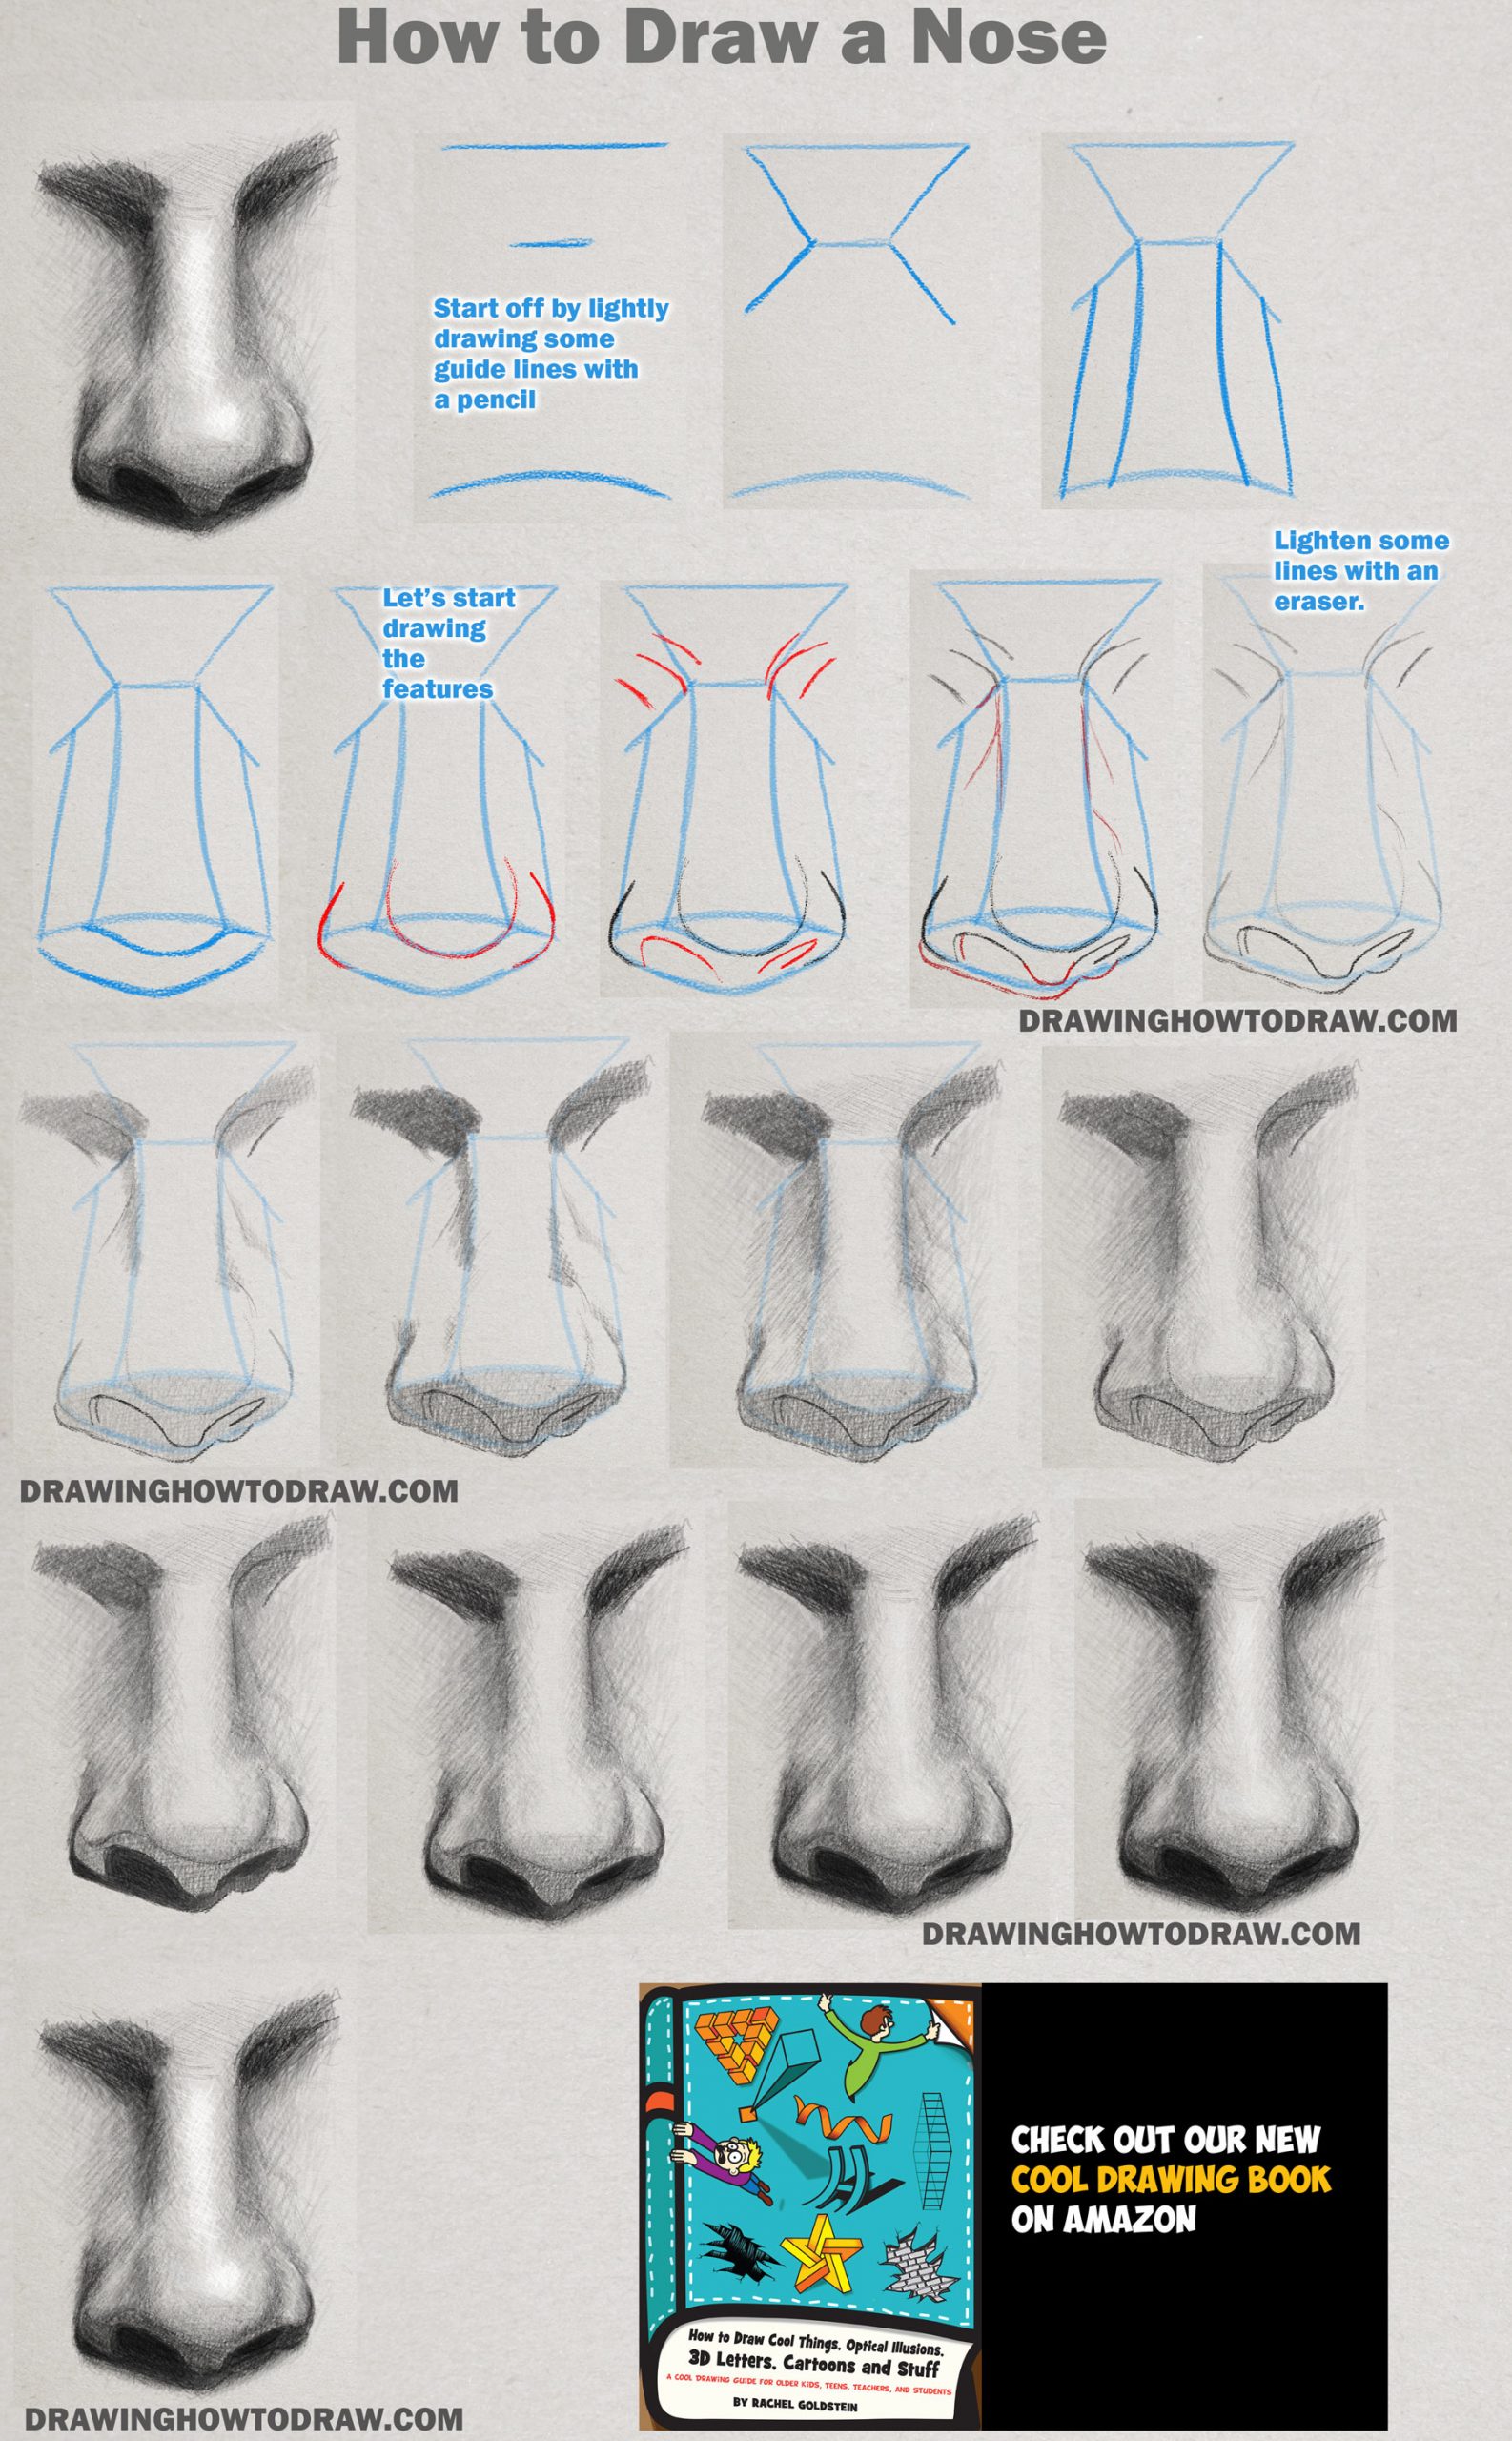
How To Draw A Realistic Nose Step By Step - Web in this tutorial, i’ll show you how to draw a nose in four simple steps: Lightly fill in some shading and guidelines around the outside of the nose. Web to elongate the face, apply contour to both sides of the hairline without connecting them in the middle. Web (step 6) draw the nostrils. Remember, the eyes sit in the middle of the face. The wings of the nose. Learn how to create a variety of nose shapes using this method!requested by: Also, draw some curved lines at the top of the nose. The highest point of the bridge of the nose does as well. To add a more realistic touch, you can use your blending tool to add small portions of skin below and to the left of the nose.
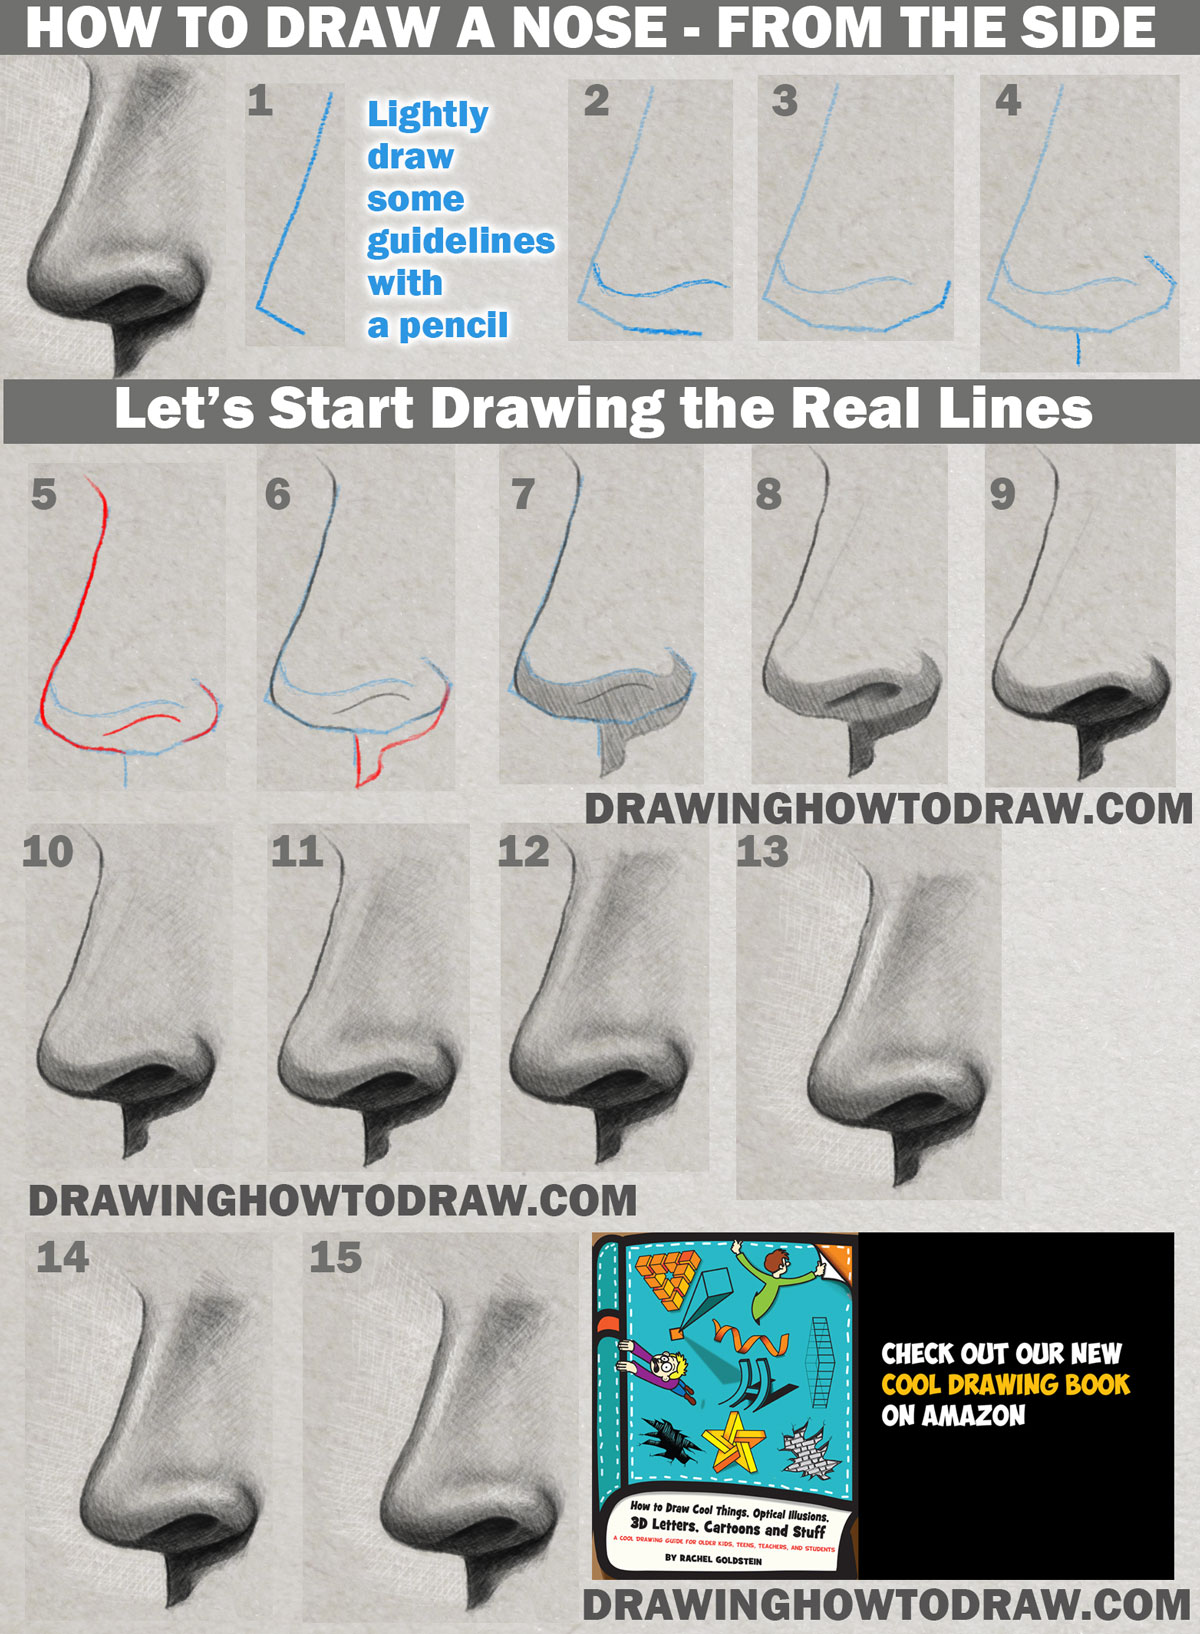
The highest point of the bridge of the nose does as well. If you want to draw a nose (or any realistic object, person, or scene), having a clear reference picture is always a good idea. Lightly fill in some shading and guidelines around the outside of the nose. For the chin and the legs, draw these shapes lightly, as you will be adjusting them later. Web this tutorial gives you a basic look at the shapes and anatomy needed for drawing realistic noses. Start with the areas that are the darkest and slowly get darker with your pencil. Mapping out the particular nose we're drawing by finding its specific angles. Making sure the nose sits in the lower half of the face, with. To begin the first step in nose drawing, you should choose a soft pencil and use a ruler to draw a vertical line in the middle of your page. Next, i overlapped it with one on each side.
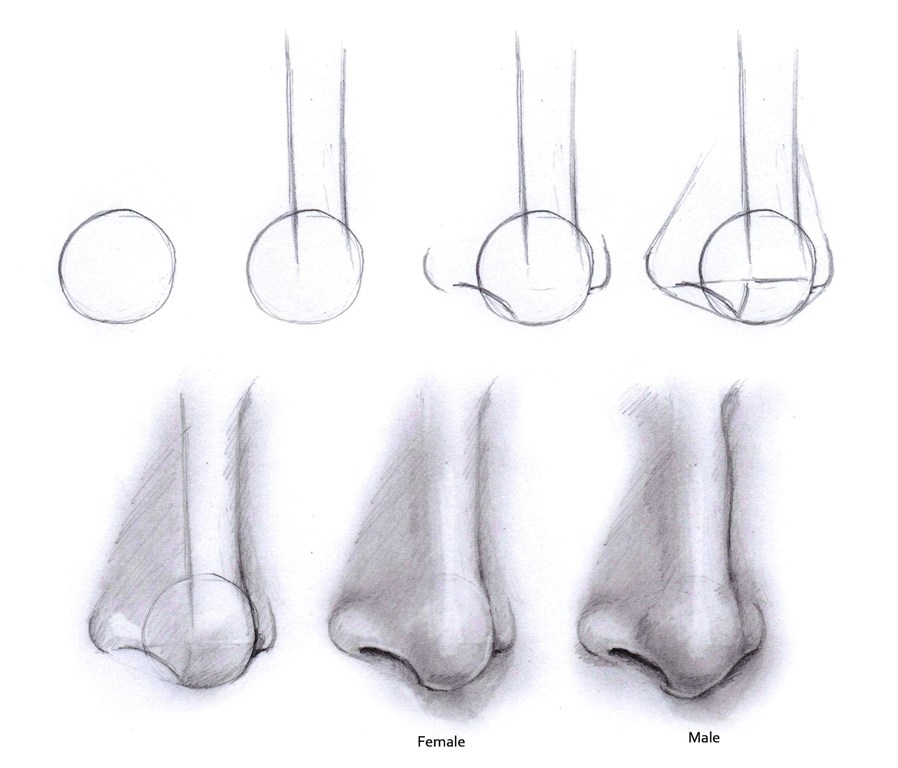
Next, draw a horizontal line through the bottom of the vertical line. Web get access to the full class and all my art classes on skillshare! Dark lines won’t look realistic. There will be a shadow under the nose, you should draw that too. To begin the first step in nose drawing, you should choose a soft pencil and use a ruler to draw a vertical line in the middle of your page. To keep that symmetry, i started with a vertical line. Try to think of the end of the nose as a sphere, the light source comes from above, so the top receives the most light, and the bottom also receives less light, so the highlights are on the top and the shadows are mainly on the bottom. Now we’re going to draw the nose bridge and nostrils, try to use curvy organic lines for this step, and fill the nostril with two or three layers of graphite. Perfect for artists looking to improve their animal drawing skills! Jonodryi really enjoyed making this video!
How To Draw A Nose Step By Step
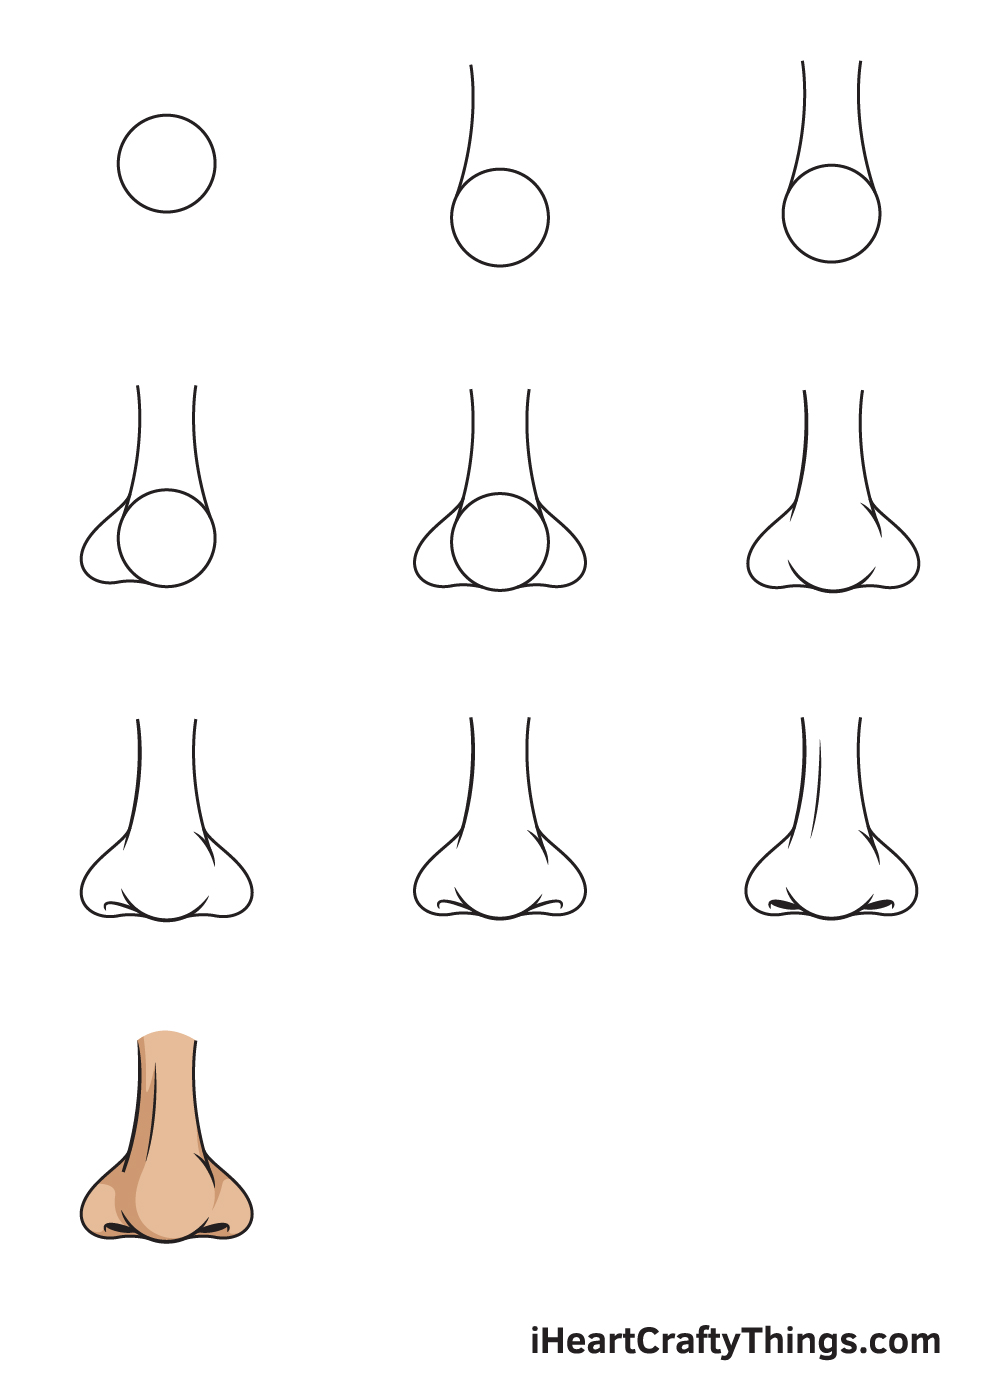
Remember, the eyes sit in the middle of the face. Add a rounded triangle to the bottom of the oval for the head. (step 8) i have lightened some of the lines a bit. Web 2 how to draw a nose from the front view. Later on, these will become the end or ball of the nose and the wings.

Step By Step How To Draw A Nose at Drawing Tutorials
You can improve your drawing skills from he. Jonodryi really enjoyed making this video! Web draw a realistic nose. With just a few ma. (step 7) draw the center of the nose and a bunch of curved lines as well.
Portrait Black/Brown And Colored Pencil Sketch How To Draw Realistic Nose
You can find a good reference picture on a free stock photo site like unsplash.com. Try to think of the end of the nose as a sphere, the light source comes from above, so the top receives the most light, and the bottom also receives less light, so the highlights are on the top and the shadows are mainly on.

How to Draw a Realistic Nose Step by Step Henderson Coonly
Connect the bottom of the nostrils lightly to the bottom tip of the circle. Add a rounded triangle to the bottom of the oval for the head. Web repeat the drawing on the opposite side. Web learn how to draw a realistic nose with a pencil in this easy step by step art tutorial. Second step is sketching, where we.
How to Draw and Shade a Realistic Nose in Pencil or Graphite Easy Step
To keep that symmetry, i started with a vertical line. (step 7) draw the center of the nose and a bunch of curved lines as well. The ball of the nose. To begin, let’s take a look at the five main parts of the nose so that we know the basics before we start drawing: Wendy nelson :)🔔 subscribe for.
How To Draw A Realistic Nose Step By Step For Beginners
Perfect for artists looking to improve their animal drawing skills! To begin, let’s take a look at the five main parts of the nose so that we know the basics before we start drawing: The wings of the nose. Web draw a realistic nose. Or you can grab your mobile phone, and take a few shots of your friend,.

How To Draw Realistic Noses Draw Noses Step By Step Nose People
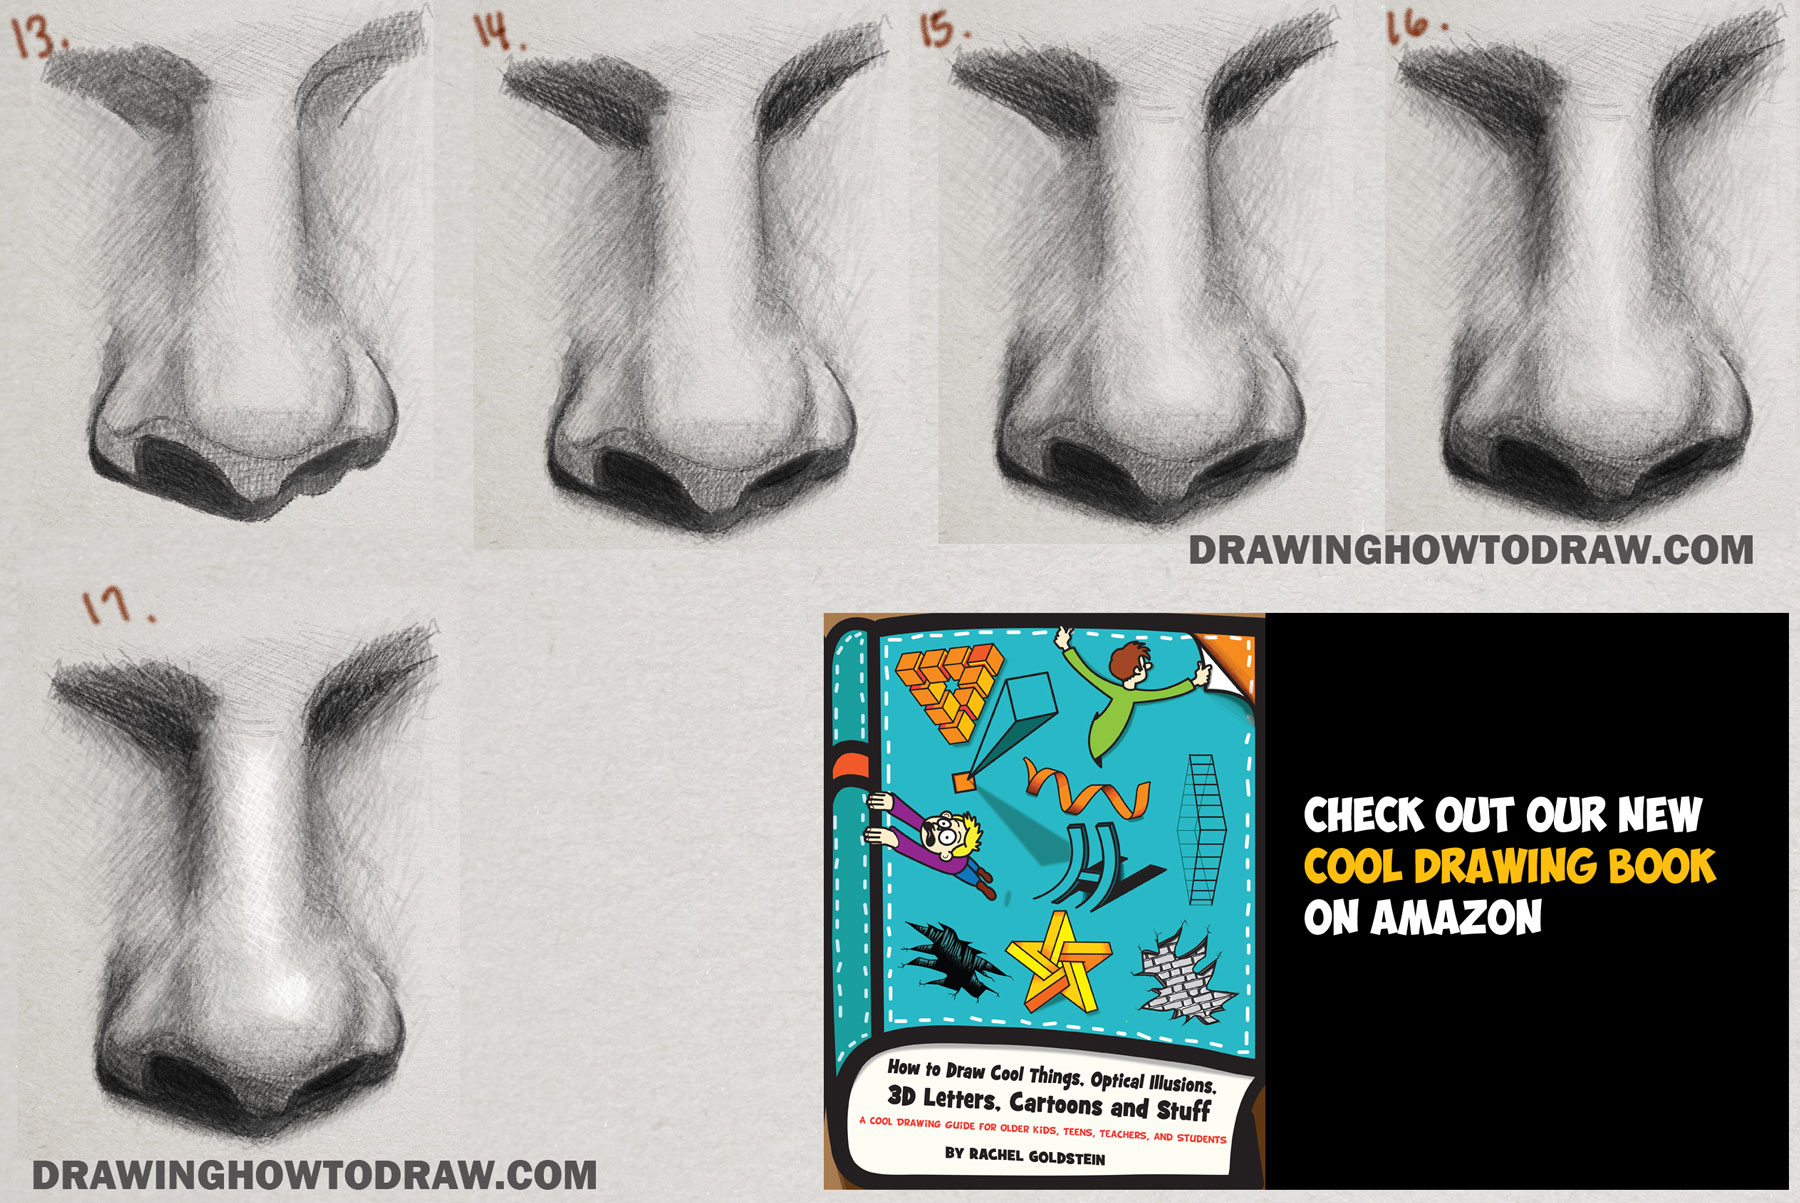
Shading an image turns a flat drawing into a deep drawing. (step 7) draw the center of the nose and a bunch of curved lines as well. Now we’re going to draw the nose bridge and nostrils, try to use curvy organic lines for this step, and fill the nostril with two or three layers of graphite. To add a.
Nose Drawing — How To Draw A Nose Step By Step
Web draw a realistic nose. To begin, let’s take a look at the five main parts of the nose so that we know the basics before we start drawing: With just a few ma. At the end of it, i put a circle. Web this tutorial gives you a basic look at the shapes and anatomy needed for drawing realistic.

How to Draw a Realistic Nose in 6 Easy Steps
Web in this tutorial, i’ll show you how to draw a nose in four simple steps: To add a more realistic touch, you can use your blending tool to add small portions of skin below and to the left of the nose. In a simple way this tutorial takes a basic look at the nose. Also, draw some curved lines.

How To Draw a Nose Realistic Nose Side View Nose step by step
Start with the areas that are the darkest and slowly get darker with your pencil. Mapping out the particular nose we're drawing by finding its specific angles. Try to think of the end of the nose as a sphere, the light source comes from above, so the top receives the most light, and the bottom also receives less light, so.
You Can Improve Your Drawing Skills From He.
The third step is blocking and shading two tonal values to identify the highlights and the shadows. The wings of the nose. If you want to draw a nose (or any realistic object, person, or scene), having a clear reference picture is always a good idea. Try to think of the end of the nose as a sphere, the light source comes from above, so the top receives the most light, and the bottom also receives less light, so the highlights are on the top and the shadows are mainly on the bottom.
Now You Can Begin To Add Darker Values Where The Nose Is Shaded.
Connect the bottom of the nostrils lightly to the bottom tip of the circle. Drawing a nose from the side is much easier than drawing a nose from the front, so this is a great place to start. To begin, let’s take a look at the five main parts of the nose so that we know the basics before we start drawing: Add a rounded triangle to the bottom of the oval for the head.
Now We’re Going To Draw The Nose Bridge And Nostrils, Try To Use Curvy Organic Lines For This Step, And Fill The Nostril With Two Or Three Layers Of Graphite.
Make sure to watch my other tutorials on facial features! Perfect for artists looking to improve their animal drawing skills! Learn how to create a variety of nose shapes using this method!requested by: To keep that symmetry, i started with a vertical line.
Next, Draw A Horizontal Line Through The Bottom Of The Vertical Line.
You will learn how to draw realistic nose step by step in. The ball of the nose. To begin the first step in nose drawing, you should choose a soft pencil and use a ruler to draw a vertical line in the middle of your page. Later on, these will become the end or ball of the nose and the wings that flare out and encompass the nostrils.