How To Draw Hairstyles Step By Step
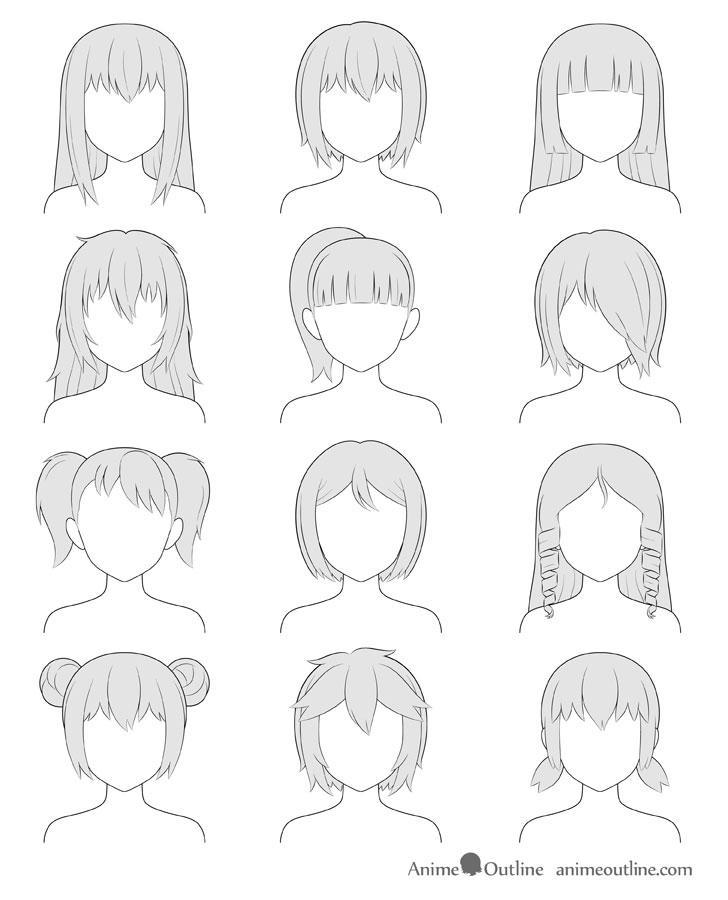
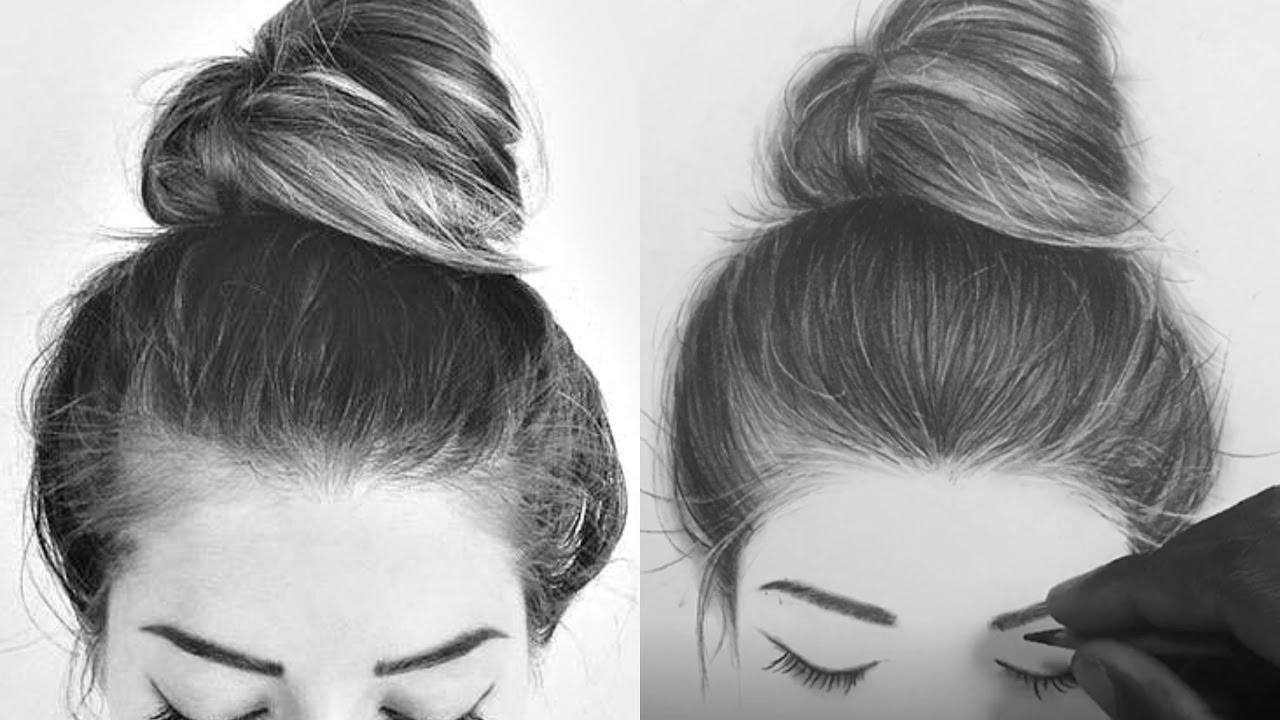
How To Draw Hairstyles Step By Step - Click the link at the bottom of this photo to see the full tutorial. Draw the direction of the hair, creating the 3d form of. Leave a small gap between the hair and the head to give the hair some volume. In this case it will also be the outline of the whole haircut. Wavy hair tends to have less body than curly hair, but it’s still thick enough to stand out from the head. The small volume it can have is because of bouncing with the ears. Split the circle in half. Texture the bun with curved lines of different lengths. To do this, move your pencil to the hair part and draw several lines in the direction of where the hair grows. Draw the bun at the back of the head;
Then i filled it in to create its silhouette. (4b) click here to learn how to draw a head/face from the side and where to draw the ear. Begin the drawing by first outlining the entire shape of the head (including the ears). Draw a loose outline of the hair using strokes that flow in the actual direction the hair is pointing. Male hair on head drawing. Now, draw the face’s outline. Web how to draw afro hairstyles step 1. Let's begin by looking at afro inspired hairstyles. Then, use curved lines that meet at points to enclose the hair tie and tufts of hair. Web learn how to draw gojo satoru from jujutsu kaisen | how to draw anime step by step | easy anime drawing | step by step anime drawing with pencilhow to draw g.
End the sides of the hair about halfway down the face. Click the link at the bottom of this photo to see the full tutorial. The upper part is usually straighter, because of the weight it holds. Web learn how to draw gojo satoru from jujutsu kaisen | how to draw anime step by step | easy anime drawing | step by step anime drawing with pencilhow to draw g. Web hi friends, in this video you will learn how to draw realistic hair with different hairstyles using oil pastel and pencil color step by step, quick and easy. Construct the shape of the head and position the ear in the correct place. Add texture to the hair. In this case it will also be the outline of the whole haircut. Type 4 hair is generally separated into 4a, 4b, and 4c, but some people may have a combination of more than one type. 2.2) draw wavy or curly hair.

30 Girl Hair Drawing Ideas and References Beautiful Dawn Designs
Start with an irregular round shape. 1) the hair must describe the form of the head. Now, fill in the hair with texture. Add texture to the hair. Male hair on head drawing.
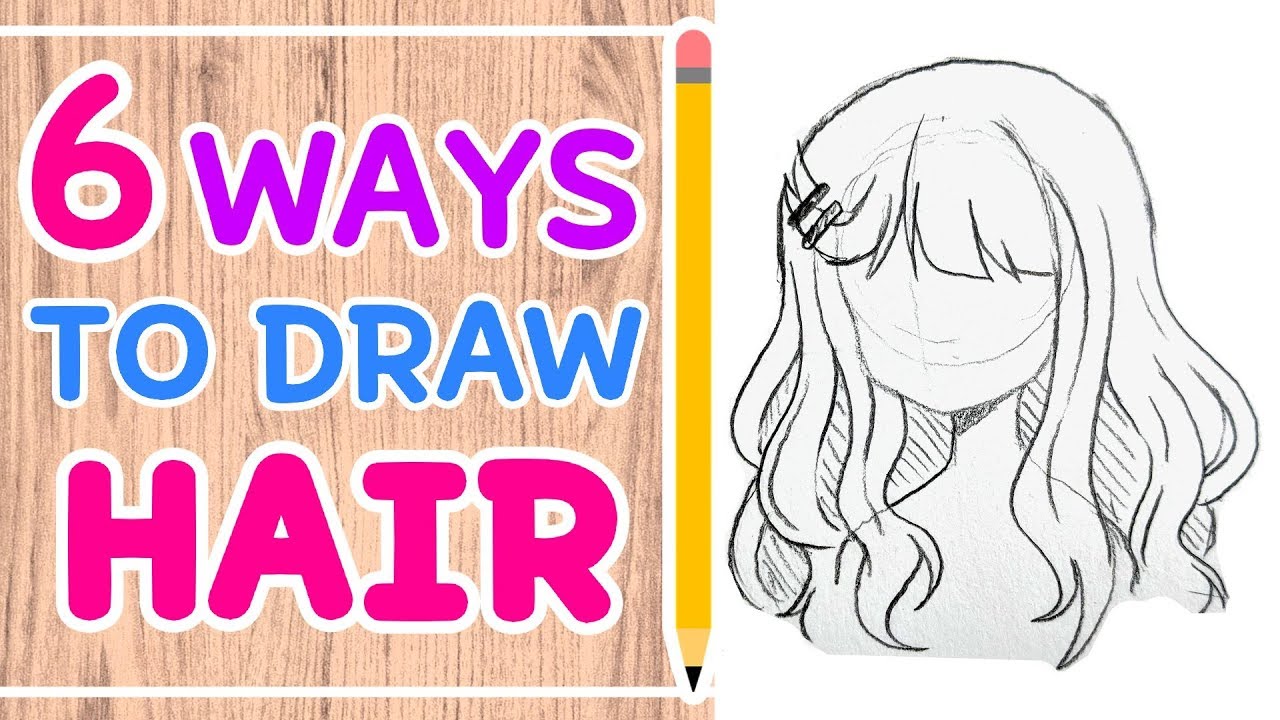
HOW TO DRAW 6 HAIRSTYLES Easy Tutorial! ☆ YouTube
Web learn how to draw gojo satoru from jujutsu kaisen | how to draw anime step by step | easy anime drawing | step by step anime drawing with pencilhow to draw g. Web draw the basic shape of the hair on the head. Now, draw the face’s outline. These lines can vary in length, from long to. Establish your.
How to Draw a Hair? Step by Step for Beginners HARUNMUDAK
Again, draw some volume around the head. Web 2.1) draw straight hair. • the little strands on step 3 follow a very similar direction, but slightly more pronounced, enough to add dynamism to the shape. Hair is affected by gravity and, on the contrary, on the top of the head, the hair on the sides falls down. It is more.

24 How to Draw Hair Ideas and StepbyStep Tutorials Beautiful Dawn
Draw wavy strands on the sides of the face. • the little strands on step 3 follow a very similar direction, but slightly more pronounced, enough to add dynamism to the shape. This will indicate the ear’s position. Draw an outline of the head using a pencil, this will only serve as your guide in drawing the hair. Web get.

22 How to Draw Hair StepbyStep Tutorials Beautiful Dawn Designs in
Draw a small ellipse under the line you drew in the previous step. Draw the bun at the back of the head; Web how to draw wavy hair: Hair is affected by gravity and, on the contrary, on the top of the head, the hair on the sides falls down. Leave a small gap between the hair and the head.

24 How to Draw Hair Ideas and StepbyStep Tutorials Beautiful Dawn
Draw the lower part with more curves. Draw a loose outline of the hair using strokes that flow in the actual direction the hair is pointing. Web how to draw afro hairstyles step 1. Leave a small gap between the hair and the head to give the hair some volume. In this case it will also be the outline of.
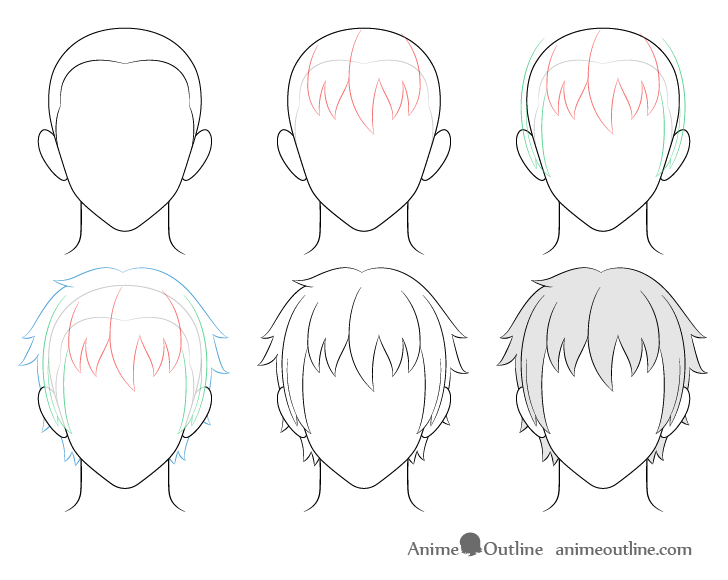
How to Draw Anime Male Hair Step by Step AnimeOutline
• my first step was to draw the outline of the main lock (the one which will be the base of our drawing), following the direction in a s shape. Now, fill in the hair with texture. Try drawing simple long slanted and curved lines of the hairstyle you want. Web draw the basic shape of the hair on the.

24 How to Draw Hair Ideas and StepbyStep Tutorials Beautiful Dawn
(4b) click here to learn how to draw a head/face from the side and where to draw the ear. Web hi friends, in this video you will learn how to draw realistic hair with different hairstyles using oil pastel and pencil color step by step, quick and easy. End the sides of the hair about halfway down the face. Wavy.

Learn How to Draw Hair With Your iPad and Apple Pencil This Weekend
Web 2.1) draw straight hair. Establish your line of action. Imagine a long hair style you want and to which direction the hair strands flow. Construct the shape of the head and position the ear in the correct place. Draw an outline of the head using a pencil, this will only serve as your guide in drawing the hair.
How to Draw Hair Step By Step Guide How to Draw
It is more readily visible from this angle. Draw the lower part with more curves. Try drawing simple long slanted and curved lines of the hairstyle you want. Establish your line of action. Split the circle in half.
This Will Indicate The Ear’s Position.
Draw the lower part with more curves. Web view the full tutorial on how to draw hair from a reference. In this case it will also be the outline of the whole haircut. Hair is affected by gravity and, on the contrary, on the top of the head, the hair on the sides falls down.
We Are Aware That Drawing Hair Is Not An Easy Task, That Is Why We Wanted To Create This Guide That Will Help You Learn To Simplify Its Shape With A Professional Result.
Again, draw some volume around the head. Type 4 hair is generally separated into 4a, 4b, and 4c, but some people may have a combination of more than one type. Then i filled it in to create its silhouette. Using your 2h pencil, draw a small to medium circle.
Leave A Small Gap Between The Hair And The Head To Give The Hair Some Volume.
Make the general outline complete by drawing the hairline next to the ear. Simplify your braid into basic shapes to streamline the process of drawing hair. Doing so will help you better estimate the volume of the hair. Web to be convincingly realistic in a drawing:
Wavy Hair Doesn't Give In To Gravity So Easily!
• the little strands on step 3 follow a very similar direction, but slightly more pronounced, enough to add dynamism to the shape. Now, draw the face’s outline. Draw the parting and the fringe going straight from it. Web my drawing faces tutorial video: