How To Draw Honeycomb Pattern
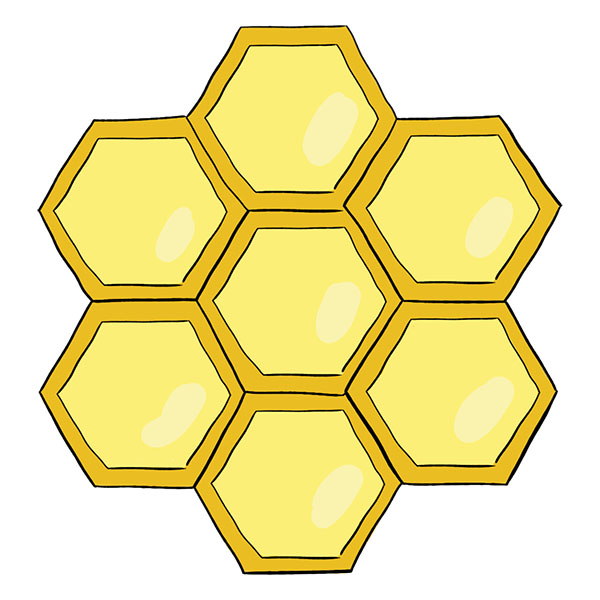
How To Draw Honeycomb Pattern - Simplifies sketching and makes for a more stable pattern. Now you have the hang of the basics of everything we will need for this design. Then, divide the circle into six equal sections by drawing lines that intersect at the center. They are very full and leaking honey together! In order to make your honeycomb print a bit more realistic you'll need some of the holes to be empty and free of honey (or larvae). When the water cools at least 0.9 degree fahrenheit below average for three. Download the fusion 360 design file of this model fro. Web this video will teach you how to design honeycomb patterns in the sketch panel in autodesk fusion 360. Look at the bottom and select the polygon tool. Beginner artists can now draw a great looking honeycomb.would you like to learn how to d.
In order to make your honeycomb print a bit more realistic you'll need some of the holes to be empty and free of honey (or larvae). Then, divide the circle into six equal sections by drawing lines that intersect at the center. Sketch out a few more straight lines to make the same hexagon. This step will help create a more realistic and visually appealing honeycomb structure. In fact, a strict folding of this crease pattern produces a brick wall rectangular tessellation, which. Connect the points to create a hexagon. Make summertime all about relaxation and adventure! The frisco half moon cat litter mat is the best cat litter mat for the money. Connect the points where the lines intersect to form a hexagon. It gets the job done.
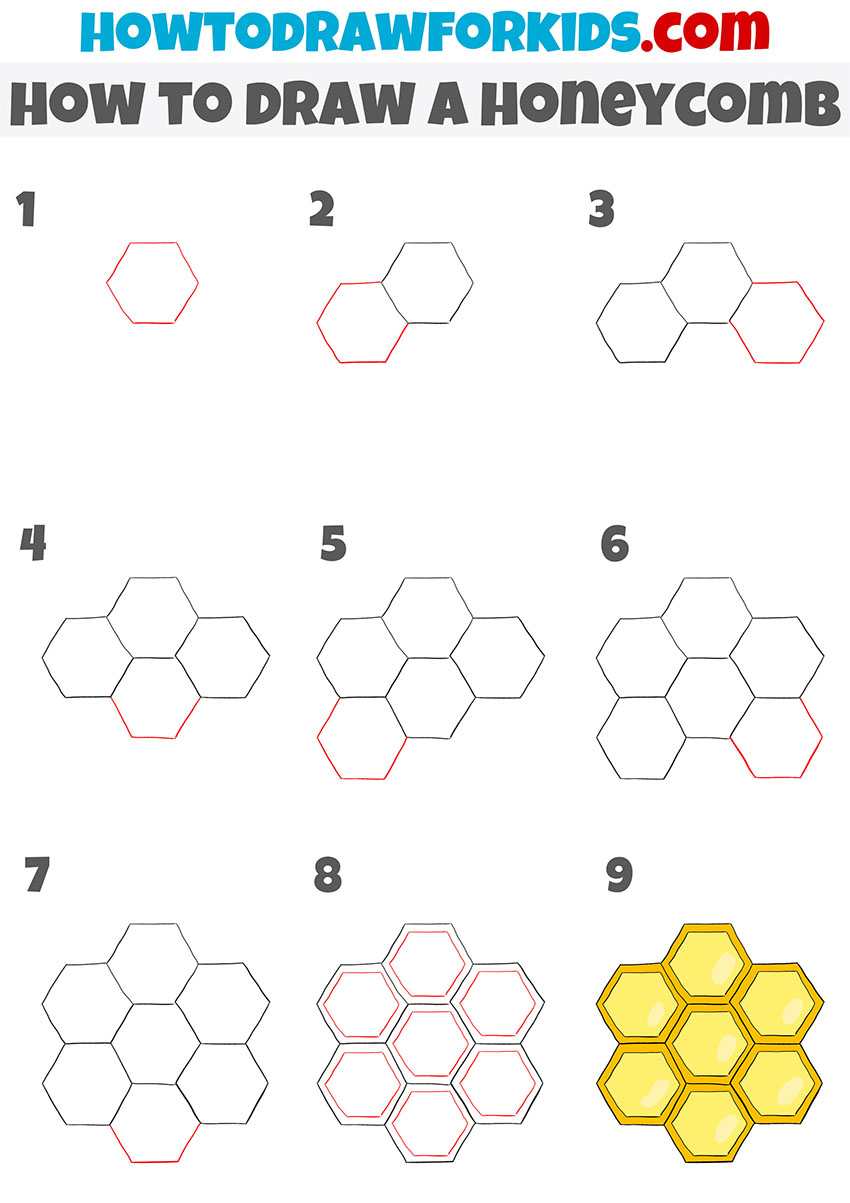
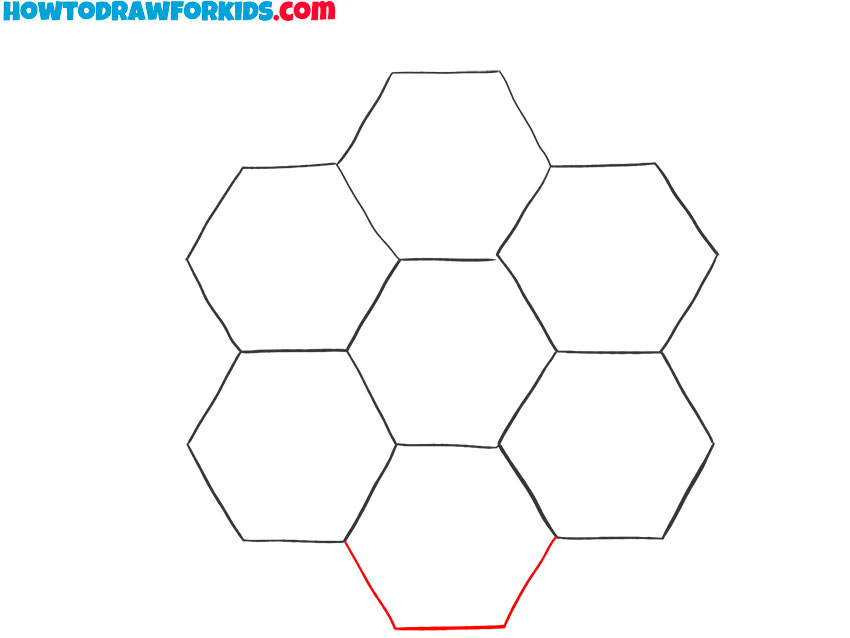
Repeat your action in the previous step and draw the cell on the other side. Remember to use a ruler or straight edge to ensure straight lines. Draw a hexagonal shape on the left side of the first wax cell to give the appearance of the second prismatic wax cell. 24 x 16 x 0.4 inches. To do this, draw a regular hexagon. Then, divide the circle into six equal sections by drawing lines that intersect at the center. Web create a planar shape from the selected epd honeycomb vectors, draw an oval equal in size to the inside of your frame, select the oval and clear the working model outside of the selected vector, make the working model into a component and subtract that component from your frame component. Web learn how to make a seamless honeycomb or hexagon pattern in photoshop. This eva foam mat has. Go into the sketch tab and click on the down arrow under the rectangle tool.

How to Draw a Really Easy Drawing Tutorial
In fact, a strict folding of this crease pattern produces a brick wall rectangular tessellation, which. Web a short workflow on how to create a hexagon (honeycomb) pattern using the new thin extrude and parameters. Simplifies sketching and makes for a more stable pattern. First create a new document. Now you have the hang of the basics of everything we.
How to Draw a Easy Drawing Tutorial For Kids
Drawing a honeycomb may seem intimidating,but it’s actually a fairly easy task! To turn it on go to view and make sure snap is selected. Web flexing honeycomb (origami design) one uncut square, designed in 2007. Go into the sketch tab and click on the down arrow under the rectangle tool. Create the hexagon pattern sketch on the front plane.

How to Draw a Really Easy Drawing Tutorial
First, draw a straight line and then use a compass to create six evenly spaced points along the line. Web flexing honeycomb (origami design) one uncut square, designed in 2007. This step will help create a more realistic and visually appealing honeycomb structure. Web create the ellipse or circle shape on the top plane. In fact, a strict folding of.

How to Draw a Really Easy Drawing Tutorial
Make summertime all about relaxation and adventure! Web adaptations, honey production, and reproduction strategies. Draw a hexagonal shape on the left side of the first wax cell to give the appearance of the second prismatic wax cell. In fact, a strict folding of this crease pattern produces a brick wall rectangular tessellation, which. Create the hexagon pattern sketch on the.

How to Draw Cells YouTube
Sketch out the fourth cell. I'm using adobe photoshop cc. Web learn to draw a honeycomb. This step will help create a more realistic and visually appealing honeycomb structure. Draw a hexagonal shape on a sheet of paper for the first prismatic wax cell.

How to Draw a Really Easy Drawing Tutorial
Web learn how to create the honeycomb pattern (repeating hexagons) in photoshop.in this tutorial you will learn how to:👉 create a hexagon shape in photoshop👉 d. Download the fusion 360 design file of this model fro. I'm using adobe photoshop cc. In fact, a strict folding of this crease pattern produces a brick wall rectangular tessellation, which. Web create the.
How to Draw a Easy Drawing Tutorial For Kids
Once you have the hang of it, we can start adding more. This eva foam mat has. This forms the bee's head, thorax, and abdomen. Repeat your action in the previous step and draw the cell on the other side. Draw another hexagon using the same method.

How to draw a pattern YouTube
First, draw a straight line and then use a compass to create six evenly spaced points along the line. To draw a hexagon, start by drawing a circle. Using an eraser, carefully remove the outer lines of the hexagon, leaving only the interior lines and the honeycomb pattern intact. Draw a circle, an oval, and an inverted teardrop shape. Copy.
How to Draw a Easy Drawing Tutorial For Kids
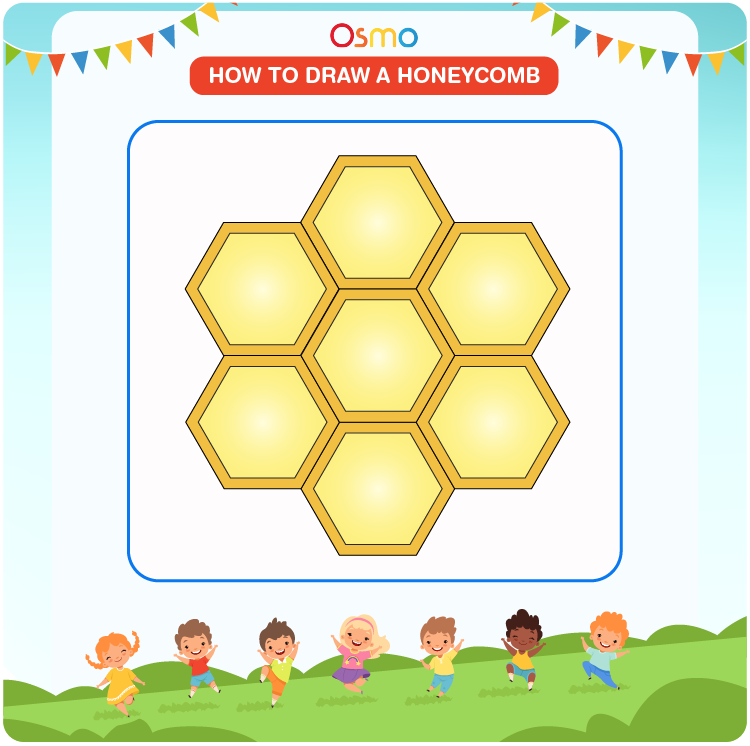
To do this, draw a regular hexagon. Web here's what you need to do to make a honeycomb pattern. Simplifies sketching and makes for a more stable pattern. Web learn to draw a honeycomb. Web this video will teach you how to design honeycomb patterns in the sketch panel in autodesk fusion 360.
How to Draw a A StepbyStep Tutorial for Kids
Web learn how to make a seamless honeycomb or hexagon pattern in photoshop. Web learn to draw a honeycomb. Web flexing honeycomb (origami design) one uncut square, designed in 2007. Web in this webcast, we show how to create a honeycomb by simply using the linear pattern tool in solidworks. Web to draw a honeycomb, you will need to use.
Beginner Artists Can Now Draw A Great Looking Honeycomb.would You Like To Learn How To D.
Using an eraser, carefully remove the outer lines of the hexagon, leaving only the interior lines and the honeycomb pattern intact. Go into the sketch tab and click on the down arrow under the rectangle tool. Once you have the hang of it, we can start adding more. First create a new document.
Web This Video Will Teach You How To Design Honeycomb Patterns In The Sketch Panel In Autodesk Fusion 360.
It gets the job done. Web create the ellipse or circle shape on the top plane. Sketch out a few more straight lines to make the same hexagon. Web to draw a honeycomb, you will need to use a ruler to draw straight lines and a compass to create the hexagons.
Copy And Paste The Original Honeycomb Group And Delete Some Of The Brighter Gradient Shapes.
Web these diagonal lines will give the honeycomb pattern its characteristic shape. This step will help create a more realistic and visually appealing honeycomb structure. Download the fusion 360 design file of this model fro. Then, draw a busy worker bee.
Web A Short Workflow On How To Create A Hexagon (Honeycomb) Pattern Using The New Thin Extrude And Parameters.
Draw another hexagon using the same method. Remember to use a ruler or straight edge to ensure straight lines. Change the middle hexagon shape to the same brown gradient used in section 2, step 4. First, draw a straight line and then use a compass to create six evenly spaced points along the line.