How To Make Cricut Draw Fill In Letters
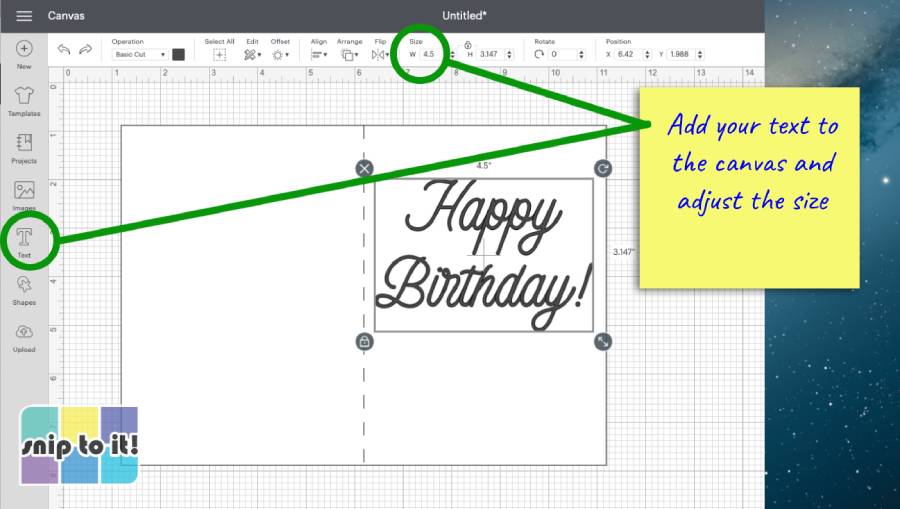
How To Make Cricut Draw Fill In Letters - Click on the line type option. Save a project on ios, then open it on desktop,. Draw projects are being opened as cuts instead of drawings, resulting in a color change. You can somewhat cheaply get set up for this method, most expensive thing is a monochrome laser. Changes made to the latest project are lost upon sharing. You might want to look at toner reactive foil for the look you are going for. Create a rectangle the same size as your envelope and position your text where you want it to be. Web move the letters where you want them to be (hold down the shift key to keep them aligned as you move), then select all the letters and choose “attach” or “weld” in the lower right to keep them all together. Do not try to cut files you make this way, they are for markers only. Web creating fills in design space can be done but you will need to have access to hatch fill that can be imported and sliced out in design space to get your cri.
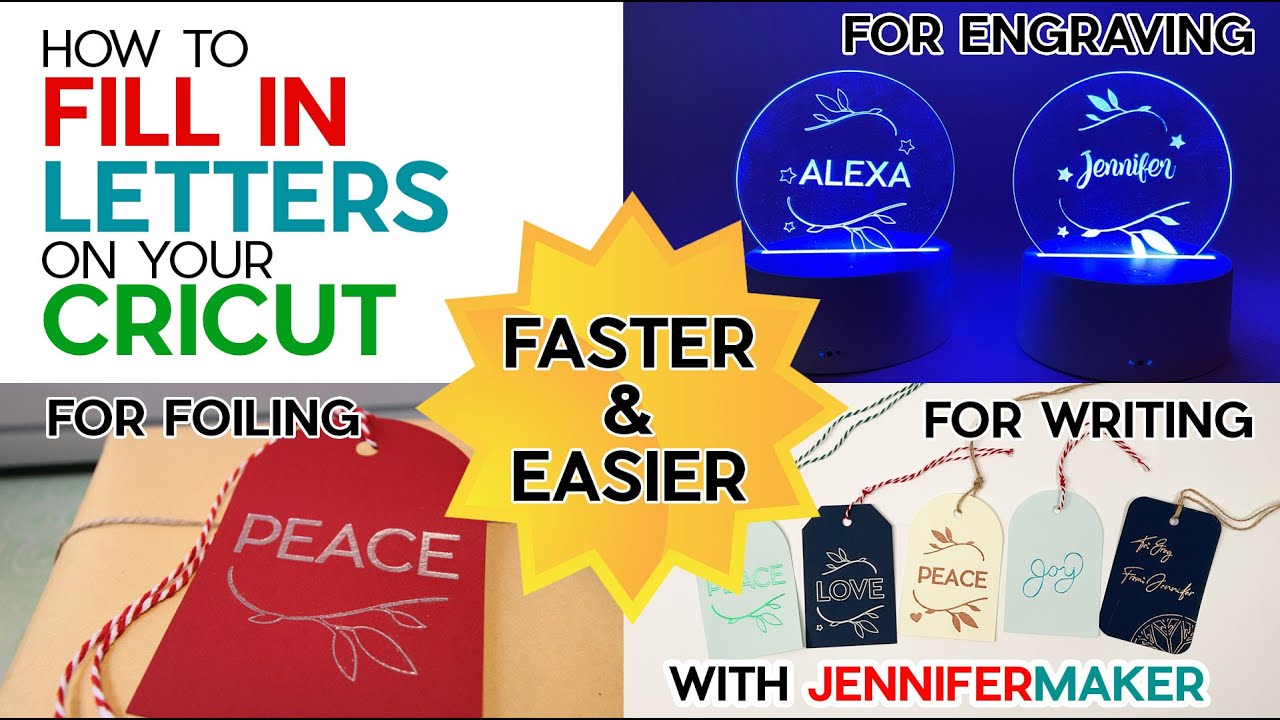
It’s basically going to create a line in design space, fill it with color and repeat the line to create a set of hash marks. Web creating fills in design space can be done but you will need to have access to hatch fill that can be imported and sliced out in design space to get your cri. To begin writing with your cricut, type out the words that you want on your envelope using your desired font. On the prepare screen, the number of copies can be increased if needed. Changes made to the latest project are lost upon sharing. Web method for engraving. I saved mine in my illustrator folder. Web how to get a solid look when engraving, foiling or drawing, by adding line fill (also called hatch fill) to your designs using the slice method in cricut des. Web 🢃 tap for info & links 🢃i am so excited to finally be able to share this with you! The font i used was mikelis light from dafont.com.
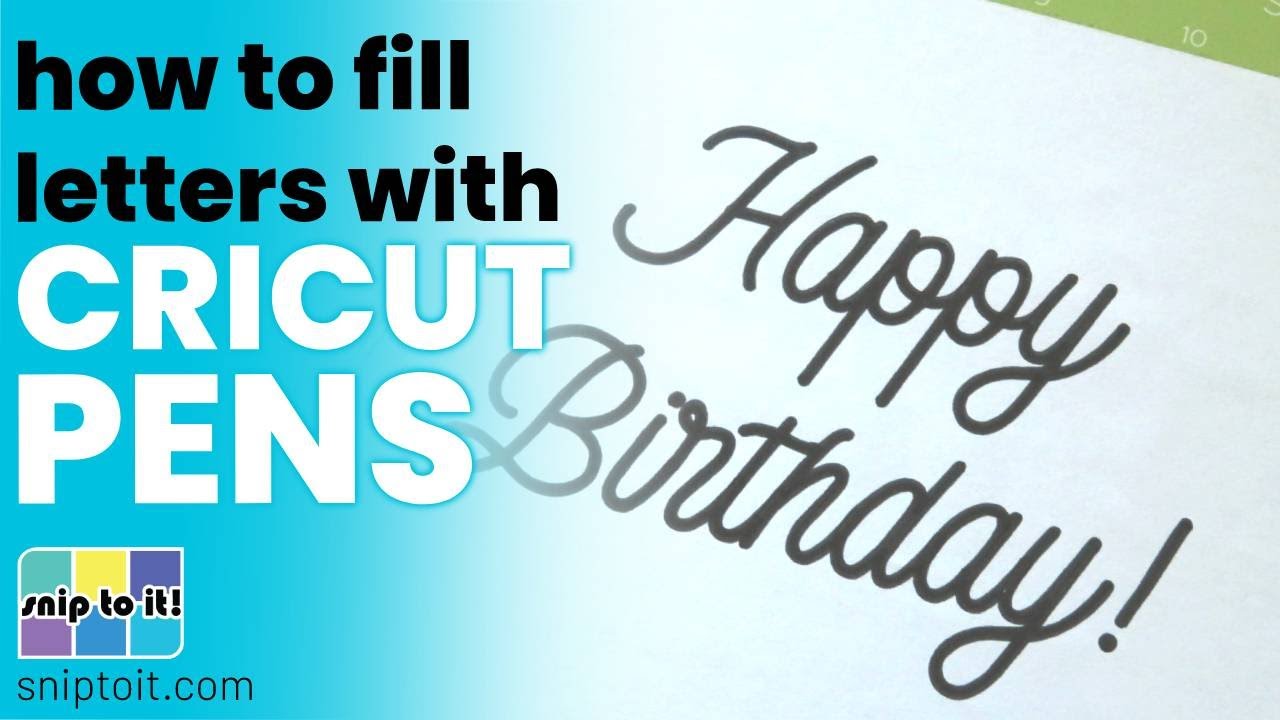
Web last 6 weeks: Click on the line type option. Web in this tutorial you will learn how to do the hatch fill method in cricut design space, so you will be able to make solid letters with your cricut pens and m. This takes a very long time to finish marking on the cricut so take that into account when using this technique. Now that design space knows where to write the text, the tag is ready to cut. Web you can see this being done in the video if you like. The font i used was mikelis light from dafont.com. You can change your pen color by selecting the square in the toolbar by the linetype box. You can somewhat cheaply get set up for this method, most expensive thing is a monochrome laser. For me it was too slow and cumbersome.

Cricut Pattern Fill and How to Upload Patterns to Cricut Design Space
Web creating fills in design space can be done but you will need to have access to hatch fill that can be imported and sliced out in design space to get your cri. This method requires patience but you’ll love the results. Select your text and click offset. The branch also looks good just outlined with the bold foil tip..
How to Fill in Fonts on Cricut Makers Gonna Learn
Web first, i’m going to open the cricut app and start a new project. I saved mine in my illustrator folder. When you are happy with your design, select all the layers of your design and click ‘attach’ to make sure they all draw together. Changes made to the latest project are lost upon sharing. Do not try to cut.

How to Fill Text and Shapes in Cricut Design Space No More Outlines
Since they have been attached, the image and text are on the same mat. Web in this tutorial you will learn how to do the hatch fill method in cricut design space, so you will be able to make solid letters with your cricut pens and m. Click on the line type option. Web you can see this being done.
How to fill in writing on Cricut Stop writing bubble letters Solid
I tried the technique in one of the videos, using a grid of lines and slicing my image from the grid. Heat up your easypress to 385º. On the prepare screen, the number of copies can be increased if needed. Load your cardstock onto the mat and load the mat into the machine. To increase the number of copies, click.
How to fill in Fonts with a Cricut pen YouTube
Then hold shift and select the layers you want to fill with foil, so the letters and branch. You can change your pen color by selecting the square in the toolbar by the linetype box. Press to preheat the towel section where you will be transferring your recipe for 15 seconds. Heat up your easypress to 385º. When you change.

How to Make Cricut Fill in Letters For You! Cricut, Cricut tutorials
Select your text and click offset. It’s basically going to create a line in design space, fill it with color and repeat the line to create a set of hash marks. Click on the line type option. In last week’s tutorial, i saved my design on my ipad as an svg file. Web first, i’m going to open the cricut.
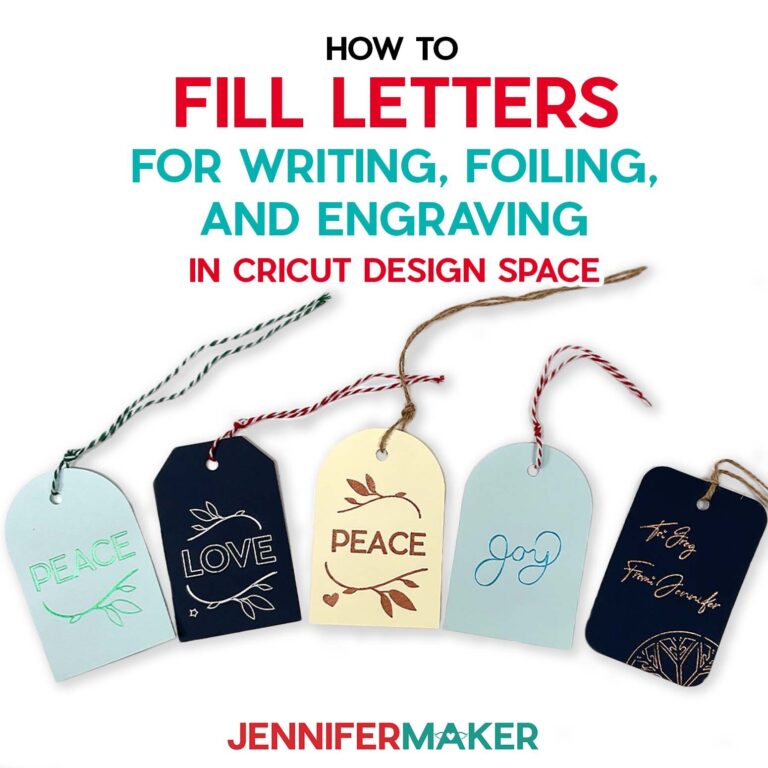
How to Fill in Letters on a Cricut for Writing, Foiling, & Engraving
For me it was too slow and cumbersome. Now that the image and text are attached, click make it. Web that's how the foil lines will fill the space. Set your operation to draw. Web creating fills in design space can be done but you will need to have access to hatch fill that can be imported and sliced out.

How to make Cricut fill in letters (Updated Cricut Foil Tested) Snip
You might want to look at toner reactive foil for the look you are going for. It’s basically going to create a line in design space, fill it with color and repeat the line to create a set of hash marks. Since they have been attached, the image and text are on the same mat. Load your cardstock onto the.
How to make Cricut fill in letters (Updated Cricut Foil Tested) Snip
Now that design space knows where to write the text, the tag is ready to cut. Web you can see this being done in the video if you like. This method requires patience but you’ll love the results. When you are happy with your design, select all the layers of your design and click ‘attach’ to make sure they all.
How to Make Cricut Fill in Letters For You! Jennifer Maker
Web 🢃 tap for info & links 🢃i am so excited to finally be able to share this with you! The font i used was mikelis light from dafont.com. To increase the number of copies, click the up arrow until you get to the desired number, and click “apply.”. Heat up your easypress to 385º. When you are happy with.
Web Using The Offset Tool To Create A Filled In Font Appearance.
Create a rectangle the same size as your envelope and position your text where you want it to be. Every time the pen touched down. You might want to look at toner reactive foil for the look you are going for. Heat up your easypress to 385º.
Web Unfortunately The Cricut Software Has No Built In Way To Apply Stroke Fills.
Push the pen in until the arrow on the side of the pen disappears. When you are happy with your design, select all the layers of your design and click ‘attach’ to make sure they all draw together. Changes made to the latest project are lost upon sharing. Web method for engraving.
With The Tag And Text Selected, Click “ Attach.”.
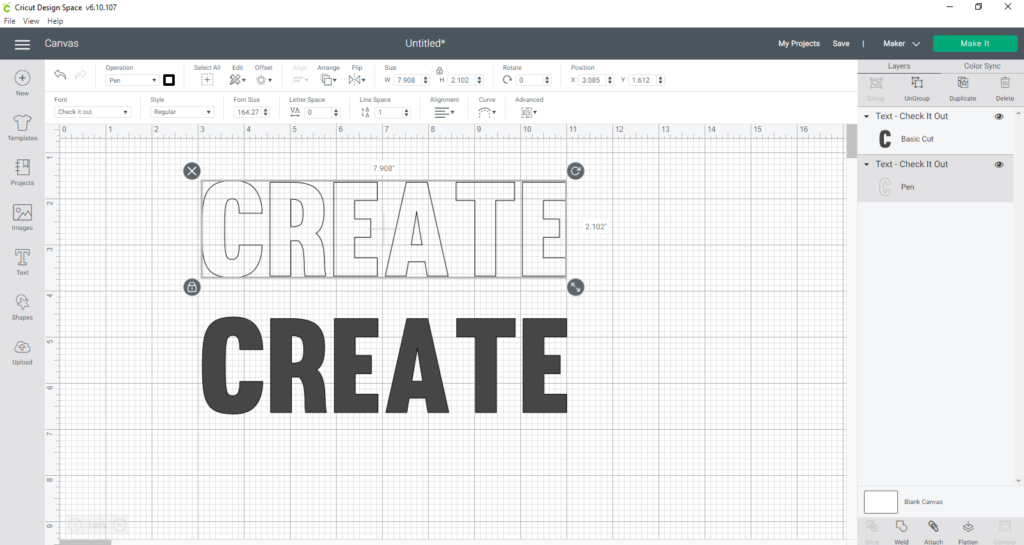
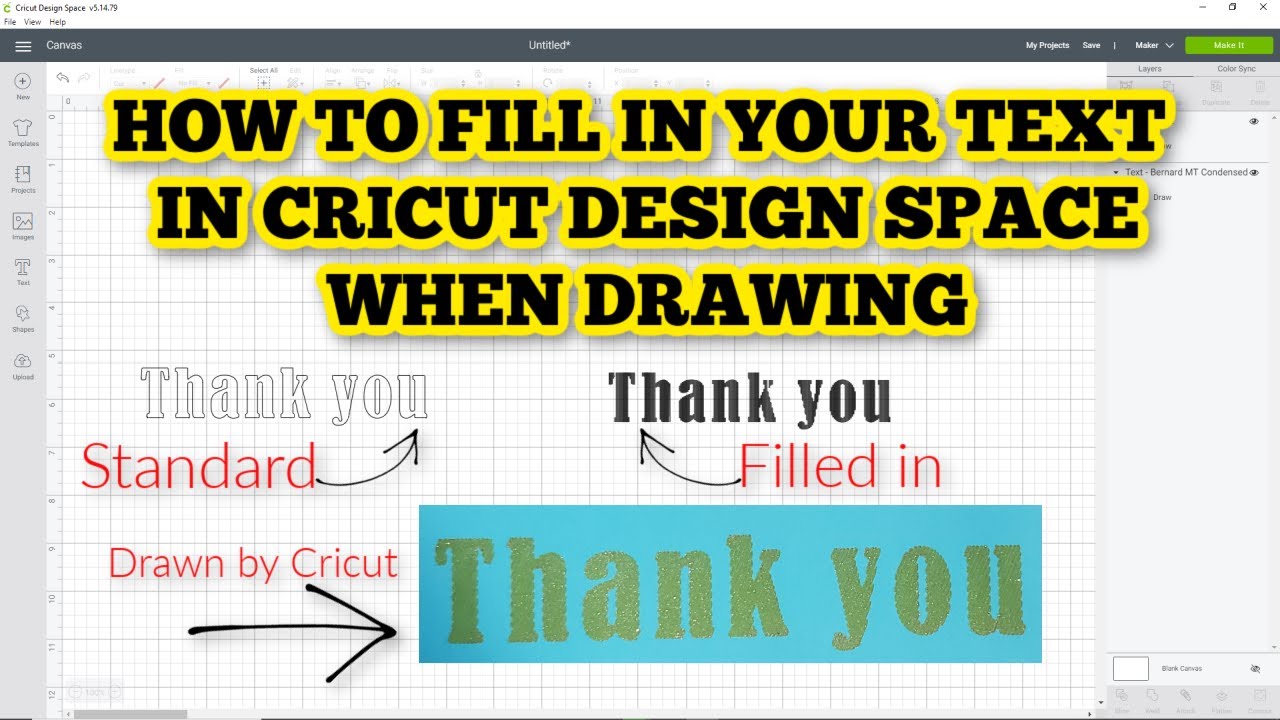
When you change the operation mode to pen, you see the text as an outline. This takes a very long time to finish marking on the cricut so take that into account when using this technique. Web first, i’m going to open the cricut app and start a new project. Do not try to cut files you make this way, they are for markers only.
To Increase The Number Of Copies, Click The Up Arrow Until You Get To The Desired Number, And Click “Apply.”.
This method requires patience but you’ll love the results. Web last 6 weeks: Then, down at the bottom of the screen, i’m going to select upload and browse files. Now that the image and text are attached, click make it.