How To Make Drawer Dividers
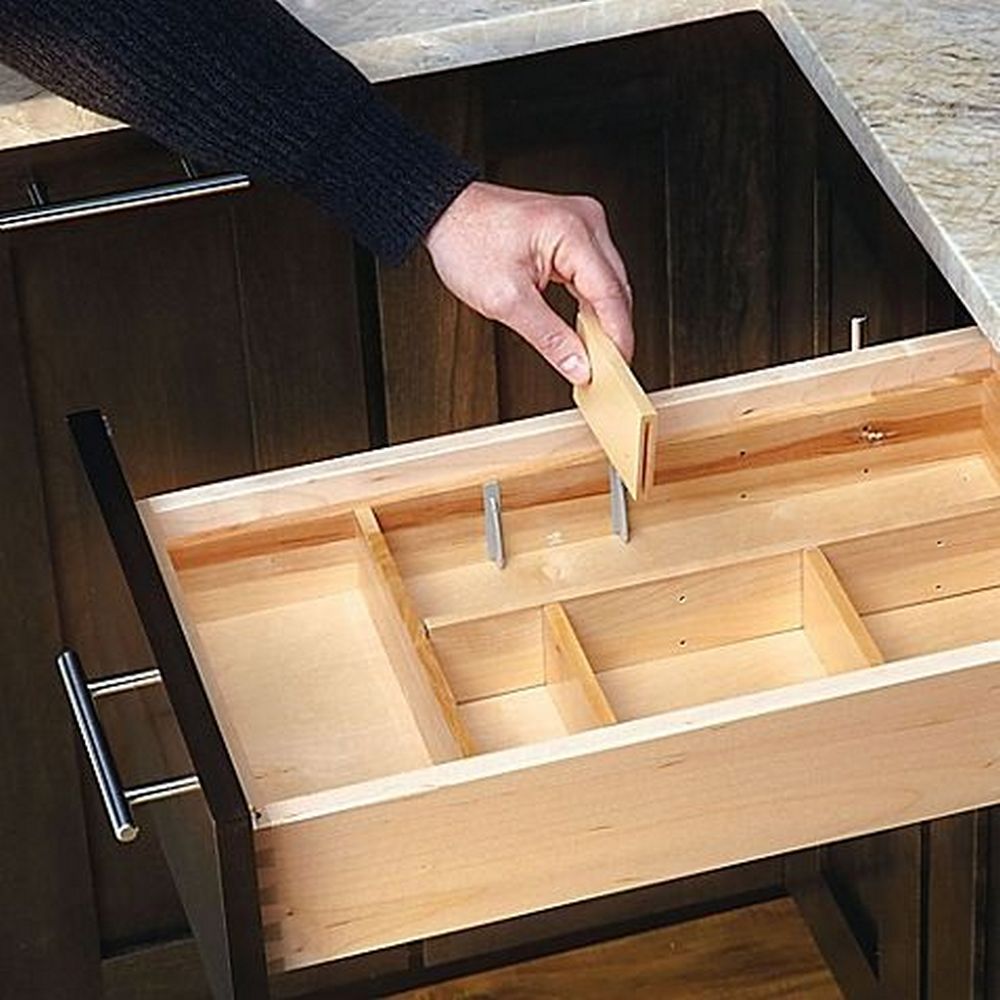
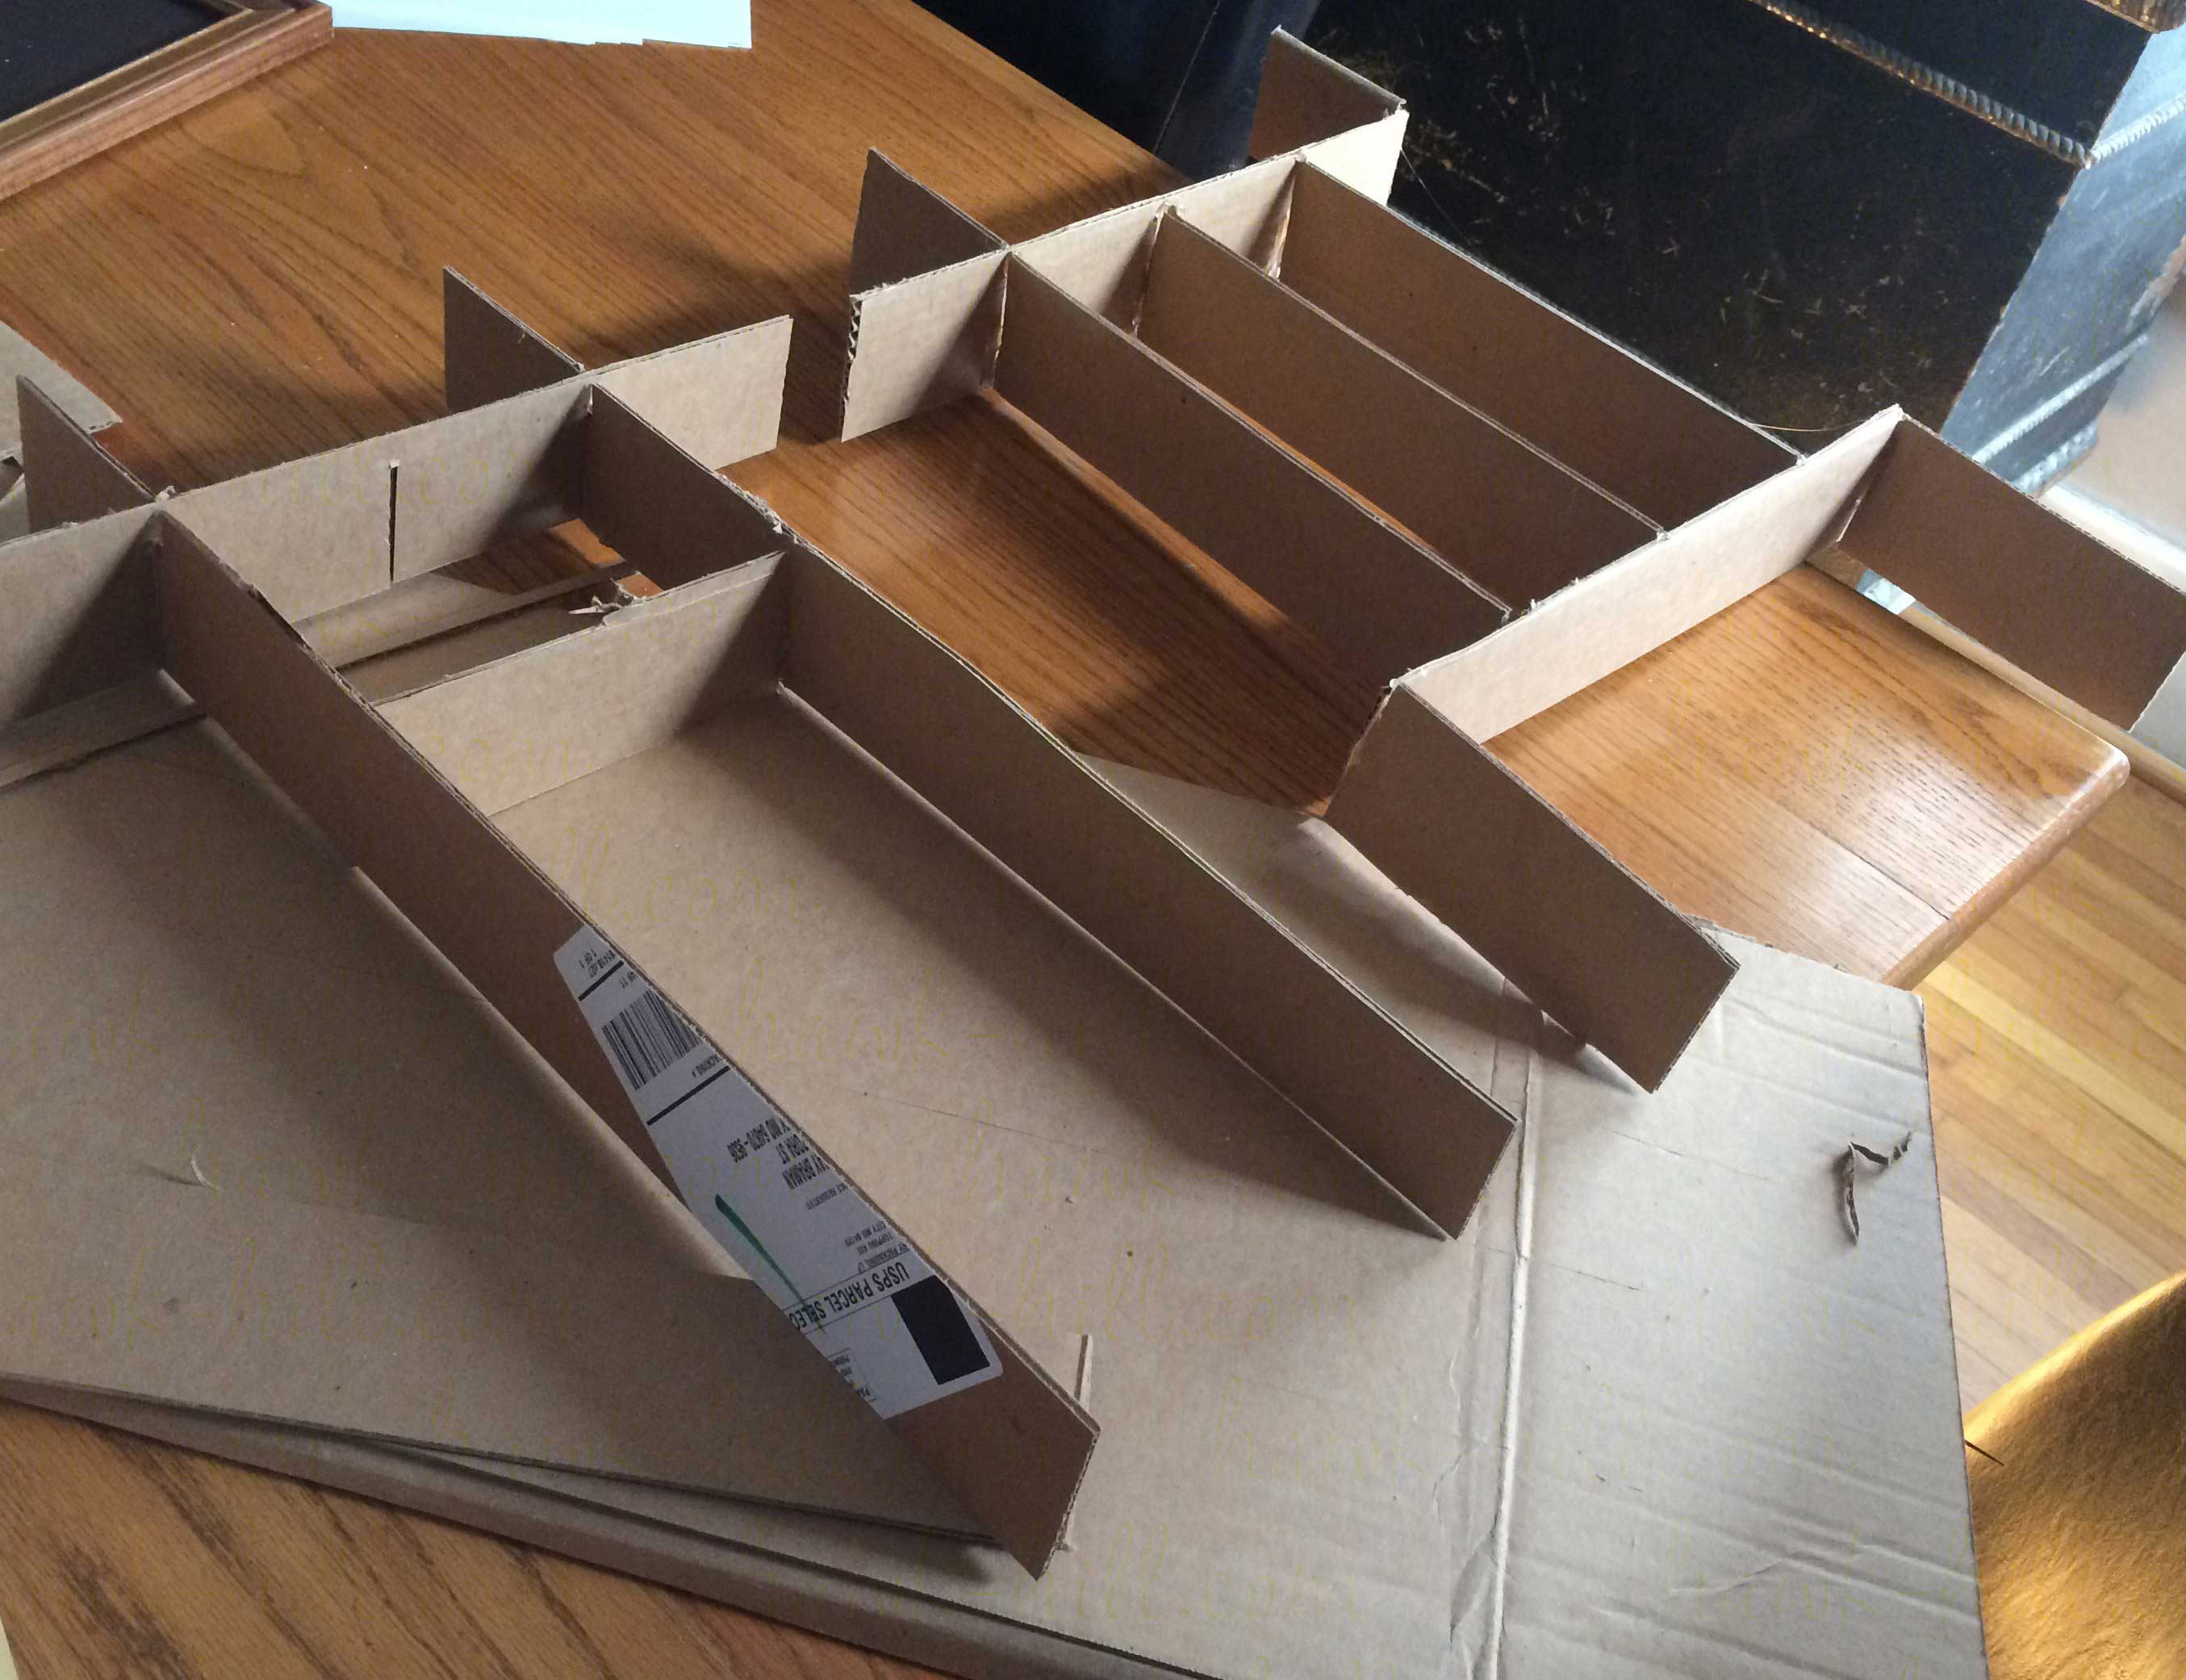
How To Make Drawer Dividers - Each drawer divider has two layers — a score line layer and a solid cut layer. Measure the height and width dimensions of your drawer along where you want your cardboard dividers to fit. Piles of coats and shoes in the mudroom. Determine the layout of your diy cardboard drawer dividers that will organize its contents most efficiently. Use the wood clips on the corners and ends to create your desired configuration. Web the formula to draw your drawer divider pattern: Cut the excess sides along each side of the overlaps. Web apply wood glue to the edge of a compartment piece and attach it perpendicularly to an end piece. Attach the other end piece to finish the divider. You need all three measurements to get a good fit.
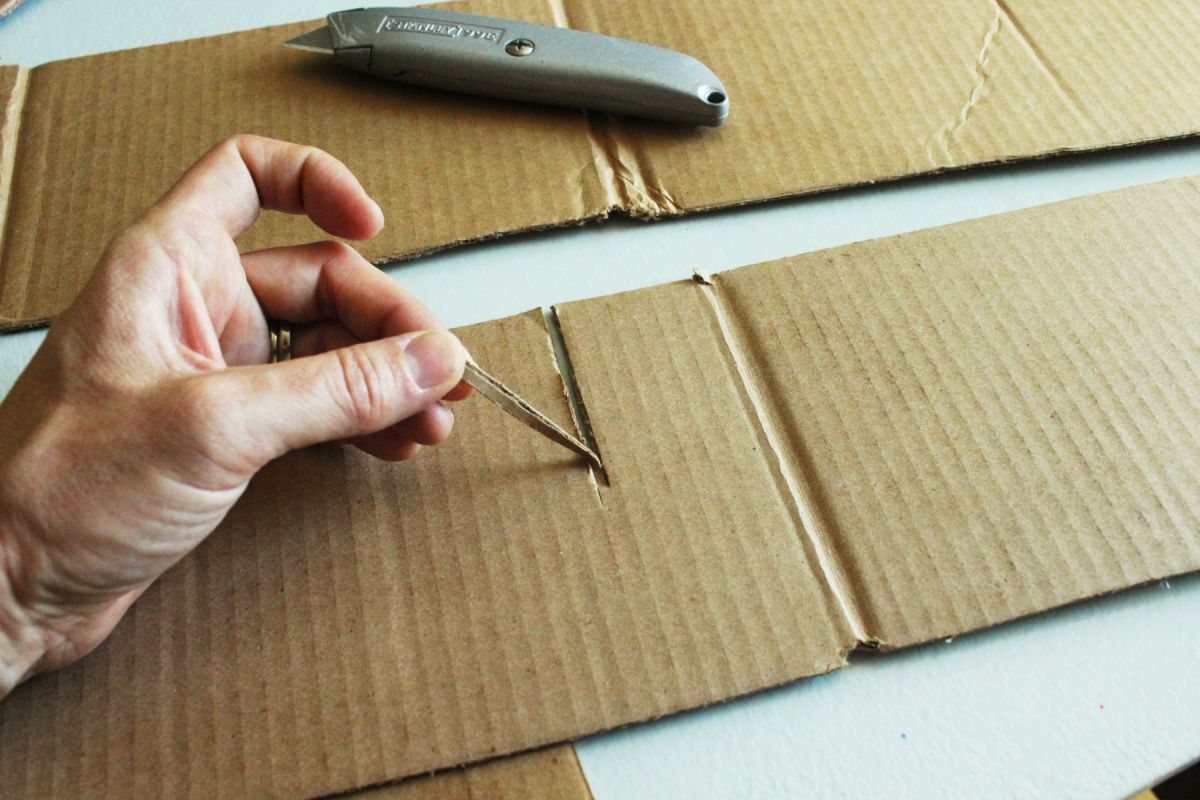
Wrap the cardboard dividers like presents with pretty wrapping paper or contact paper. Fit the wood in place to check that it fits correctly. This became the plan for the diagonal drawer dividers: Web ornafort stackable organizer bins. Before installing the strips, i cleaned the drawer bottom with a moist rag to make sure that the hot glue would stick. Web cut the mdf to the appropriate width for your custom drawer divider layout. Check size in the drawer before you cover your divider and make any necessary adjustments. Trim any excess neatly with a utility knife. Clean the inside of your drawer with rubbing alcohol and allow to air dry briefly to ensure good adhesion. I tried scissors, but it bent the material and created permanent creases.
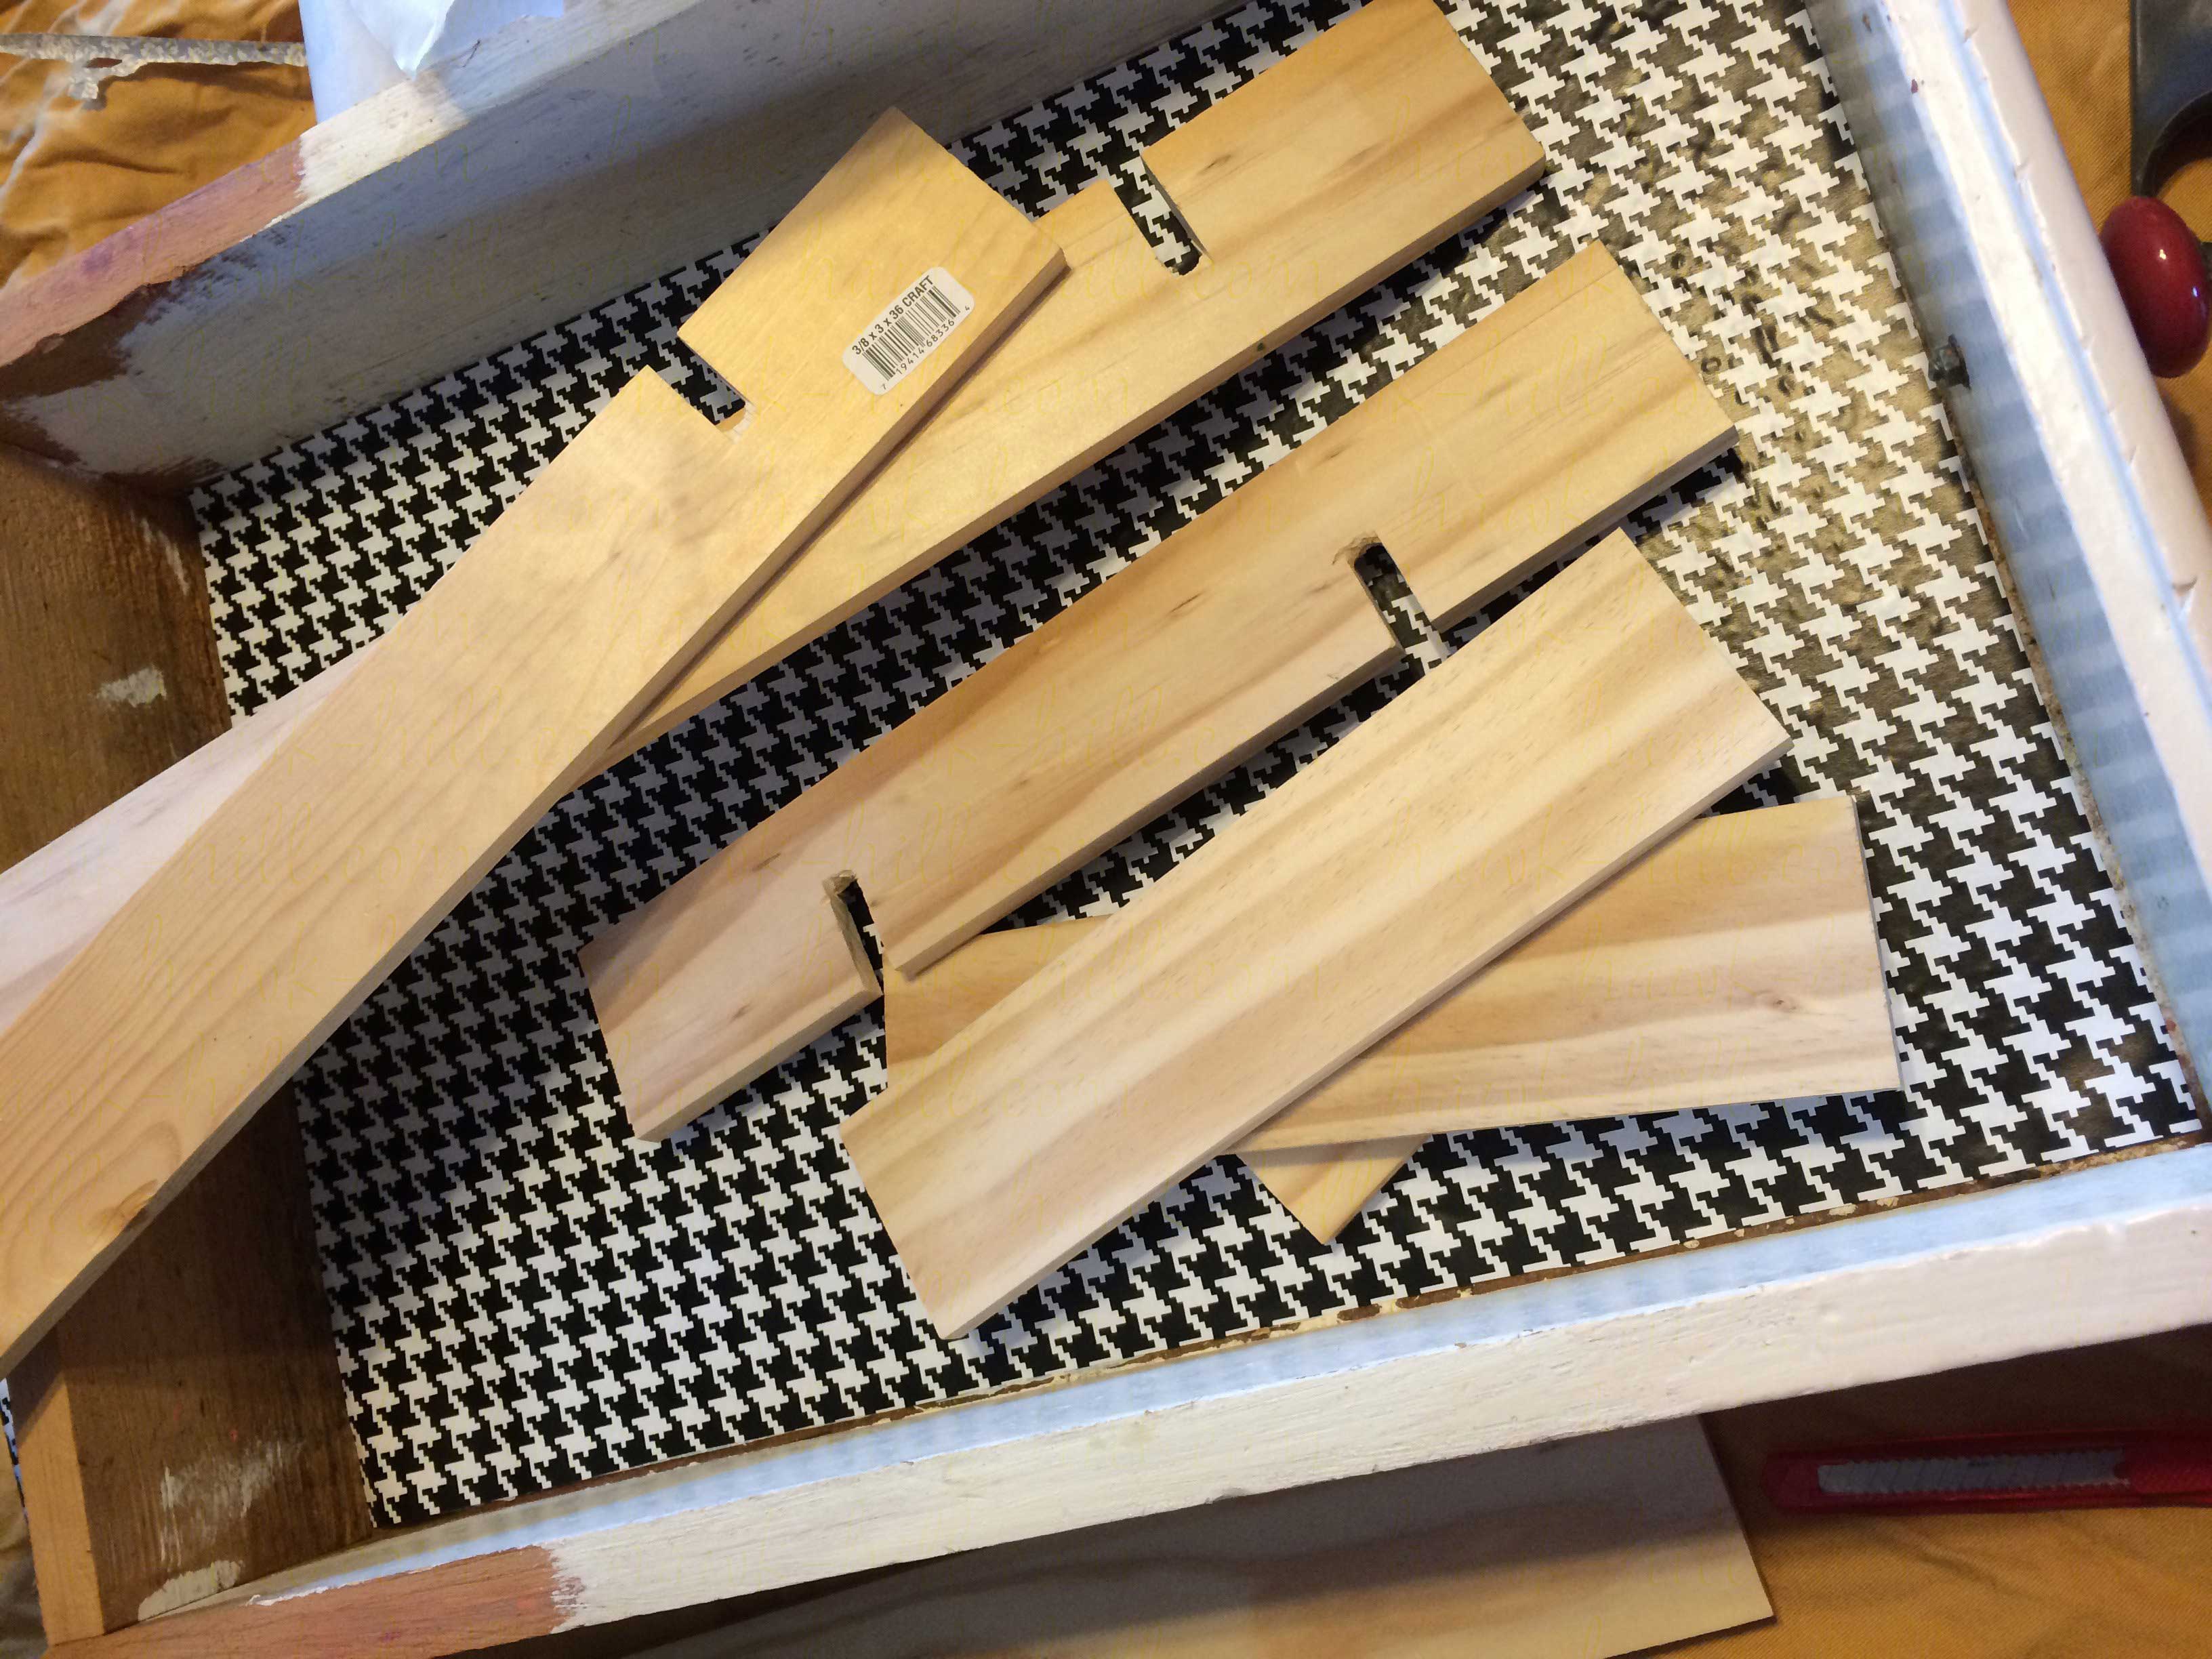
It should form the divider pattern that you want for your drawer. Cross the boards so that the slots meet and push them together. Make sure you fold really good creases in the cardboard so you can find your creases again when it’s covered in fabric. It’s made from alloy steel and is. Sand off the rough edges and then paint the dividers if you want them to match the drawer color. Fit the dividers in the drawer to make sure it fits properly. Use a utility knife and a straight edge to cut out the divider. Hold the pieces together using clamps, and let the glue dry overnight. Secure the wood pieces together with wood glue. Before installing the strips, i cleaned the drawer bottom with a moist rag to make sure that the hot glue would stick.

Tutorial DIY Drawer Dividers Kitchen Edition Hawk Hill
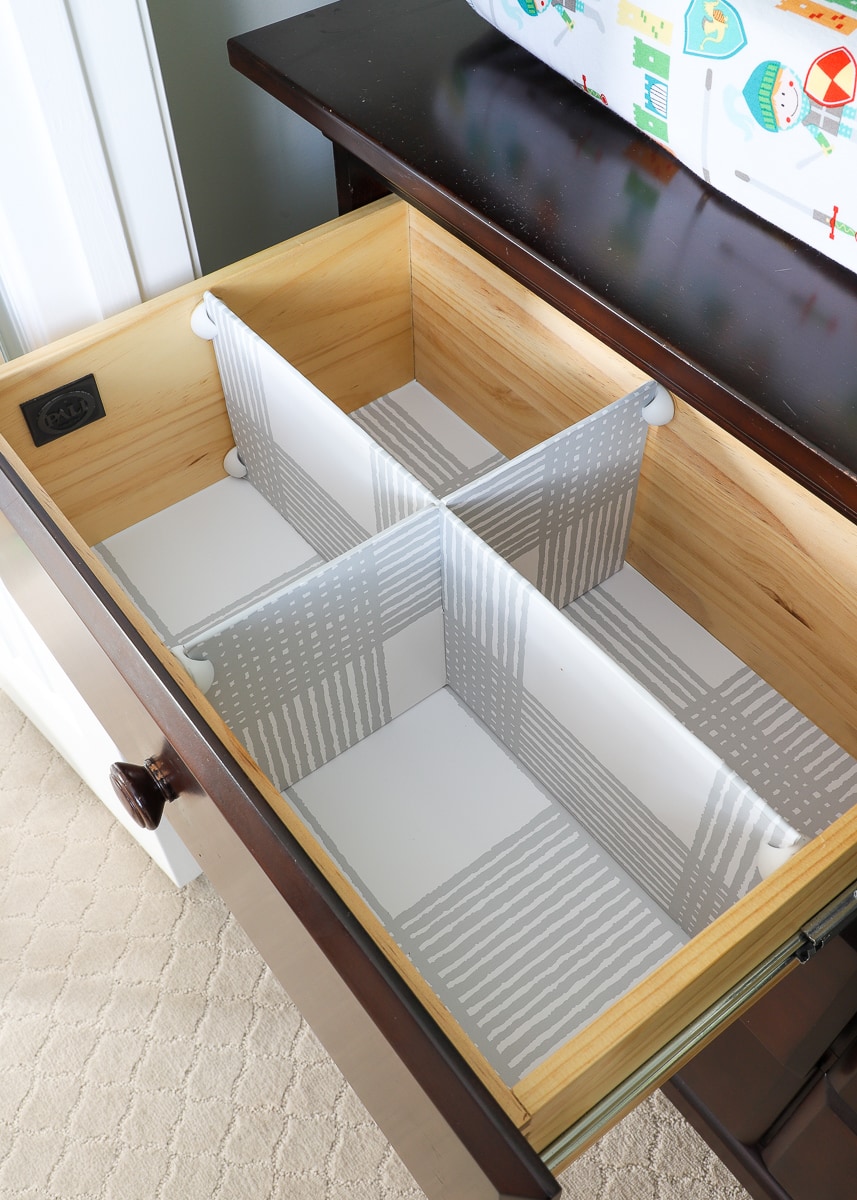
From deli meats to fruits and vegetables, these bins keep your food fresh and accessible. Drawer dividers are a common small kitchen storage idea that every home organizer relies on, but how you use them is just as important as where. These diy drawer dividers have score lines which you need to set and attach to the base layer. Repeat.
Super Easy Custom Wood DIY Drawer Dividers
If you don’t want the overlap then it’s: Fit the wood in place to check that it fits correctly. Clean the inside of your drawer with rubbing alcohol and allow to air dry briefly to ensure good adhesion. In this workshop drawer organization video i’m making simple drawer dividers with an upper level sliding tray for extra storage. I always.

Easy DIY wood Drawer Dividers
Drawer dividers are a common small kitchen storage idea that every home organizer relies on, but how you use them is just as important as where. This became the plan for the diagonal drawer dividers: Web thin pine craft boards from the lumber yard worked perfectly to make these durable drawer dividers! Pop in more storage systems. Installing the divider.
DIY Drawer Dividers in 15 Minutes or Less
Repeat this process on the opposite drawer side. This became the plan for the diagonal drawer dividers: Adding drawer liners is guaranteed to make you smile every time you open the drawers. Secure the wood pieces together with wood glue. Measure across your drawer and secure the first cord clip in place, ensuring that the groove is straight up and.
DIY Adjustable Drawer Dividers DIY projects for everyone!
Clean the inside of your drawer with rubbing alcohol and allow to air dry briefly to ensure good adhesion. Web draw a quick diagram of the layout, or use some washi tape to mark the layout. Making it even more removable. Create the layout of the cardboard inserts for drawer dividing. It should form the divider pattern that you want.
Tutorial DIY Drawer Dividers Kitchen Edition · Hawk Hill
Before installing the strips, i cleaned the drawer bottom with a moist rag to make sure that the hot glue would stick. I tried scissors, but it bent the material and created permanent creases. Web take out the card stock and use a ruler to draw a final outline, taking 2 mm off each side of the rough outline. First.

DIY Custom Drawer Dividers in Under 15 Minutes Simplify Create Inspire
Note the measurements in your phone or write them down. Web the formula to draw your drawer divider pattern: Pop in more storage systems. (see one of our vertical drawer dividers in action in this quick video below!) maximize every inch of your drawer interiors, get them organized for exactly what you have inside them, and immediately enjoy the efficiency.
Tutorial DIY Drawer Dividers Kitchen Edition Hawk Hill
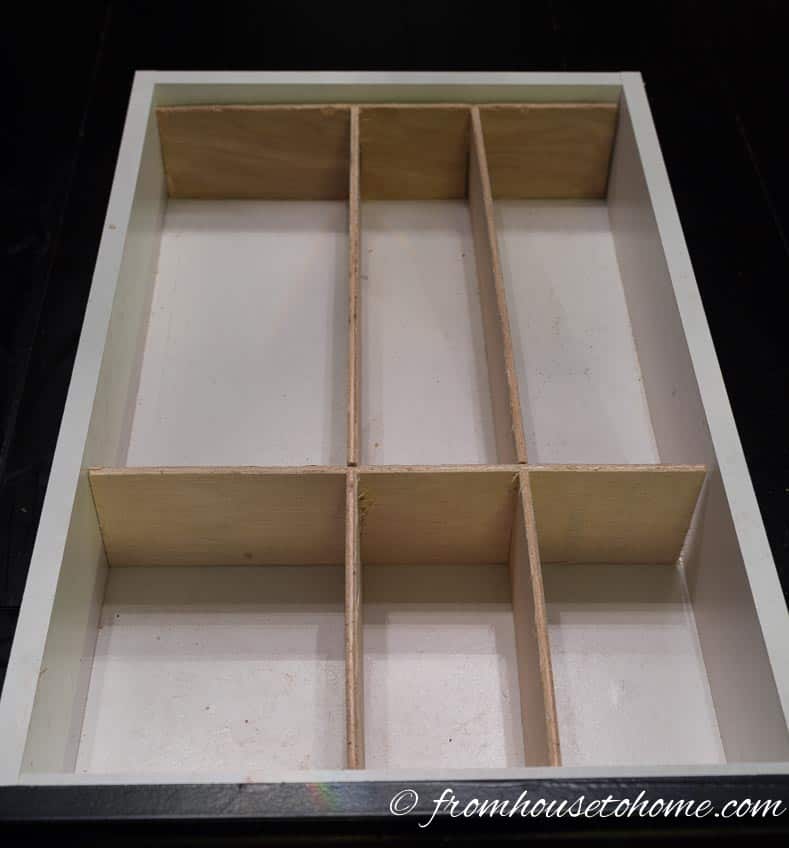
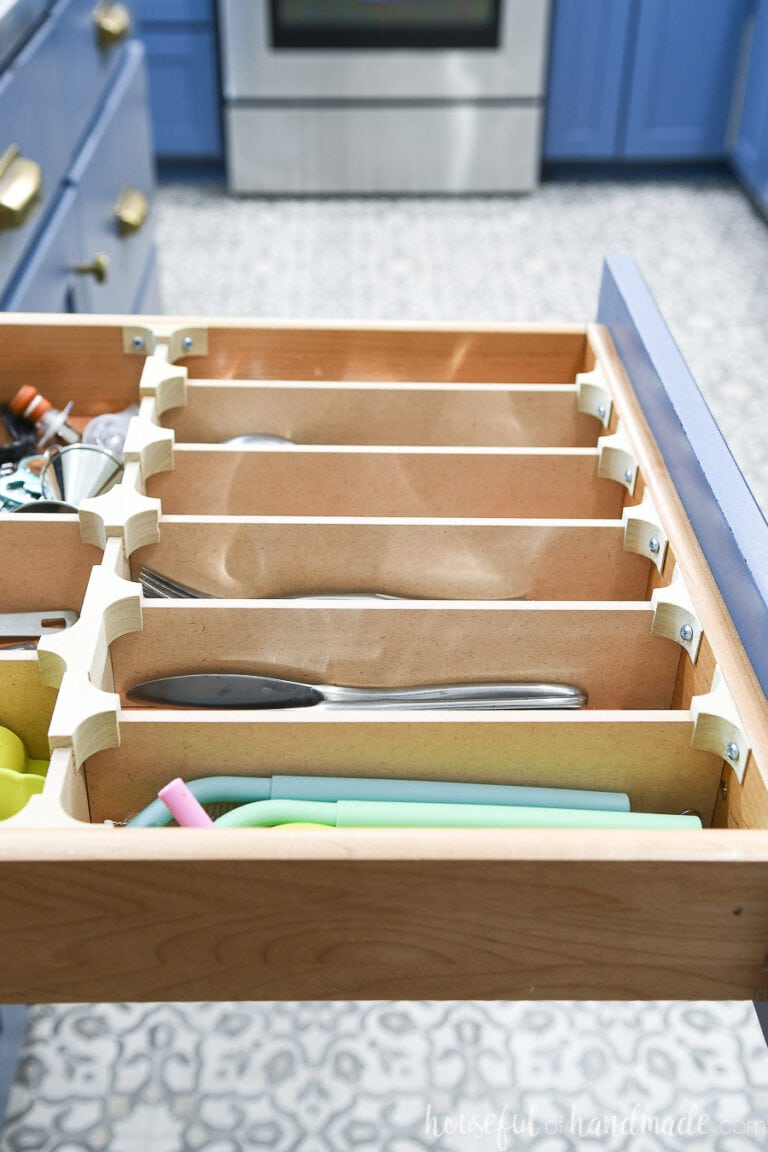
Web cut the mdf to the appropriate width for your custom drawer divider layout. Use the wood clips on the corners and ends to create your desired configuration. Repeat with the other pieces to form compartments. Finally, so that your dividers fit together, you need to cut out where the two boards will intersect. Making it even more removable.
Easy DIY Drawer Dividers For Any Size Drawer The Homes I Have Made
Use the craft knife to cut a 1/4″ wide slit halfway down the exact middle of one board and halfway up the exact middle of the other (as shown below). Create the layout of the cardboard inserts for drawer dividing. You need to locate the score line layer and change it from “cut” to “score” in the operation menu, then.
DIY Drawer Dividers for Perfectly Organized Drawers Houseful of Handmade
Note the measurements in your phone or write them down. To make sure i cut my boards right the first try and didn’t waste this expensive. Web place the drawer gently on the floor, then get your tape measure and your phone (or a notepad and something to write with). These diy drawer dividers have score lines which you need.
Create The Layout Of The Cardboard Inserts For Drawer Dividing.
Cut the excess sides along each side of the overlaps. Pop in more storage systems. Measure all inner dimensions of the drawer: Web cut the divider to fit.
You Can Get Binning Strips At Rockler Or On Amazon.
The mudroom is often a hot spot for clutter. (see one of our vertical drawer dividers in action in this quick video below!) maximize every inch of your drawer interiors, get them organized for exactly what you have inside them, and immediately enjoy the efficiency (a.k.a. This storage drawer system from weather guard is suitable for pickup trucks and cargo vans. Fit the wood in place to check that it fits correctly.
Mark Out The Lines And Size Of Your Dividers On Your Cardboard Or Box Then Take Care To Cut Them To Size.
Piles of coats and shoes in the mudroom. Outline the sides of the divider according to your preferred divider height. Adding drawer liners is guaranteed to make you smile every time you open the drawers. Measure the height and width dimensions of your drawer along where you want your cardboard dividers to fit.
Web Once You Remove The Protective Backing, Put One Strip At The Bottom And Press It Firmly Into Place.
If you want to make them removable, do not attach them to the sides of the drawers. Use the wood clips on the corners and ends to create your desired configuration. Installing the divider strips into the front drawer compartment. Secure the wood pieces together with wood glue.