How To Remove Lg Freezer Drawer
How To Remove Lg Freezer Drawer - Find helpful videos about your lg product. Compressor motor and thermal overload device. Lg bottom freezer refrigerator user manual. Web look no further! You may need to remove it to replace the drawer seal as well. Crisper drawers feature a different humidity level from the rest of the refrigerator designed to prolong freshness of produce, optimizing the freshness in fruits and vegetables. Pull the drawer open to full extension. For next steps, check out these useful links: Remove the screws on both rails. Check for any loose items in the freezer that could be blocking the drawer from opening or removing.
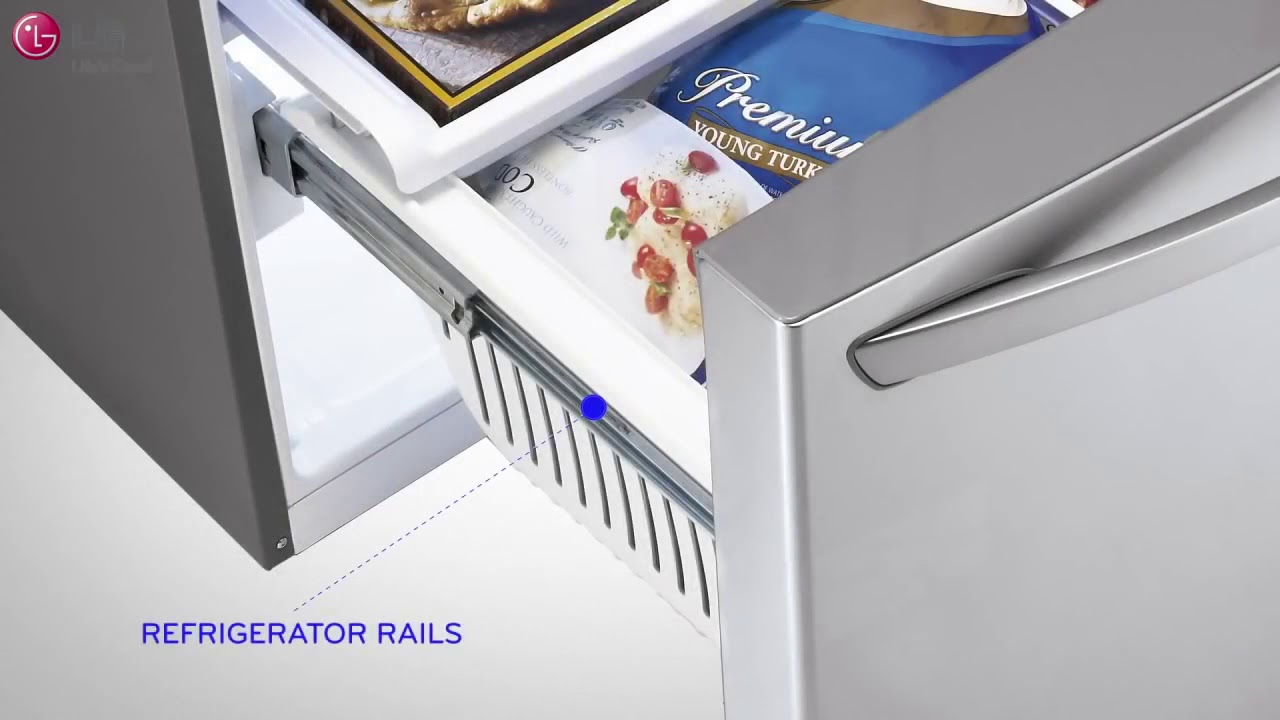
Pull the refrigerator away from the wall and locate the drawer handles. After reading this, “there are two white plastic tabs with access windows on either side of the drawer”, Check for any loose items in the freezer that could be blocking the drawer from opening or removing. Make sure the drawer is fully closed and latched before attempting to remove it. Web step 1 unplug your refrigerator. Also see for bottom freezer refrigerator: Apply a small amount of lubricant to the drawer tracks to help it move more easily. If you are testing or repairing the following items, you may also need to shut off and disconnect the water supply: Tray won't move easily, drawer won't move easily. (if the door is not fully open, the shelves will get caught in the door and cannot be assembled.) 2.
Web fully extend the drawer, lift the lid and with both hands on each end, lift up and out. Take the basket out from the rails. Remove the screws on both rails. Lift up on both sides of the freezer drawer handle to separate the drawer railings from the rail assemblies. The most common reason for replacing the handle is when it. After inserting the back of the shelf hook into the groove, lower the front of the shelf so that it hangs securely in the groove. This lg/kenmore made refrigerator freezer drawer rail assembly replaces the following older part. Web lift the front up and lift the entire basket up and out of the drawer. For models with shelf hooks at the front left and front right of the shelf, hang the shelf hooks. Compressor motor and thermal overload device.
how to remove freezer drawer lg ripvanwinklebrewery
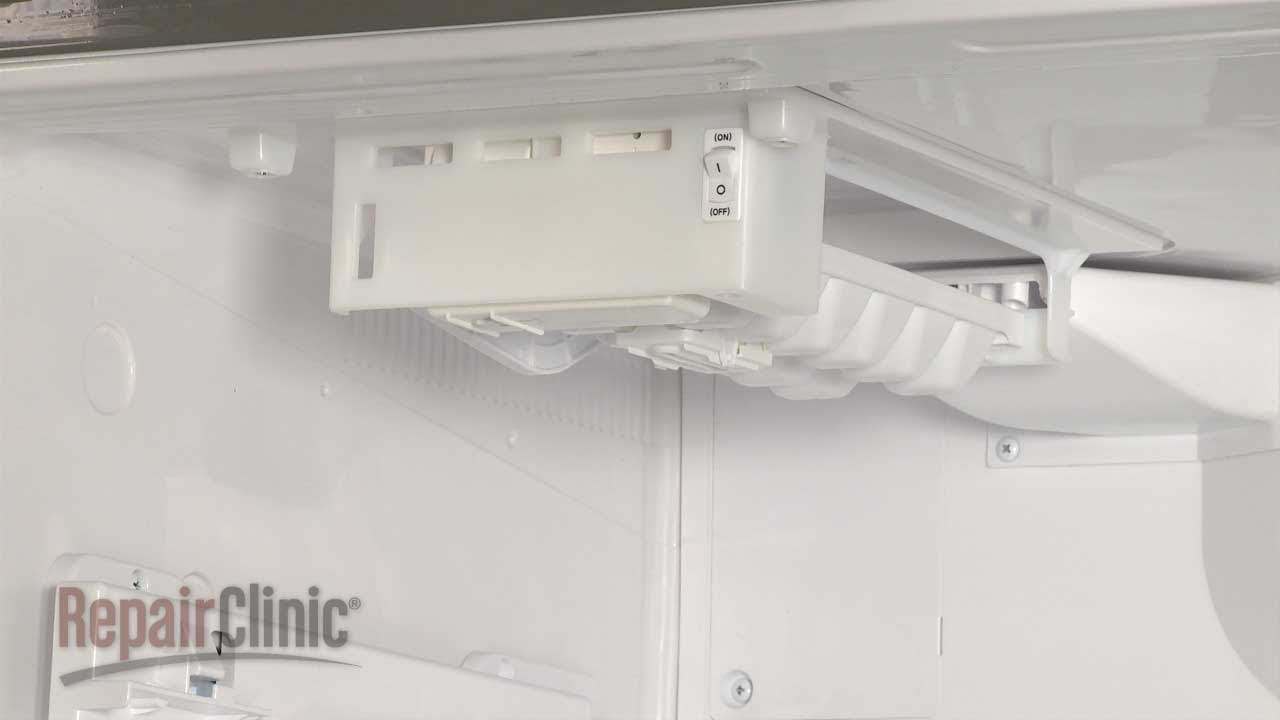
Next, open the freezer drawer and remove any items that may be stored in it. Make sure all pieces are completely dry. Among them are the evaporator cover, the evaporator fan, the freezer ice maker, the defrost heater and two different thermistors. After inserting the back of the shelf hook into the groove, lower the front of the shelf so.
![[LG Refrigerator] How to replace the shelves and drawers of a Bottom](https://i.ytimg.com/vi/kwkQoh9l7Ac/maxresdefault.jpg?sqp=-oaymwEmCIAKENAF8quKqQMa8AEB-AHUBoAC4AOKAgwIABABGGUgZShlMA8=&rs=AOn4CLDHyvKK51mhLCAA3r0t2R8w-dk7RA)
[LG Refrigerator] How to replace the shelves and drawers of a Bottom
(if the door is not fully open, the shelves will get caught in the door and cannot be assembled.) 2. Web lift the front up and lift the entire basket up and out of the drawer. The most common reason for replacing the handle is when it. Pull the drawer out as far as it will go. Unplug your refrigerator.

how to remove lg bottom freezer drawer partsofspeechcheatsheet
Next, open the freezer drawer and remove any items that may be stored in it. ※ please do not hold the handle when assembling or disassembling the drawer. Also see for bottom freezer refrigerator: Pull the drawer out as far as it will go. Unplug the refrigerator from the wall outlet.

How to Remove the Top Freezer Drawer YouTube
Web step 1 unplug your refrigerator. User manual (44 pages) , owner's manual (44 pages) , user manual (44 pages) 1. Also see for bottom freezer refrigerator: Web lift the front up and lift the entire basket up and out of the drawer. Crisper drawers feature a different humidity level from the rest of the refrigerator designed to prolong freshness.

how to remove freezer drawer lg
Also see for bottom freezer refrigerator: If you are testing or repairing the following items, you may also need to shut off and disconnect the water supply: Make sure the drawer is fully closed and latched before attempting to remove it. User manual (44 pages) , owner's manual (44 pages) , user manual (44 pages) 1. After reading this, “there.

how to remove freezer drawer lg ripvanwinklebrewery
Take the basket out from the rails. Remove the screw from the inside of each railing. For next steps, check out these useful links: Lift the front of the drawer up, then pull it out. Compressor motor and thermal overload device.

how to remove freezer drawer lg
Lg bottom freezer refrigerator user manual. I had placed the drawer in sink half filled with water and dawn while trying to research how to release the clear plastic “face”. Lift the drawer up and out of the refrigerator. This lg/kenmore made refrigerator freezer drawer rail assembly replaces the following older part. Among them are the evaporator cover, the evaporator.

how to remove freezer drawer lg
Crisper drawers feature a different humidity level from the rest of the refrigerator designed to prolong freshness of produce, optimizing the freshness in fruits and vegetables. (if the door is not fully open, the shelves will get caught in the door and cannot be assembled.) 2. User manual (44 pages) , owner's manual (44 pages) , user manual (44 pages).
how to remove lg bottom freezer drawer alidisneyfineartphotography
(if the door is not fully open, the shelves will get caught in the door and cannot be assembled.) 2. Tray won't move easily, drawer won't move easily. Step 2 open the freezer door. If you are testing or repairing the following items, you may also need to shut off and disconnect the water supply: After reading this, “there are.

how to remove lg bottom freezer drawer partsofspeechcheatsheet
This will help prevent any electrical shocks or injuries. Grasp both ends of the drawer and pull upwards to remove it from the rails. Web fully extend the drawer, lift the lid and with both hands on each end, lift up and out. These drawers can be removed for cleaning and easily reinstalled. 15k views 1 year ago [lg refrigerators].
Step 2 Open The Freezer Door.
After reading this, “there are two white plastic tabs with access windows on either side of the drawer”, These drawers can be removed for cleaning and easily reinstalled. You may need to remove it to replace the drawer seal as well. (if the door is not fully open, the shelves will get caught in the door and cannot be assembled.) 2.
Grasp Both Ends Of The Drawer And Pull Upwards To Remove It From The Rails.
For models with shelf hooks at the front left and front right of the shelf, hang the shelf hooks. 241k views 10 years ago lg refrigerator. Take the basket out from the rails. Web buy part mjs62813501 now:
Pull The Refrigerator Away From The Wall And Locate The Drawer Handles.
Also see for bottom freezer refrigerator: Apply a small amount of lubricant to the drawer tracks to help it move more easily. When the bins and shelves have been removed, these items can be hand washed using soap and water. First, unplug the refrigerator from the power source.
The Most Common Reason For Replacing The Handle Is When It.
Owner's manual (48 pages) , user manual (44 pages) , user manual (37 pages) 1. Web this video shows you how to take apart the lg freezer drawer, mainly for extensive cleaning. Make sure the drawer is fully closed and latched before attempting to remove it. Unplug your refrigerator before you begin your repair.