Replace Kitchen Drawer Slides
Replace Kitchen Drawer Slides - The slides can be made of wood, metal, plastic, or a combination. Some mounting plates adjust by turning a single screw. The final step is installing the new glides; Mark placement with a pencil. Use a screwdriver to remove any screws holding the slides in place. How to install drawer slides. You need to attach one side of the slide inside t. Next, pull the drawer out of its track and set it aside. Before attaching the drawer front to the drawer box, make sure that the box slides in and out of the cabinet without issue. If you're replacing old slides, remove them from both the drawer and the cabinet.
Web installing new kitchen cabinet hardware knob. Drawer slides come in two pieces. If the hardware is only bent or misaligned, you can sometimes bend the components back in shape with a pair of pliers. Place the screw in the hole in the inside of the door (or drawer) with the screw extending out through the outside of the door. Remove old drawers and drawer slides from inside the cabinet. The final step is installing the new glides; Web 5) install new glides. Next, pull the drawer out of its track and set it aside. Then, locate the drawer slides on each side of the drawer. Before attaching the drawer front to the drawer box, make sure that the box slides in and out of the cabinet without issue.
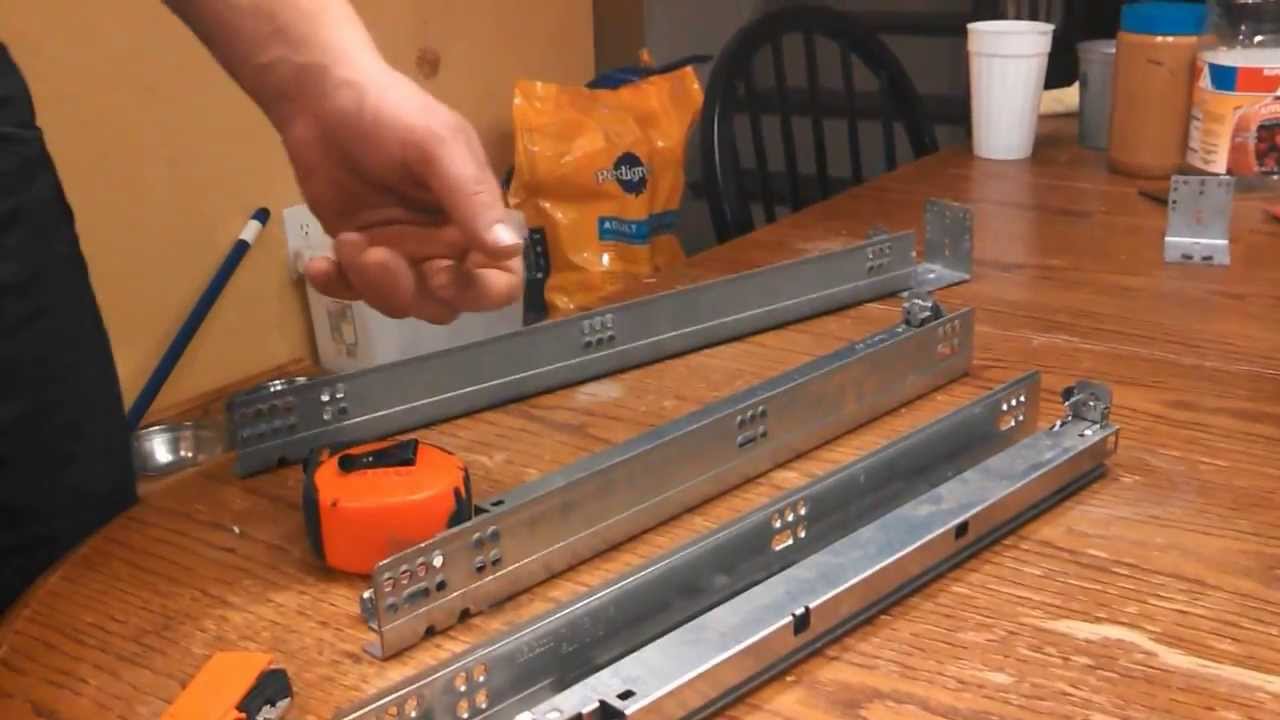
Remove the drawer slides from each side of the drawer by unscrewing the mounting screws on each slide. Web loosen the screws at both hinges, slide the door up or down and tighten the screws. Web with the slide half in place, mark at least two mounting holes. Web selecting the replacement. Hold the box level in front of the cabinet and place the ends of the slides attached to the drawers into the tracks inside the cabinet. Install the new drawer slides. The big advantage of these slides is that they extend fully, giving you complete access to everything in the drawer. If you have flooring that's more than 1/4 in. The two pieces slide into each other and interlock, allowing the drawer to slide back and forth. Web the first step in replacing drawer slides is to remove the old ones.
How to install soft close drawer slides YouTube
How to install drawer slides. Web installing the side mount drawer slides (or replacing them) was a fairly easy task. Web loosen the screws at both hinges, slide the door up or down and tighten the screws. Set the drawer on its side. Web pull the drawer out until it stops.

How to replace drawer slides YouTube Kitchen drawers
Check the fit of the door after each adjustment. Some mounting plates adjust by turning a single screw. If you have flooring that's more than 1/4 in. Use a measuring tape to measure the length and width of the drawer. We'll use a pocket hole system to construct the drawer and you'.

How to Install Drawer Slides 11 Diy slides, Installing drawer slides
This can be done by following a few simple steps: Place the knob on top. Web 5) install new glides. Use a measuring tape to measure the length and width of the drawer. Hold the box level in front of the cabinet and place the ends of the slides attached to the drawers into the tracks inside the cabinet.
:no_upscale()/cdn.vox-cdn.com/uploads/chorus_asset/file/19497307/kitchen_shelf_8.jpg)
PullOut Kitchen Shelves Installation in 8 Steps with VADANIA Drawer
Remove each of the glides from the inside of the. If the hardware is only bent or misaligned, you can sometimes bend the components back in shape with a pair of pliers. You need to attach one side of the slide inside t. Attach the drawer slide on to the cabinet’s interior with the screws included. Use the screws to.

💎 How to Install 3 Types of Drawer Slides in [Step by Step
Web i'll show you how to build a drawer and replace the old slides on your broken cabinet drawer. Remove the drawer slides from each side of the drawer by unscrewing the mounting screws on each slide. Web installing the side mount drawer slides (or replacing them) was a fairly easy task. Set the retention clips in place against underside.

How to under mount drawer slides woodworking Artofit
Web best drawer slides for kitchen cabinets. Measure for the new drawer glides. Web pull the drawer out until it stops. Web i'll show you how to build a drawer and replace the old slides on your broken cabinet drawer. Insert the drawer slides into the metal brackets.

How To Install Drawer Slides On Face Frame AW Extra 2/14/13
Web i'll show you how to build a drawer and replace the old slides on your broken cabinet drawer. Web when you’re building projects with drawers, installing the slides can be one of the most challenging tasks. Install the new drawer slides. Remove and replace first, remove the drawer by pulling it out and lifting the glides from the guide.

How To Install Kitchen Drawer Slides Our Home from Scratch
Next, pull the drawer out of its track and set it aside. However, note installation can be tricky especially underneath cabinets. Web when you’re building projects with drawers, installing the slides can be one of the most challenging tasks. Web each mount style and material offers different benefits. We will replace handles or give you a full refund if there.

How To Install Kitchen Drawer Slides Our Home from Scratch
Web selecting the replacement. Web in this video you can see how easy is to replace/upgrade drawer slides. If you are replacing drawer slides then these will be a great upgrade to older style drawers or epoxy slides. The two pieces slide into each other and interlock, allowing the drawer to slide back and forth. Measure for the new drawer.

Faye Daily Replace Kitchen Drawer Slides With Soft Closest
Use a measuring tape to measure the length and width of the drawer. However, note installation can be tricky especially underneath cabinets. We will replace handles or give you a full refund if there are any quality problems in 730 days from the date of purchased. Web install the new drawer box. Install the new drawer slides.
Measure The Length And Width Of The Drawer.
However, note installation can be tricky especially underneath cabinets. Web installing the side mount drawer slides (or replacing them) was a fairly easy task. Use a screwdriver to remove any screws holding the slides in place. Web selecting the replacement.
We'll Use A Pocket Hole System To Construct The Drawer And You'.
If the hardware is only bent or misaligned, you can sometimes bend the components back in shape with a pair of pliers. Lift the front of the drawer and pull the drawer free from the cabinet. Insert the drawer slides into the metal brackets. Make sure to have a screwdriver on hand for this step.
Otherwise, Measure The Drawer So You.
If your wood drawer is getting stuck in certain areas you can also wax those places. Hold the box level in front of the cabinet and place the ends of the slides attached to the drawers into the tracks inside the cabinet. Drawer slides come in two pieces. If you're replacing old slides, remove them from both the drawer and the cabinet.
Screw The Glide Into Place, Predrilling Holes If Desired.
I’m so pleased that these drawers feel new without having to buy an entire new set of drawers! We will replace handles or give you a full refund if there are any quality problems in 730 days from the date of purchased. Mark placement with a pencil. The final step is installing the new glides;